Generate e-Invoice for Credit note
In case of sales returns, you will record a credit note for your customer. You need to generate an e-Invoice for a credit note with the correct reason for return.
- Open the Credit Note in Item Invoicemode.
- Press Alt+G (Go To) > Create Voucher > press F10 (Other Vouchers) > type or select Credit Note > and press Enter.
Alternatively, Gateway of Tally > Vouchers > press F10 (Other Vouchers) > type or select Credit Note > and press Enter. - Press Ctrl+H (Change Mode) > select Item Invoice.
Note: If you are recording the credit note against the sales of a service with a service ledger, then you can create the credit note in the Accounting Invoice mode.
- Press Alt+G (Go To) > Create Voucher > press F10 (Other Vouchers) > type or select Credit Note > and press Enter.
- Specify the buyer details.
- Party A/c name: Select the recipient of the goods and press Enter.
The Receipt Details screen appears. - Receipt Details: Enter the Receipt Details, as needed.
Under Original Invoice Details, specify the Original Invoice No. and Date of the original sales transaction against which you are recording a sales return and press Enter.
The Party Details screen appears. - Party Details: Specify the buyer details, as needed.
- Party A/c name: Select the recipient of the goods and press Enter.
- Enter the stock item details.
- Name of Item: Select the stock item that you have received as a sales return.
- Specify the Quantity and Rate.
- Specify the accounting details, as applicable.
- Select the Sales ledger in which VAT details are specified.
- Press Ctrl+A to save.
- Select the VAT ledger.
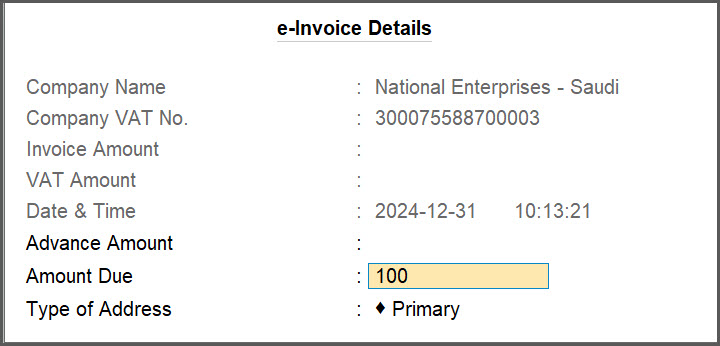
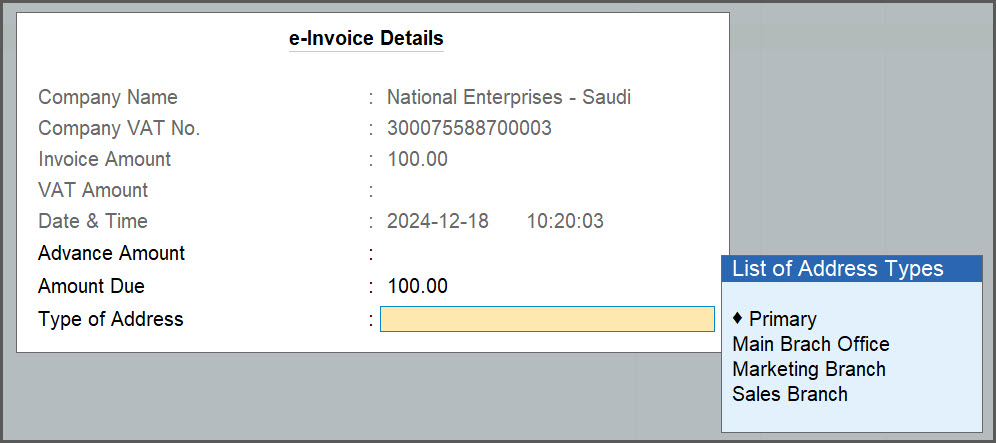
- Specify the e-Invoice details.
- Show e-Invoice details: Yes.
The e-Invoice Details screen appears. - Advance Amount: Skip this field, as it is not applicable for the voucher.
The Amount Due gets calculated.
- In Type of Address field, select the relevant address, if you have enabled multiple addresses.

The Company Mailing Name of selected addresses in TallyPrime should exactly match with the Company Name specified in the e-Invoice certificate, which is saved in the company data folder.
- Show e-Invoice details: Yes.
- Specify theVAT details.
- Provide VAT details: Yes.
The VAT Details screen appears. - Original Invoice No.: The voucher no. of the sales invoice against which you are creating the credit note.
- Date: The voucher date of the original invoice.
- Reason for Return: Select the appropriate reason for the sales return and press Enter.

- Press Ctrl+A to save the screen.
- Provide VAT details: Yes.
- Provide other necessary details, as needed, and press Ctrl+A to save.
- Press Y to generate e-Invoice.
The e-Invoice gets generated. - Print the Credit Note.
- In the Credit Note voucher, press Ctrl+P.
Alternatively, press Alt+P (Print) > Current. - Configure the print for bilingual invoice.
- Press C (Configure).
- Under Print Type, select Bilingual.
- Press Ctrl+A to save the configuration.
- Press I (Preview) to check the voucher before printing, if needed.
- Press P (Print) to print the voucher.
- In the Credit Note voucher, press Ctrl+P.
To check the PDF A3 format file embedded with XML:
- Open archived location of e-Invoices.
- Press F11 (Company Features).
- Set Enable Value Added Tax (VAT) to Yes and press Enter.
You can see the Location of e-Invoice Archives.
- Go to the location and select the relevant e-Invoice folder to get the PDF file embedded with XML.
Preview of a credit note with all the e-Invoice details including the QR code appears.
Was this article helpful?
That’s Great!
Thank you for your feedback
Sorry! We couldn't be helpful
Thank you for your feedback
Feedback sent
We appreciate your effort and will try to fix the article