Generate e-Invoice for Advance Receipt
When you receive an advance amount from your customer against a specific sales order, you will need to generate an e-Invoice for the same. When you allow e-Invoicing for a Receipt Voucher Type, the default voucher when you open a receipt will be an advance receipt. You can maintain a separate voucher type to create normal receipts.
It is important to note the following:
- You can generate an e-Invoice only for an advance receipt and not a normal receipt.
- You must record an advance receipt for only one party at a time and one line item.
- Press Alt+G (Go To) > Create Voucher > press F6 (Receipt).
Alternatively, Gateway of Tally > Voucher > press F6 (Receipt).
Since e-Invoice is enabled for the Receipt Voucher Type, the default voucher is an Advance Receipt. - Under Account, select the cash or bank account from the List of Ledger Accounts.
- Under Particulars, select the party.
- If you wish to print the item details in the invoice, then open the party or ledger in the alteration mode.
- In the Ledger Alteration screen, press Ctrl+I (More Details) and set Inventory Values are affected to Yes.
- In the Inventory Allocations for screen, select one item and enter the details, such as Quantity, Rate, and Amount.

- In the Advanced Receipt Details screen, give advance receipt details such as Nature of Transaction, Vat Rate, Advance Amount, Taxable Amount, and so on.

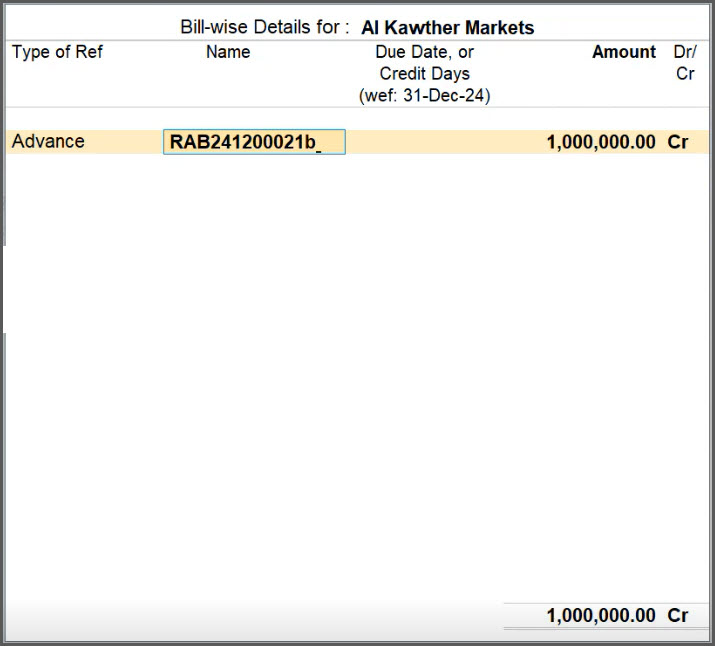
- In the Bill-wise Details for screen
- Press Enter on the final Amount.
- Under Type of Ref, select Advance.
- If you want to add multiple stock items in the advance receipt, then you should add any suffix, say ‘a’, in the Reference name at the end, as it should be unique.
You can add any other alphabet of your preference as suffix in the Reference name.
- Press Ctrl+A to save the Bill-wise Details.
- In the Advanced Receipt Details screen, give advance receipt details such as Nature of Transaction, Vat Rate, Advance Amount, Taxable Amount, and so on.
- Select the same party again, and in the Inventory Allocations for screen, select another item and enter the details, such as Quantity, Rate, and Amount.
- In the Advanced Receipt Details screen, give advance receipt details such as Nature of Transaction, Vat Rate, Advance Amount, Taxable Amount, and so on.

- In the Bill-wise Details for screen
- Press Enter on the final Amount.
- Under Type of Ref, select Advance.
- Add any suffix, say ‘b’, in the Reference name at the end as it should be unique.
You can add any other alphabet of your preference as suffix in the Reference name.
- Press Ctrl+A to save the Bill-wise Details.
To select more items, as per your requirement, you can follow the same procedure by selecting same party again.
- In the Advanced Receipt Details screen, give advance receipt details such as Nature of Transaction, Vat Rate, Advance Amount, Taxable Amount, and so on.
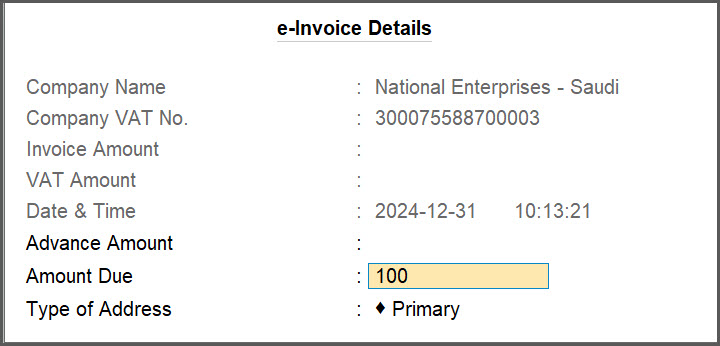
- Specify the e-Invoice details.
- Show e-Invoice details: Yes.
The e-Invoice Details screen appears. - Advance Amount: Skip this field, as it is not applicable for the voucher.
The Amount Due gets calculated.
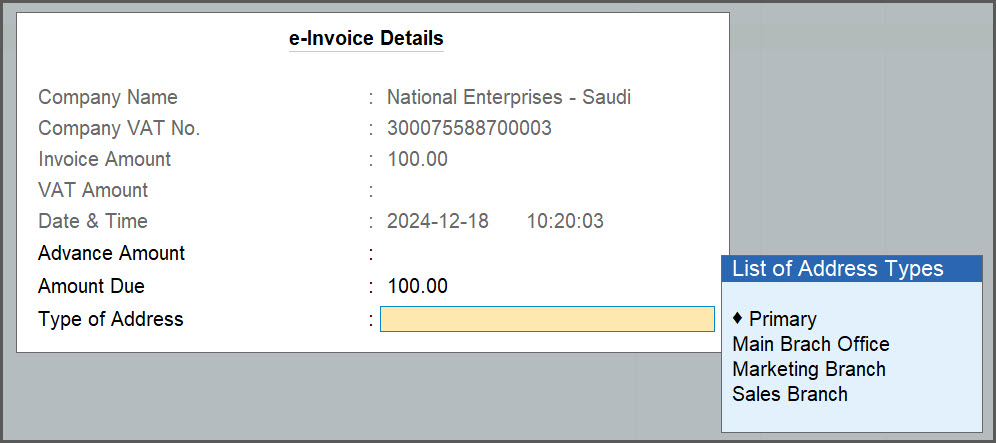
- In Type of Address field, select the relevant address, if you have enabled multiple addresses.

The Company Mailing Name of selected addresses in TallyPrime should exactly match with the Company Name specified in the e-Invoice certificate, which is saved in the company data folder.
- Show e-Invoice details: Yes.
- Provide other necessary details, as needed, and press Ctrl+A to save.
- Press Y to generate e-Invoice.
If it is a B2C invoice, then you can generate the e-Invoice later within 24 hours.


To check the PDF A3 file embedded with XML.
- Open archived location of e-Invoices.
- Press F11 (Company Features).
- Set Enable Value Added Tax (VAT) to Yes and press Enter.
You can see the Location of e-Invoice Archives.
- Go to the location and select the Exports folder to get the PDF file embedded with XML.
To print the invoice:
- In the sales voucher, press Ctrl+P.
Alternatively, press Alt+P (Print) > Current. - Configure the print for bilingual invoice.
- Press C (Configure).
- Under Print Type, select Bilingual.
- Press Ctrl+A to save the configuration.
- Press I (Preview) to check the invoice before printing, if needed.
- Press P (Print) to print the invoice.
Preview of an advance receipt voucher with all the e-Invoice details including the QR code appears.

Was this article helpful?
That’s Great!
Thank you for your feedback
Sorry! We couldn't be helpful
Thank you for your feedback
Feedback sent
We appreciate your effort and will try to fix the article