Set Up Voucher Types for e-Invoicing
You need to alter voucher types, so that you can generate e-Invoices for the vouchers. e-Invoicing is applicable to Sales, PoS Invoice, Debit Note, Credit Note, and Receipt voucher types.
As you enable e-Invoicing for the Voucher Type, the default Method of Voucher Numbering will get set to Automatic (Manual Override). Furthermore, you will not be able to create multiple e-Invoices for a specific voucher number. This is because ZATCA does not allow you to create e-Invoices for repeated voucher numbers. Only one e-Invoice can be generated against a voucher number.
If you are creating a Voucher Class under a specific voucher type, then you have the flexibility to enable e-Invoicing in the same.
- Press Alt+G (Go) > Alter Master > Voucher Type > type or select the name of the Voucher Type and press Enter.
Alternatively, Gateway of Tally > Alter > Master > Voucher Type > type or select the name of the Voucher Type and press Enter.
You can select any other Voucher Type for which e-Invoicing is applicable. - Allow e-Invoicing: Yes.
The Method of Voucher Numbering gets set to Automatic (Manual Override). - Prevent creating duplicate Voucher Nos.: Yes.
- Enter the Prefix or Suffix Details.
- Set/Alter additional numbering details: Yes.
- Under Prefix Details, enter the Applicable From date and enter the preferred Prefix.
If you prefer to specify a suffix, then under Suffix Details, enter the Applicable From date and enter the preferred Suffix.
This ensures that all the voucher numbers are unique.
- Under Prefix Details, enter the Applicable From date and enter the preferred Prefix.
- Press Ctrl+A to save the details.
A sales voucher type screen with all the necessary details appears.
- Set/Alter additional numbering details: Yes.
In a similar way, you need to allow e-Invoicing for Debit Note, Credit Note, and Receipt voucher types.
Set Up Ledger for e-Invoicing
For the successful generation of an e-Invoice, it is mandatory to provide some specific details of the party for whom you are recording transactions.
The following details of the party are mandatory:
- Mailing details, as per the party’s official address.
ZATCA also requires the mailing details of the buyer in Arabic. National ID is required if taxability is zero-rated and category code reason is
- Private Healthcare for Citizens
- Qualifying Metals
- VAT Registration Details including registration type and VAT no.
You can also mention the date of registration, if needed.
Apart from the aforementioned details, you can provide Buyer ID details such as National ID, Tax Identification Number (TIN), Momra License (MOM), or others, as needed.
Once you have all the details of the buyer, you can enter the details in the respective ledger.
- Press Alt+G (Go To) > Alter Master > Ledger > type or select the name of the party ledger and press Enter.
Alternatively, Gateway of Tally > Alter > Master > Ledger > type or select the name of the Ledger and press Enter. - Specify the Building No., City, District, Region, Country, PO Box, and Pin Code.
- Specifythe Buyer ID Details.
- Buyer ID Details: Yes.
The Buyer Additional Details screen appears. - Specify only one of the buyer ID details.
- Press Ctrl+A to save.
- Buyer ID Details: Yes.
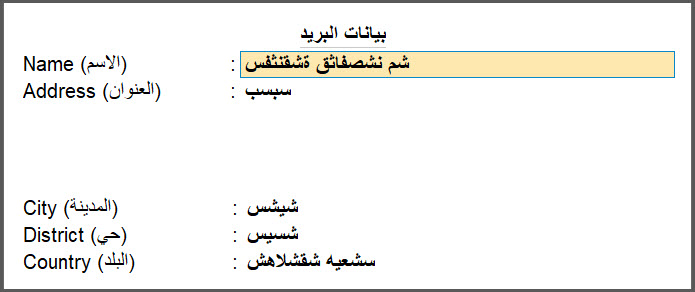
- Specify the address in local language.
- Mailing details in local language: Yes.
- Enter the address in Arabic.

- Press Ctrl+A to save.
- Under VAT Registration Details, specify the required details.
- Registration type: Registered or Unregistered, as applicable.
- Date of VAT registration: The date on which the Company had registered for VAT.
- VAT No.: The Company VAT registration number.
- VRN Type: Company Registration or Headquarter Registration, based on the nature of registration.
A party ledger screen with all the necessary details appears.
View Mailing Details (History)
The mailing details of a party can keep changing, and you will need to update the party ledger with the latest mailing details. You can always view the history of mailing details along with the dates from which they became applicable.
- Press Alt+G (Go To) > Alter Master > Ledger > type or select ledger and press Enter.
- Press Ctrl+I (More Details) > Mailing Details (History) and press Enter.
A sample Mailing Details (History) appears as shown below:

Set Up Stock Items for e-Invoicing
As per the regulations by ZATCA, for the successful generation of e-Invoices, you need to provide Stock Item alias in Arabic.
- Press Alt+G (Go To) > Alter Master > Stock Item > type or select the name of the Stock Item and press Enter.
Alternatively, Gateway of Tally > Alter > Master > Stock Item > type or select the name of the Stock Item and press Enter. - Enable language aliases or name.
- Press F12 (Configure) > set Provide language aliases or Name to Yes.
- Press Ctrl+A to save the setting.
- Under Stock Item Name, enter the name of the stock item in Arabic.
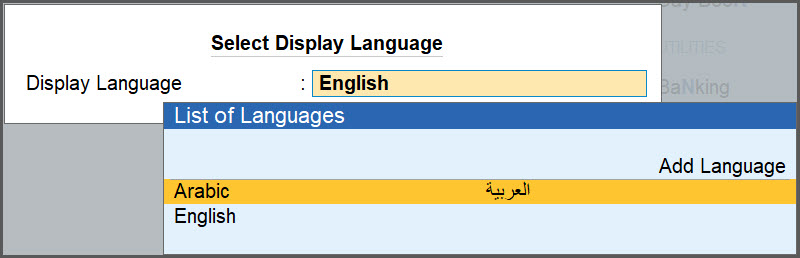
If Arabic is not appearing in the List of Languages:
- Open Gateway of Tally, and press Ctrl+K.
- Select Arabic as Display Language and press Ctrl+A to save.

- Again in Gateway of Tally, press Ctrl+K.
- Select English as Display Language and press Ctrl+A to save.
Now, as you continue with the alteration of stock item, you can see Arabic is appearing in the List of Languages.
- Select Units, as required.
- Select Taxability.
If taxability is Exempt/Zero Rated/Not Vatable, then mentioning the reason for tax exemption becomes mandatory. - Select the Reason for tax exemption/zero rate.
- Press Ctrl+A to save the stock item.
A stock item screen with the name specified in Arabic appears.

Generate e-Invoice Online
Once you specify all the necessary details in the masters, you are all set to generate e-Invoices online using TallyPrime. The product gives you the flexibility to generate e-Invoices at the time of voucher creation or later, as per your business requirement. You may want to generate e-Invoices for multiple vouchers at the end of the day. You can do so too.
It is important to note that you need to generate e-Invoices for B2B transactions as a part of voucher creation, as the e-Invoice System requires B2B e-Invoices to be generated in real time.
On the other hand, you can generate e-Invoices for B2C transactions within 24 hours of creating the voucher.
Generate e-Invoice for a single Sales invoice
For sales of goods or services, TallyPrime enables e-Invoice generation as an integral part of the voucher creation process. All you need to do is specify the party details and add the stock items or service ledgers, as applicable to the transaction.
Once you generate an e-Invoice for a specific voucher, you can view it only in the display mode.
- Open the Sales Voucher in the Item Invoice mode.
- Press Alt+G (Go To) > Create Voucher > press F8 (Sales).
Alternatively, Gateway of Tally > Vouchers > press F8 (Sales). - Press Ctrl+H (Change Mode) > select Item Invoice.
Note: If you are recording the invoice for the sales of service with a service ledger, then you can create the invoice in the Accounting Invoice mode.
- Press Alt+G (Go To) > Create Voucher > press F8 (Sales).
- Specify the buyer details.
- Party A/c name: Select Cash or Bank for cash sales and the party name for credit sales, and press Enter.
You can create the Party A/c on the fly by pressing Alt+C.
The Dispatch Details screen appears. - Dispatch Details: Enter the Dispatch Details, as needed, and press Enter.
The Party Details screen appears. - Party Details: Details such as Building No. and Additional No. are prefilled, based on the information specified in the party ledger.
You can update the buyer details while recording the transaction, as needed, and print the same in the invoice.
- Mailing details in local language: Yes.
The address is prefilled in Arabic, based on the information provided in the party ledger. - As always, you can press Ctrl+A to save.
- Party A/c name: Select Cash or Bank for cash sales and the party name for credit sales, and press Enter.
- Enter the stock item details.
- Name of Item: Select the stock item.
In case you do not see the required item in the list, you can create the stock item on the fly by pressing Alt+C. - Specify Quantity and Rate and press Enter.
- Name of Item: Select the stock item.
- Specify the accounting details, if applicable.
- Select the Sales ledger in which VAT details are specified.
- Press Ctrl+A to save.
- Select the VAT ledger.
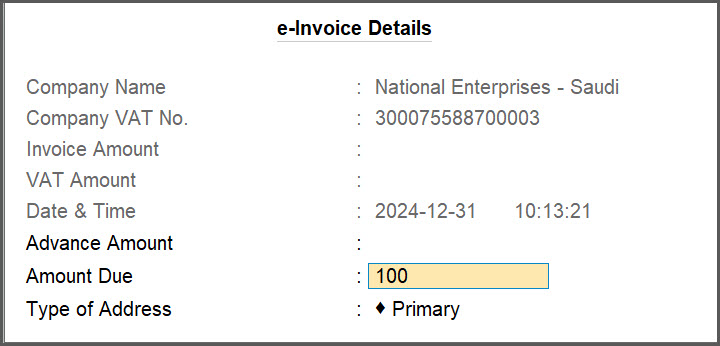
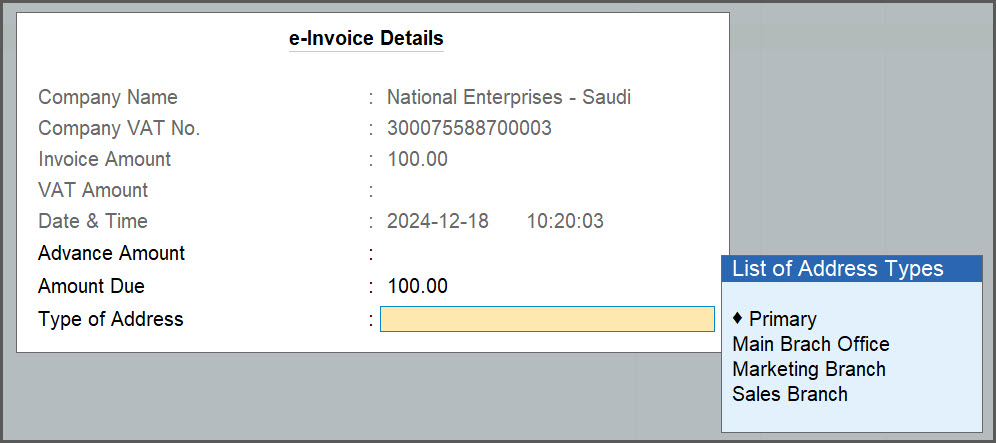
VAT is calculated based on the VAT rates defined in the sales ledger or stock items. - Specify the e-Invoice details.
- Show e-Invoice details: Yes.
The e-Invoice Details screen appears. - Specify the Advance Amount, if you had received an advance from your customer.
The Amount Due gets calculated.
- In Type of Address field, select the relevant address, if you have enabled multiple addresses.

The Company Mailing Name of selected addresses in TallyPrime should exactly match with the Company Name specified in the e-Invoice certificate, which is saved in the company data folder.
- Show e-Invoice details: Yes.
- Provide other necessary details such as Narration and Bill-wise Details, as needed.

- Press Ctrl+A to save the sales invoice.
- Press Y to generate e-Invoice.
The e-Invoice gets generated.
If it is a B2C invoice, then you can generate the e-Invoice later. - Print the invoice.
- In the sales voucher, press Ctrl+P.
Alternatively, press Alt+P (Print) > Current. - Configure the print for bilingualinvoice.
- Press C (Configure).
- Under Print Type, select Bilingual.
- Press Ctrl+A to save the configuration.
- Press I (Preview) to check the invoice before printing, if needed.
- Press P (Print) to print the invoice.
- In the sales voucher, press Ctrl+P.
Check the PDF A3 file embedded with XML:
- Open archived location of e-Invoices.
- Press F11 (Company Features).
- Set Enable Value Added Tax (VAT) to Yes and press Enter.
You can see the Location of e-Invoice Archives.
- Go to the location and select the Exports folder to get the PDF file embedded with XML.
To print the invoice:
- In the sales voucher, press Ctrl+P.
Alternatively, press Alt+P (Print) > Current. - Configure the print for bilingual invoice.
- Press C (Configure).
- Under Print Type, select Bilingual.
- Press Ctrl+A to save the configuration.
- Press I (Preview) to check the invoice before printing, if needed.
- Press P (Print) to print the invoice.
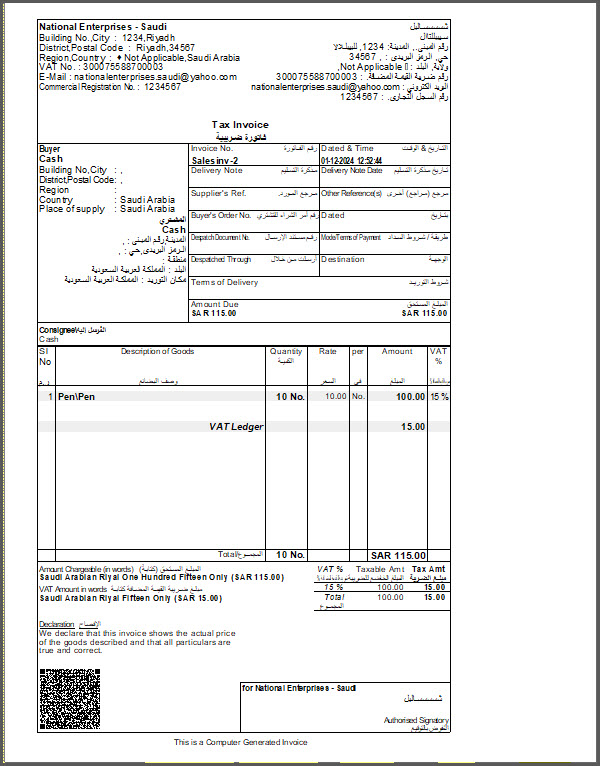
Preview of an invoice with all the e-Invoice details including the QR code appears.
In a similar way, you can generate an e-Invoice for PoS invoice.
View e-Invoice Details
Once the e-Invoice is generated, the information related to e-Invoice gets stored in the voucher. You can view the e-Invoice details, whenever required.
Open the voucher in the Voucher Display Mode.
- Press Alt+G (Go) > type or select Day Book and press Enter.
Alternatively, Gateway of TallyPrime > Day Book and press Enter. - Select the voucher and press Alt+Enter.
A sample voucher with all the e-Invoice Details appears as shown below:

Was this article helpful?
That’s Great!
Thank you for your feedback
Sorry! We couldn't be helpful
Thank you for your feedback
Feedback sent
We appreciate your effort and will try to fix the article