Reconcile Bank Transactions Manually
You can perform bank reconciliation manually if your organisation follows the practice of doing manual reconciliation. Bank reconciliation can also be done manually if you cannot download your bank statement in the format required to perform auto-reconciliation. In manual reconciliation, you need to manually update the bank clearing date against each transaction. If the number of transactions is high, you can filter the report to display transactions based on Amount, Bank Date, Instrument No., Instrument Date, Party ledger and so on to reduce the number of transactions on the screen to perform manual reconciliation.
Once the reconciliation is done, if you want to alter the voucher then you can directly do so from the Bank Reconciliation Statement.
Alter reconciled voucher
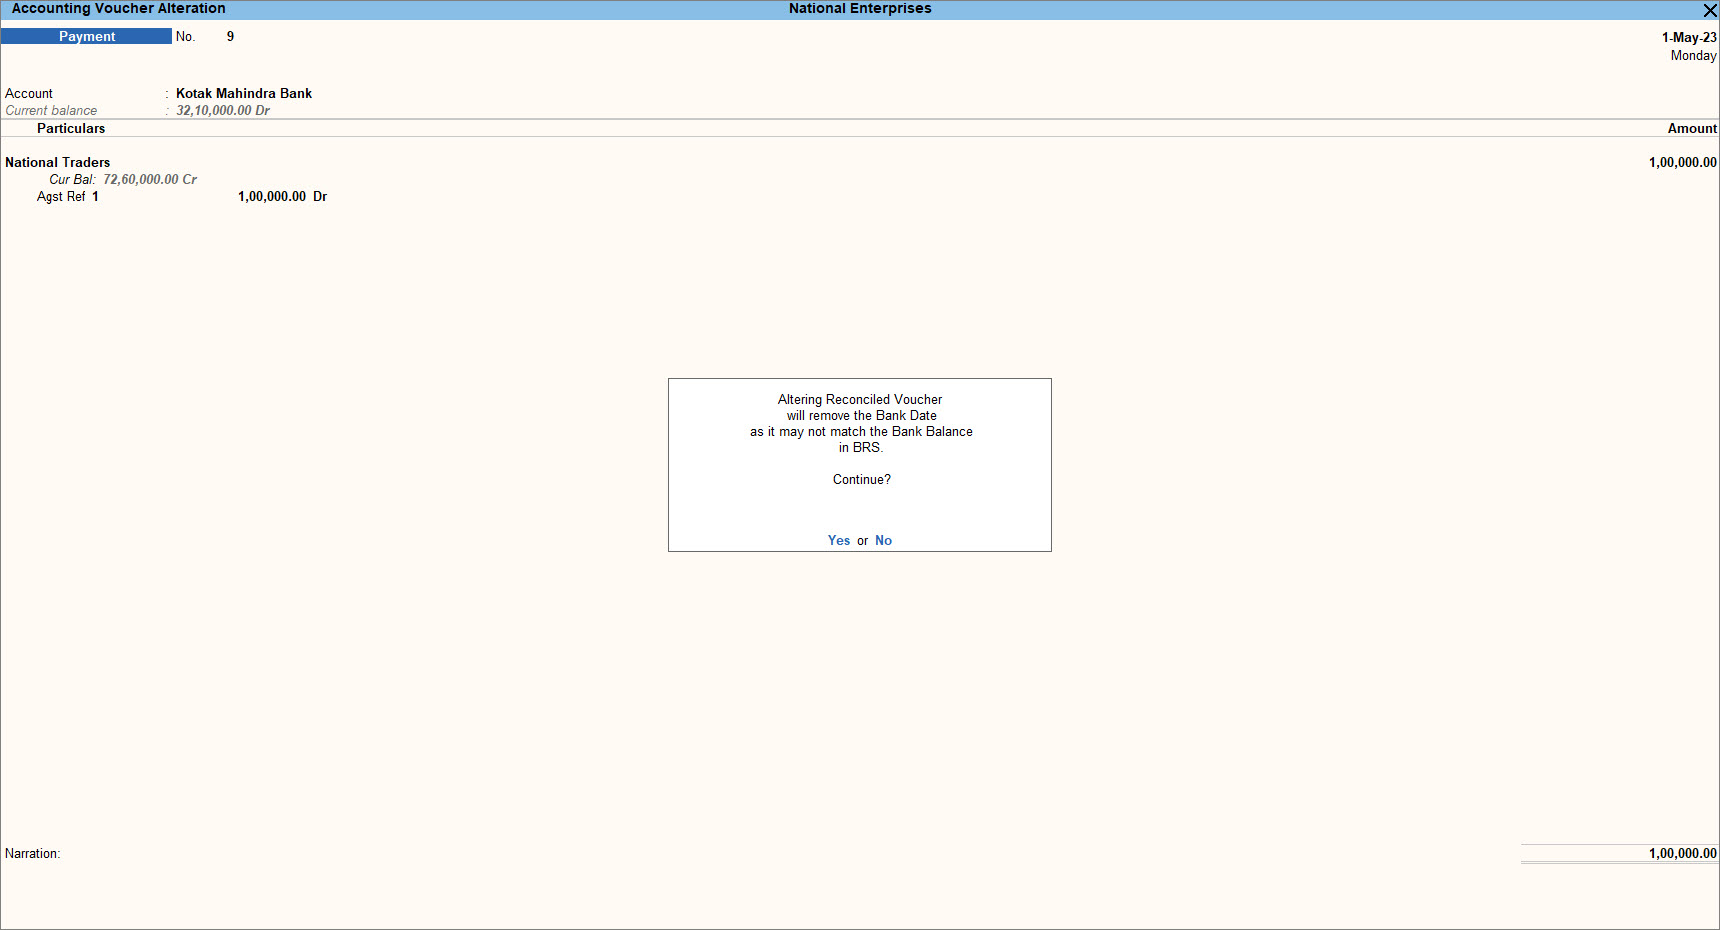
After performing the reconciliation of your bank transactions, you may need to alter the reconciled vouchers to change or split the amount of the voucher. In such a case, TallyPrime displays the message asking for confirmation to continue with the alteration. You can later reconcile the voucher from the Day Book, Bank Reconciliation, or voucher reports. For example, you need to alter a voucher dated 1.5.2023 (already reconciled) where you have issued a cheque for Rs. 1,00,000 to National Traders and while recording the transaction you have mentioned it as Rs.10,000 by mistake. Hence you need to alter the voucher to correct the amount. On saving this voucher TallyPrime displays the message indicating Altering Reconciled Voucher will remove the Bank Date as it may not match the Bank Balance in BRS.
- Open the Bank Reconciliation Statement.
- Press Alt+G (Go To) > type or select Bank Reconciliation > and press Enter.
Alternatively, Gateway of Tally > Banking > Bank Reconciliation > and press Enter. - Select the required Bank account from the List of Bank Ledgers.
The Bank Reconciliation screen appears.
- Press Alt+G (Go To) > type or select Bank Reconciliation > and press Enter.
- Open the reconciled transactions.
- Press Ctrl+B (Basis of Values).
- Enable Include Reconciled transactions.
- Alter the reconciled voucher.
- Click on the voucher you need to alter.
- From the Bank Date field, press Ctrl+Enter to open the Accounting Voucher Alteration screen.
- Ensure to enable the option Remove Bank Date while altering Reconciled Voucher from F12 (Configure).
- Alter the amount as required. In this example, update the amount to Rs.1,00,000.
- Press Ctrl+A to save the voucher.
The message Altering Reconciled Voucher will remove the Bank Date as it may not match the Bank Balance in BRS. Continue? Yes or No appears.
- Press Yes to save the voucher.
In the Bank Reconciliation screen, the Bank Date will not appear for that voucher.
Filter the report to view transactions based on the range of information
If the number of transactions is high then you can filter the report based on the range of information such as Amount, Bank Date, Instrument No., Instrument Date, Party ledger and so on. This will reduce the number of transactions on the screen and it will be easier to reconcile the transactions manually.
- In the Bank Reconciliation Statement, press Alt+F12 (Range).
The Filtration Report screen appears. - Enter the details to filter the report based on Amount, Instrument No., Instrument Date and so on.
The Bank Reconciliation Statement displays the list of transactions matching the range of information given to filter the report.
- Enter the Bank Date manually to reconcile the transactions.
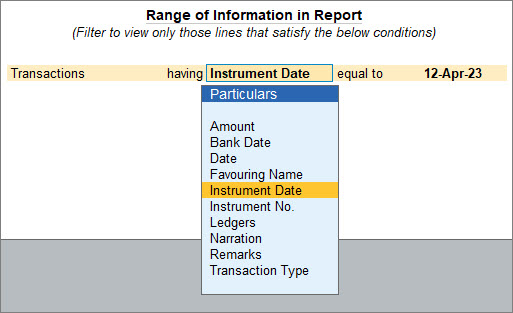
Based on the range of information once you filter the BRS, you can easily reconcile the transactions.
Record the Reconciliation of any Date
Bank accounts may have a different Starting Date for reconciliation purposes. When you create a bank ledger, you can give an Effective Date for Reconciliation. Normally, this would be the Books beginning from date itself but you can change the date and set it from when you want to start the reconciliation. Once this is done, entries made earlier than the reconciliation date will not appear for reconciliation but will appear as Opening BRS in the Bank Reconciliation screen.
It is not a real-time task, hence it is not done on the first day of the next year. For example, if the bank reconciliation date is set from 1st April 2023, and you have not done the reconciliation till 31st May 2023, you can select the month from which you need to perform the reconciliation.
You can view the bank ledger from any report such as Balance Sheet, Trial Balance or Cash/Bank Book(s).
- Press Alt+G (Go To) > type or select Balance Sheet > and press Enter.
Alternatively, Gateway of Tally > Balance Sheet > and press Enter. - Bring your cursor to Current Assets and press Enter.
- Select the required bank ledger and press Enter.
- Bring the cursor to the first month (typically April), and press Enter. This brings up the vouchers for the month of April.
- Press Alt+R (Reconcile) to view the Bank Reconciliation Statement.
The display goes to the Reconciliation mode, which can be edited. You can see the column for Bank Date to enter the date when the transactions are cleared in the bank.
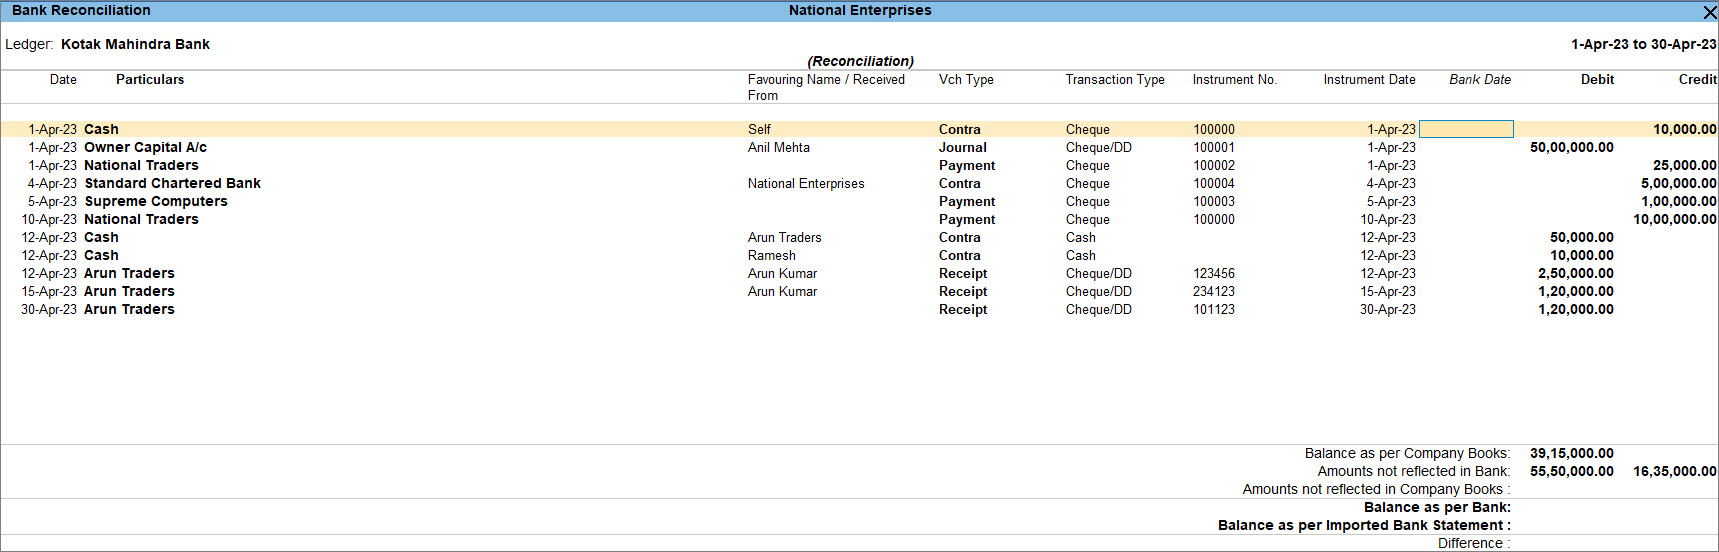
The fields at the bottom of the screen show:
- Balance as per Company Books: It reflects the balance as of the last date (in the example, it is 30th April).
- Amount not reflected in Bank: It is the debit and credit sums of all those vouchers, whose Bank Date is either BLANK or LATER than 30-Apr (i.e. these vouchers have not yet been reflected in the bank statement).
- Amount not reflected in Company Books: These are entries that are present in the bank statement but are not recorded in the company’s books.
- Balance as per Bank: It is the net effect of the Book Balance offset by the amounts not reflected in the Bank – which must be equal to the balance in the bank statement.
- Balance as per Imported Bank Statement: It refers to the balance displayed on importing the bank statement for reconciliation.
- Difference: You can see the difference in Balance as per Bank and Balance as per the Imported Bank Statement.
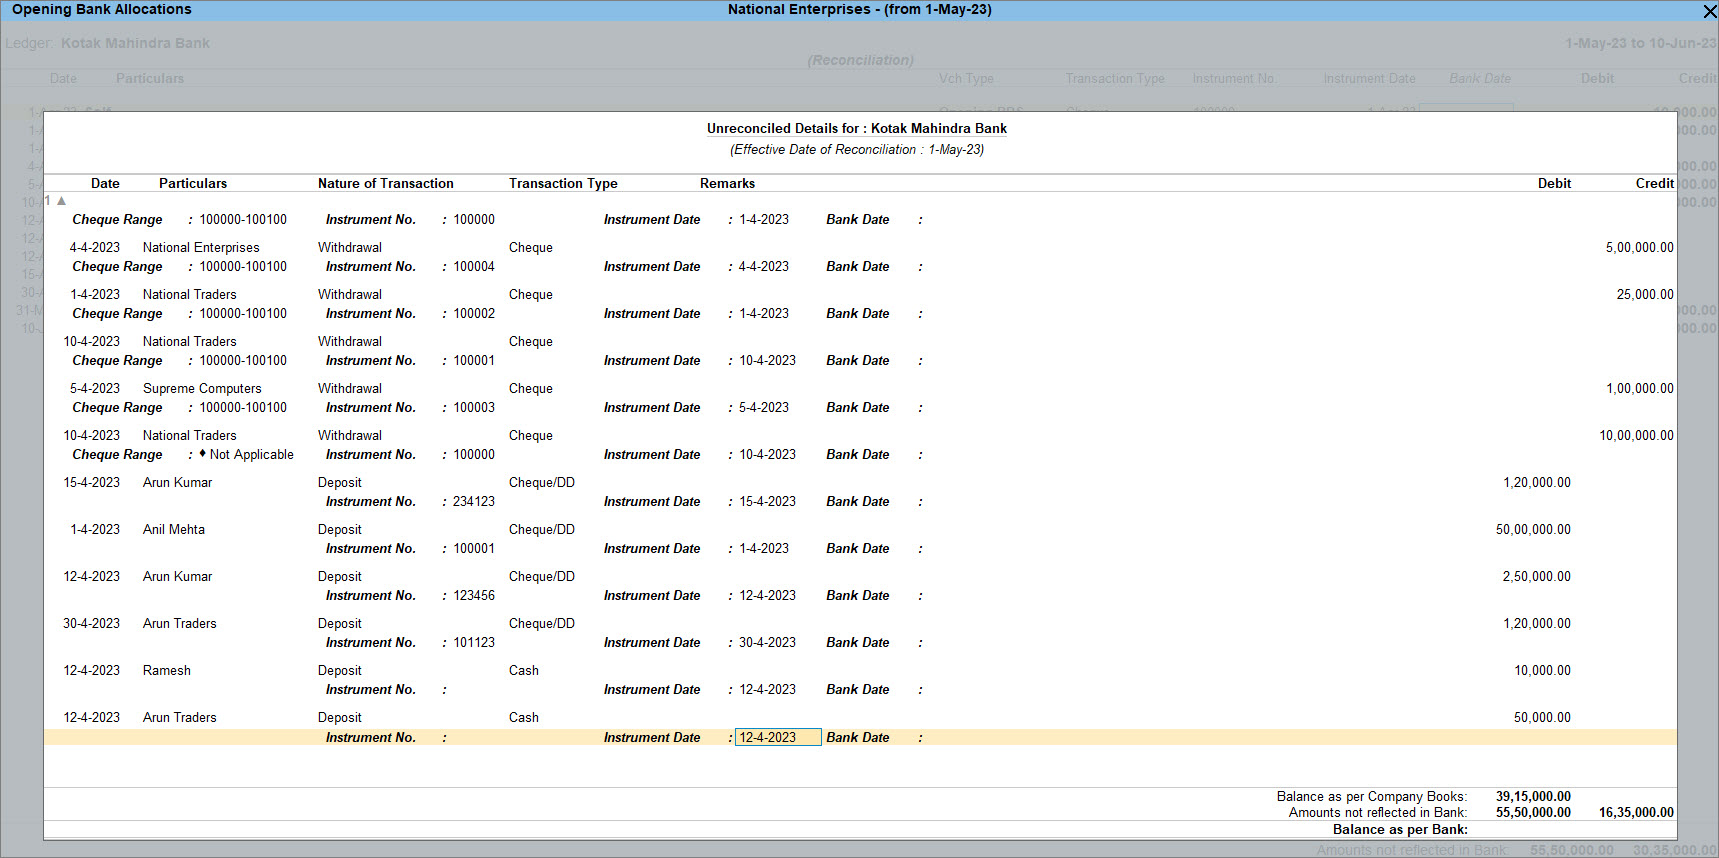
Remove Opening BRS After Splitting the Company Data
When you split the company data, the unreconciled transactions are automatically updated in the Opening BRS details of the new company. After splitting the company if you have created a new company and don’t want to view the unreconciled transactions under Opening BRS then you can remove selected or all unreconciled transactions from the Opening BRS.
![]()
- Open Bank Reconciliation of the new company.
- Open the new company.
- Press Alt+G (Go To) > type or select Bank Reconciliation > and press Enter.
Alternatively, Gateway of Tally > Banking > Bank Reconciliation > and press Enter. - Select the desired bank from the List of Bank Ledgers screen.
The Bank Reconciliation screen appears.
- View and remove unreconciled transactions.
- Press Alt+H (Opening BRS) to view the Opening Bank Allocations screen.
The list of all unreconciled transactions of the particular bank ledger appears in the Opening Bank Allocations screen. - Press Spacebar on the date displayed under the Date column to remove the transaction from the unreconciled list.
- Press Alt+J (Delete All) in the Opening Bank Allocations screen to delete all the transactions from the unreconciled list.

- Press Alt+H (Opening BRS) to view the Opening Bank Allocations screen.
- Accept the screen. As always, you can press Ctrl+A to save.
Compare Between Bank Book and Cash Book
In TallyPrime you can compare bank books with cash books or two or more banks by using the multi-columnar reporting facility. The comparison of information for multiple periods (year, month, or user-defined period) for two or more banks can be done on the same screen, instead of toggling between different periods/ledgers. Compare two or more of your bank accounts to see the transactions done in each bank and to decide from which bank you can make the payment and in which bank you should receive money.
![]()
- Press Alt+G (Go To) > type or select Cash/Bank Book and press Enter.
Alternatively, Gateway of Tally > Display More Reports > Account Books > Cash/Bank Book(s). - Select the Cash or Bank Account.
The Ledger Monthly Summary screen appears. - Press Alt+C (New Column) and select the Name of Ledger.
Based on the option selected, TallyPrime displays comparisons as shown below:

You can view the details of the transaction along with the closing balance for both banks on a single screen. To view the average of the transactions or the highest and lowest balance in a month, you can press F12 (Configure) and enable Show Average and Show Highest and Lowest Balance.
Was this article helpful?
That’s Great!
Thank you for your feedback
Sorry! We couldn't be helpful
Thank you for your feedback
Feedback sent
We appreciate your effort and will try to fix the article