While recording the payment voucher, if you want to mention the cheque details through which the payment is made then you can configure the print settings to include such details in the voucher.
![]()
- Record the payment voucher.
- Press Alt+G (Go To) > Create Voucher > press F5 (Payment) and press Enter.
Alternatively, Gateway of Tally > Vouchers > press F5 (Payment) > and press Enter. - Debit the party ledger and credit the bank ledger.
- Press Alt+G (Go To) > Create Voucher > press F5 (Payment) and press Enter.
- As always, press Ctrl+A to save the payment voucher.
The Cheque Printing screen appears. - Print the payment voucher with cheque details.
- Press C (Configure) > Set Show Bank Transaction Details to Yes to print the bank transaction details in the payment voucher.

- Press I (Preview) to preview and P (Print) to print.
- Press C (Configure) > Set Show Bank Transaction Details to Yes to print the bank transaction details in the payment voucher.
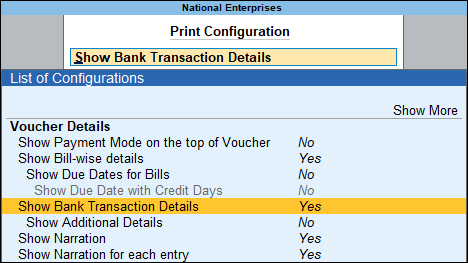
After the configurations are done in the print settings, you can print the cheque number details along with the bank name from which the payment is made. The cheque details remain saved in the voucher and can be reprinted if required.
Update Instrument Date while Issuing Cheques
If you do not want the voucher date to be your cheque date, you can print your cheque keeping the date field blank. You also have the option to update the cheque date as per your required date by configuring your cheque printing setting.
Since the validity of the cheque is for 3 months, TallyPrime provides you with the flexibility to print the cheque with the date field blank and fill it as and when you are issuing the cheque.
![]()
- Select the Bank ledger.
- Press Alt+G (Go To) > Alter Master > type or select Ledger > and press Enter.
Alternatively, Gateway of Tally > Alter > type or select Ledger > and press Enter. - Select the bank ledger. For example, Kotak Mahindra Bank.
- Press Alt+G (Go To) > Alter Master > type or select Ledger > and press Enter.
- Set Cheque Printing under Bank Configuration.
- Enable Set/Alter Cheque Printing configuration, to view the Cheque Format Selection screen.
- Select the required format from the List of Cheque Formats, to view the Cheque Dimensions screen.
- Print cheques without the Instrument Date.
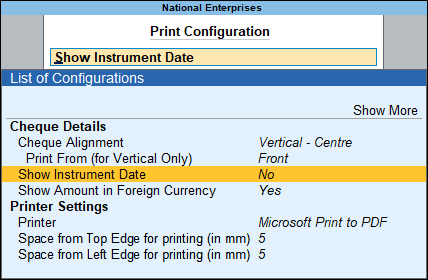
- Press Ctrl+P (Print) to view the Sample Cheque Printing and press C (Configure).
The Sample Cheque Printing screen appears. - Set Show Instrument Date to No.

- Press Ctrl+P (Print) to view the Sample Cheque Printing and press C (Configure).
- Accept the screen. As always, you can press Ctrl+A to save.
You can update the cheque date as required at the time of issuing the cheque.
View List of All Cheques to be Printed from Cheque Printing Report
The Cheque Printing report in TallyPrime provides you with the facility to view the list of all cheques issued. By default, it shows the list of cheques pending for printing for the month when the last transaction was recorded. However, you can configure the report to include the printed cheques and also view the complete list of cheques issued by changing the period. From the Cheque Printing report, you can select the cheques and print the selected cheques or you can print all the cheques at once. If the bank ledger is not configured for cheque printing then on selecting that bank ledger you can see the message that the bank is not configured for cheque printing in the header.
In this section
- View list of cheques pending for printing
- Print selected cheques
- Print all bank cheques at once
- Bank ledger not configured for cheque printing
View list of cheques pending for printing
The cheque printing report by default displays the list of pending cheques which are not yet printed. However, you can also include already printed cheques and view the complete list.
![]()
- Press Alt+G (Go To) > type or select Cheque Printing > and press Enter.
Alternatively, Gateway of Tally > Banking > Cheque Printing > and press Enter.
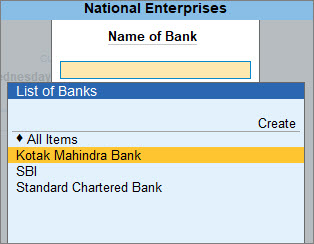
The Select Bank screen displaying the List of Banks appears, as shown below:
- Select All Items or the required Bank account from the List of Banks and press Enter.
The list of cheques pending for printing appears.
- Press F8 (Incl Printed) or Ctrl+B (Basis of Values) to display all the cheques.


You can also customise Cheque Printing and view it as required.
- Ctrl+B (Basis of Values): You can select the Scale Factor as required and view the amounts in Hundreds, Thousand and so on.
- Ctrl+H (Change View): You can view Related Reports such as Cheque Register.
- Ctrl+J (Exception Reports): You can view Optional Vouchers and Post-Dated Vouchers.
Optional Vouchers: If you want to hold on to a cheque number for a future transaction then you can record that transaction as an Optional voucher and view that voucher from Exception Reports.
Post-Dated Vouchers: If you issued a post-dated cheque for payment, then you can record that transaction as post-dated voucher and view that voucher from Exception Reports. - Alt+B (Alter Ledger): Allows you to alter Bank ledger and enable cheque printing in the Bank ledger.
- Alt+H (Alter Chq Details): Allows you to edit/update the Favouring Name, Instrument No. and Instrument Date columns.
You can also include Favouring Name from F12 (Configure).
Print selected cheques
From the list of displayed cheques, if you want to print a particular cheque or cheques and give the cheque to your supplier then you can select the cheques and print them.
![]()
- Select the bank for printing the cheques.
- Press Alt+G (Go To) > type or select Cheque Printing > and press Enter.
Alternatively, Gateway of Tally > Banking > Cheque Printing > and press Enter. - Select All Items or required Bank account from List of Banks to view the Cheque Printing screen.
- Press the spacebar to select the required row(s).
- Press Alt+G (Go To) > type or select Cheque Printing > and press Enter.
Print the cheques.
- Press Ctrl+P (Print) to view the Cheque Printing Print screen.
- Press P (Print) to print. Only the selected cheques will be printed.
Once you select the cheque for printing, only the selected cheques get printed.
Was this article helpful?
That’s Great!
Thank you for your feedback
Sorry! We couldn't be helpful
Thank you for your feedback
Feedback sent
We appreciate your effort and will try to fix the article