You can make payments through cheques by printing them directly from TallyPrime, either using a pre-printed cheque or a custom format. You just need to configure your bank ledgers with the cheque range and cheque format for printing at the time of payment. While recording the payment voucher you can print the cheque, and also update the cheque details in the voucher. You can print cheques for withdrawing cash from the bank too. You can view the list of cheques issued from the Cheque Printing Report and track the cheques from the Cheque Register.
Cheque is a common method of payment and is also considered to be the safest mode of payment. You can stop the payment in case you change your decision to pay. Also, if the cheque is crossed it cannot be encashed over the counter and has to be deposited in the bank account of the person whose name is written on the cheque. You can also issue Post-dated cheques, which gives you more time to plan your finances better as the cheque encashment will happen at a later point in time.
In TallyPrime, you have the flexibility to choose from the predefined cheque format provided by different banks. You can use the cheque format as is or you can alter and update the dimensions as per your requirement. If the bank you are dealing with does not provide a predefined cheque format then you can use the custom defined format and update the dimensions. You can print the cheques for payment to parties directly from the payment voucher and also include the cheque details in the voucher. Apart from payment to parties you can print cheques for withdrawing cash from the bank.
With TallyPrime, you can view the list of cheques that were issued and print the cheques either one at a time when recording payment vouchers or in one go from the Cheque Printing Report. You can track your cheques to see the number of available cheques you are holding and if required you can use available cheques to print them Blank without the amount from the Cheque Register. TallyPrime provides effective cheque management systems by allowing the creation of multiple chequebooks in Bank Ledger creation and Cheque Register.
Setup for Cheque Printing
You can print the cheques for payment at the time of recording the payment entry. In order to do so, you need to enable cheque range and cheque formats in your bank ledger. Since each bank maintains a unique design of cheques, depending on the bank you select you will have predefined formats that you can alter as per your requirement. You also have blank formats called user-defined which you can alter and update with the required dimensions for the cheque. Once the cheque format is updated with the dimensions of your chequebook, you can tear the cheque leaf and print the cheque. In TallyPrime, you can disable the company name at the time of printing the cheque if the cheques are already pre-printed with the details. If you are printing a cheque for a large amount, you can print the amount in the cheque in lakhs/millions.
In this section
- Enable cheque range and cheque format in bank ledger
- Alter predefined cheque format for printing with required dimensions
- Alter user-defined cheque format to add a specific format
- Print amount in lakhs/millions on cheques
- Disable company name in the pre-printed cheques
Enable bank ledger with cheque range and cheque format
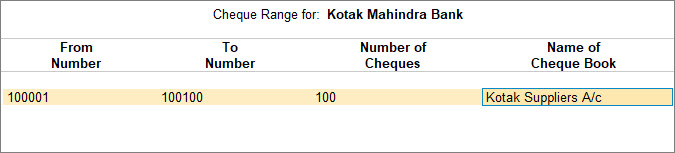
While creating the bank ledger you can add the cheque range that you are going to use for making payments from that particular bank. Once you add the cheque range, it automatically assigns the cheque number for your payments based on the last cheque number used. By configuring the cheque range in the bank ledger, you can track the cheque numbers that are assigned to the payments made along with the unassigned cheques that are kept on hold. You can change the cheque number manually in case the cheque leaf got printed wrongly or you want to keep the next cheque on hold.
![]()
- Select the bank ledger.
- Press Alt+G (Go To) > Alter Master > type or select Ledger > and press Enter.
Alternatively, Gateway of Tally > Alter > type or select Ledger > and press Enter. - Select the bank ledger. For example, Kotak Mahindra Bank.
- Press Alt+G (Go To) > Alter Master > type or select Ledger > and press Enter.
- Set the Cheque book range under Bank Configuration.
- Enable Set/Alter range for Cheque Books.
- In the Cheque Book Management screen, enter the cheque number in the fields From Number and To Number. The Number of Cheques appears automatically.
Alternatively, you can enter the From Number and the Number of Cheques. The To Number will appear automatically. - Enter the Name of Cheque Book and press Enter.

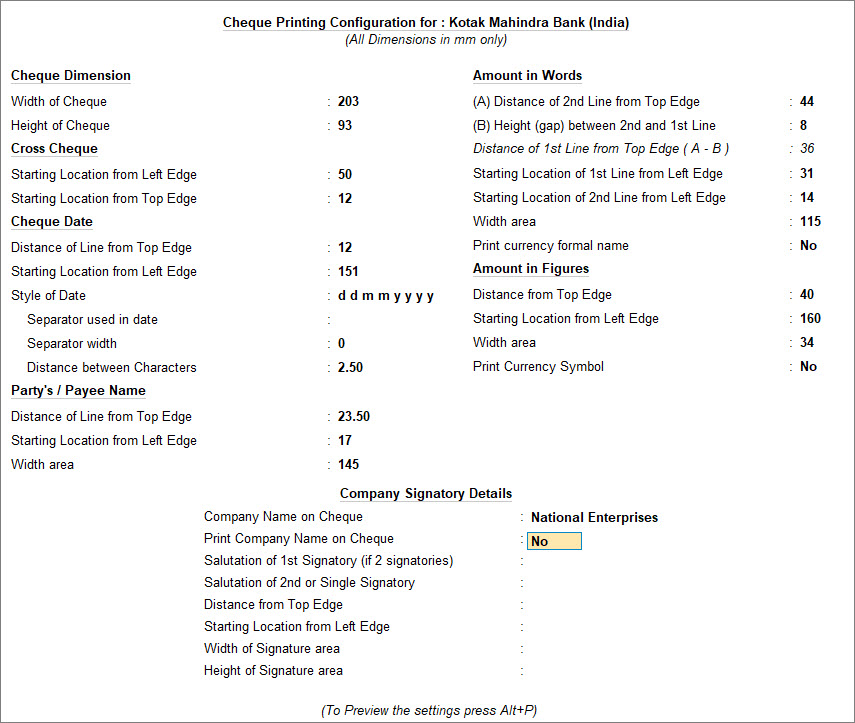
- Set Cheque Printing under Bank Configuration.
- Set Enable Cheque Printing to Yes.
- Enable Set/Alter Cheque Printing configuration.
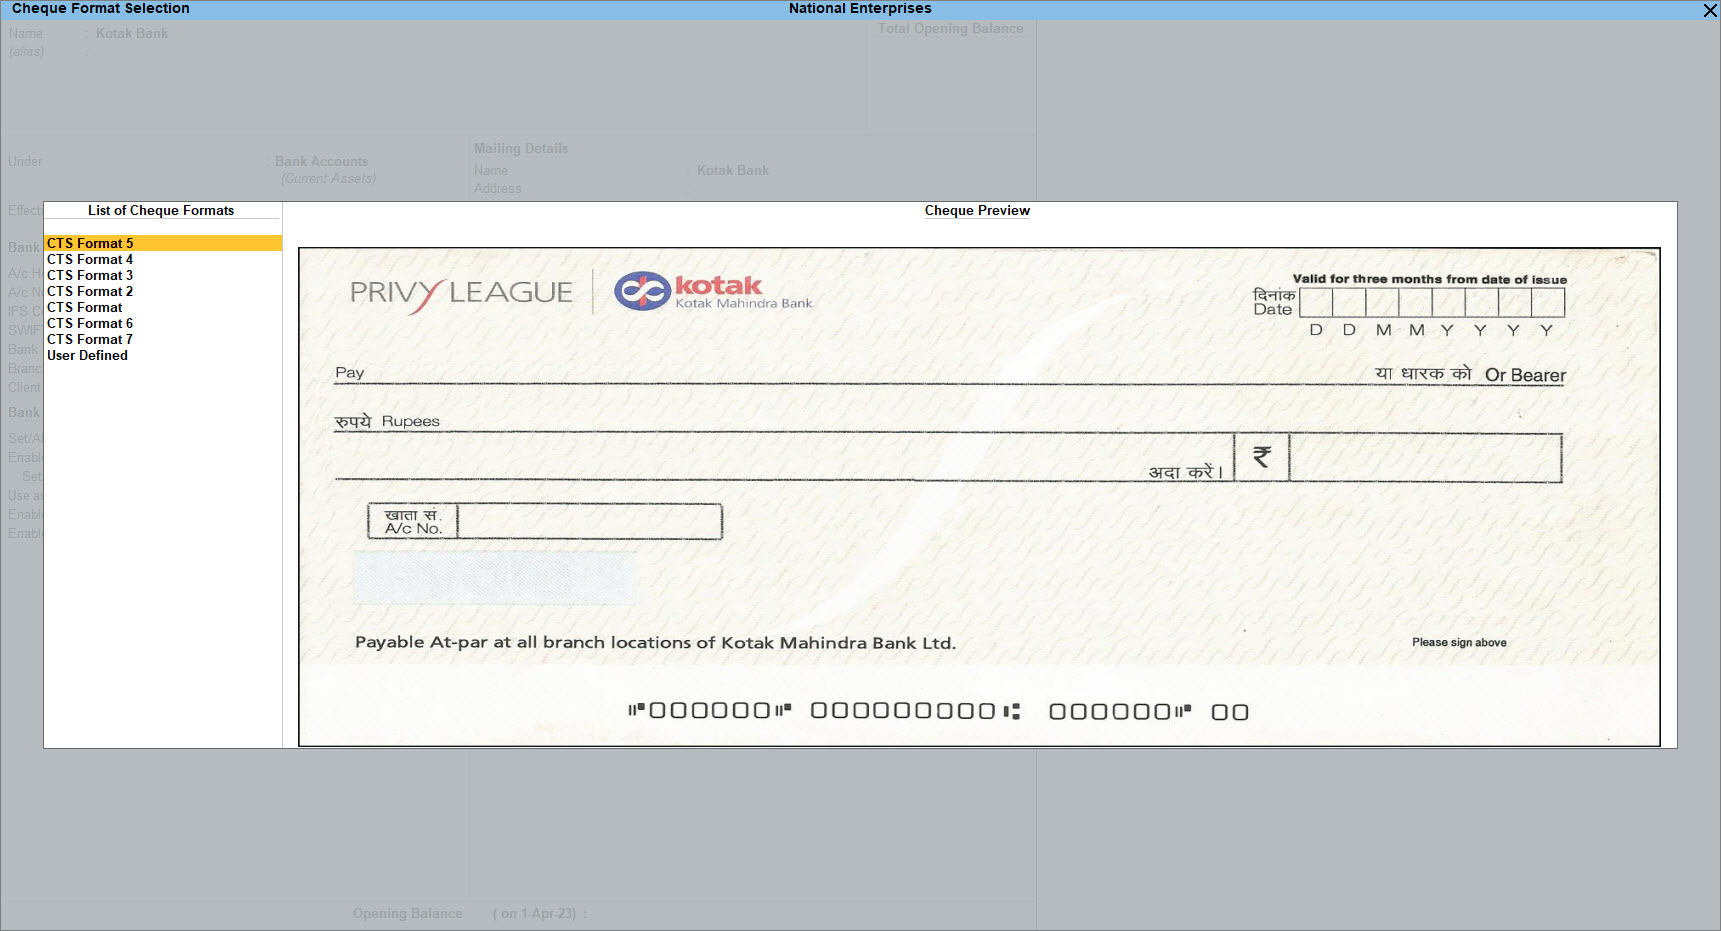
- In the Cheque Format Selection screen, you can view all the cheque formats supported for the bank selected in the Bank name field.
- Select the Cheque Format and press Enter to view/modify the pre-configured dimensions.

- Print the Sample Cheque.
- Press Ctrl+P (Print) > P (Print) to print and I (Preview) to preview the settings. The Sample Cheque Printing screen appears.
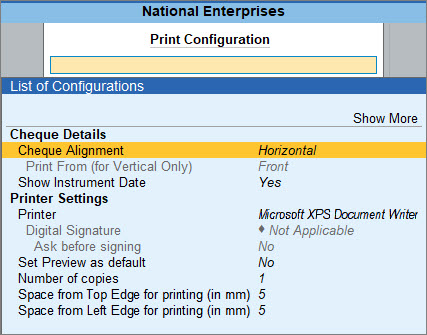
- Press C (Configure) and set the Cheque Alignment.
You can select any one of the options mentioned below for Cheque Alignment.- Horizontal: This option prints the cheque horizontally (oriented as landscape).
- Vertical-Centre: This option prints the cheque vertically at the centre of the cheque leaf.
- Vertical-Left: This option prints the cheque vertically on the left-hand side of the cheque leaf.
- Vertical-Right: This option prints the cheque vertically on the right-hand side of the cheque leaf.

Press Esc and press I (Preview) to generate the preview
Press Esc to return to the Cheque Dimension screen.
- As always, press Ctrl+A to accept the screen.
Once the bank ledger is configured with the cheque range and cheque format, you can print the cheques immediately after the payment voucher is recorded.
Alter predefined cheque formats for printing with required dimensions
TallyPrime provides you with a List of Cheque Formats given by the specific banks, from which you can select the desired format while printing the cheques. While printing the cheque if you see that the predefined cheque formats are not as per your cheque dimensions, then as a one-time set up you can alter the predefined cheque format as per your requirement.
![]()
- Select the Bank ledger.
- Press Alt+G (Go To) > Alter Master > type or select Ledger > and press Enter.
Alternatively, Gateway of Tally > Alter > type or select Ledger > and press Enter. - Select the bank ledger. For example, Kotak Mahindra Bank.
- Press Alt+G (Go To) > Alter Master > type or select Ledger > and press Enter.
- Under Bank Configuration, set Enable Cheque Printing to Yes and Enable Set/Alter Cheque Printing configuration.
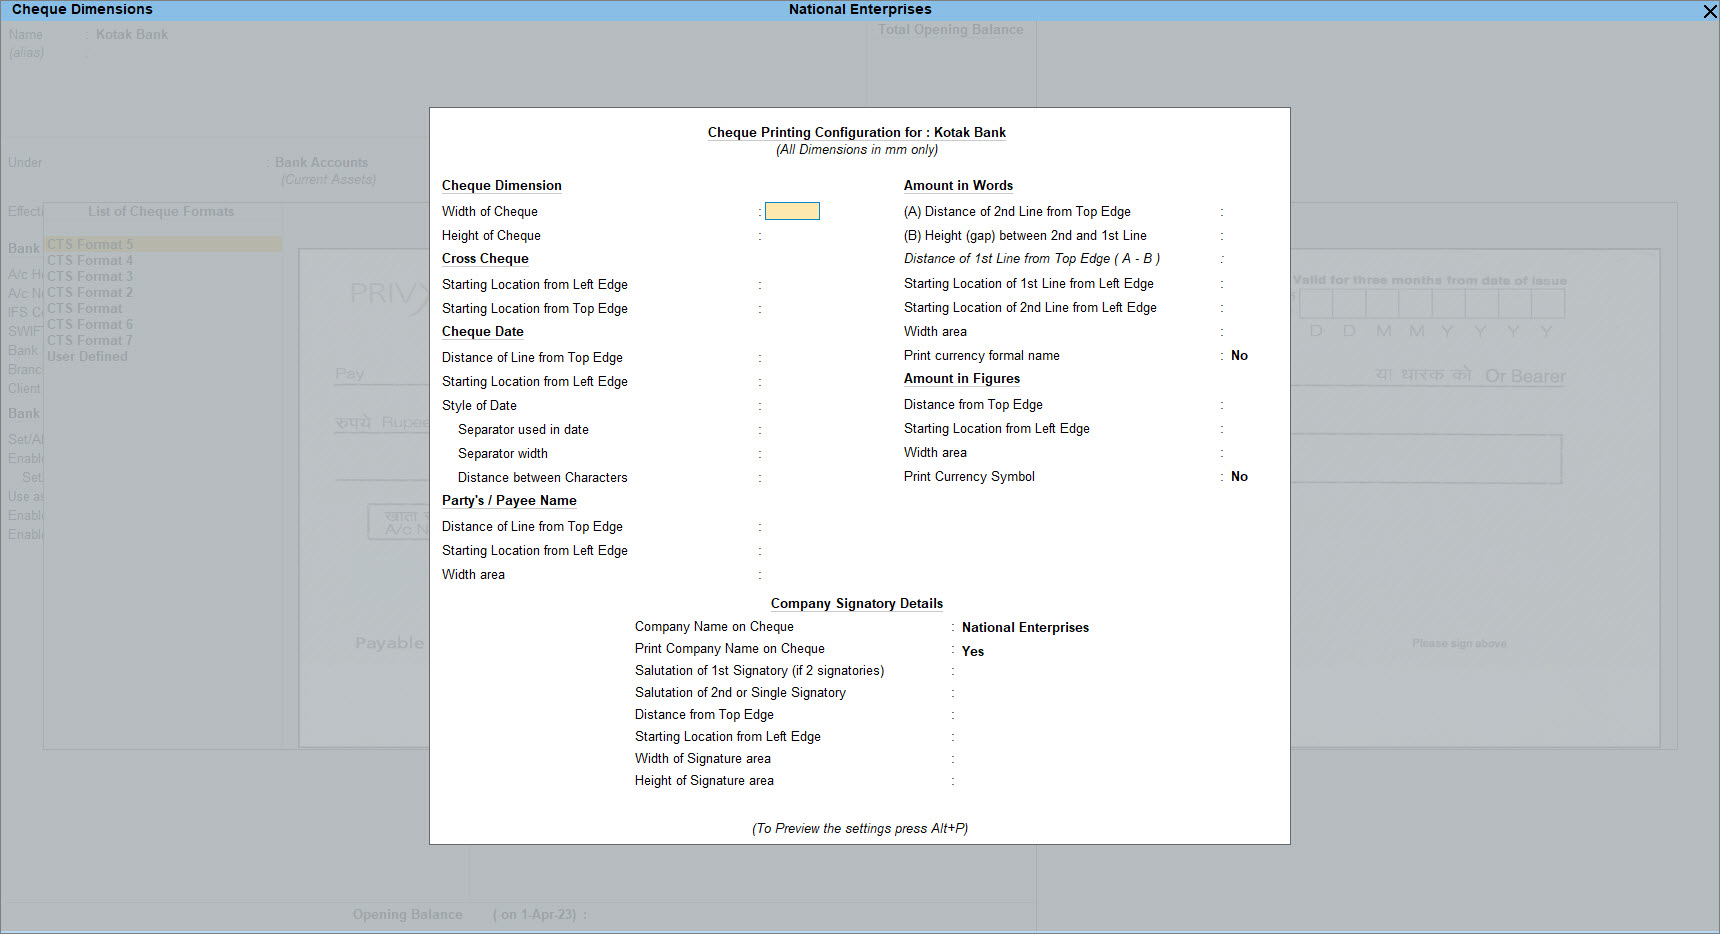
The Cheque Format Selection screen appears as shown below:
- Update the cheque dimensions.
- Select the required format from the list and press Enter. The Cheque Dimensions screen appears.
- Enter the cheque dimensions manually or press Alt+B (Copy From) to copy the predefined dimensions from the List of Cheque Formats.
- Press Ctrl+A to accept the Cheque Dimensions screen to view the Sample Cheque Printing screen.
- Accept the screen. As always, you can press Ctrl+A to save.
Once you alter the predefined cheque format and set the cheque dimensions as per your business need as a one-time requirement, you can print the cheque with the set dimensions.
To know more about the list of banks that support pre-defined cheque formats, click here.
Alter user-defined cheque format to add a specific format
Apart from the predefined cheque format TallyPrime also provides you with a User Defined format. The User Defined format is blank so that you can alter and add the dimensions as per your requirement. You can alter the User Defined format if the predefined format does not meet your requirement for cheque printing or the predefined format is not available for your bank. Going forward you can use the same format to print the cheque leaves for payment.
![]()
- Select the Bankledger.
- Press Alt+G (Go To) > Alter Master > type or select Ledger > and press Enter.
Alternatively, Gateway of Tally > Alter > type or select Ledger > and press Enter. - Select the bank ledger. For example, Kotak Mahindra Bank.
- Press Alt+G (Go To) > Alter Master > type or select Ledger > and press Enter.
- Under Bank Configuration, set Enable Cheque Printing to Yes and Enable Set/Alter Cheque Printing configuration.
The Cheque Format Selection screen appears. - Select User Defined from the List of Cheque Formats or press Alt+L (User Defined) to define the cheque dimensions in the Cheque Dimensions screen.
The Cheque Dimensions screen appears.
- Press Alt+B (Copy From), if you have defined cheque dimensions for other banks.
Select the format of the required bank from the List of Configured Banks. In the Cheque Dimension screen, update the details as per your requirement, as shown below:
In the Cheque Printing Configuration screen, no field other than salutations should be blank.
- Press Enter to accept the Cheque Dimensions screen.
- Accept the screen. As always, you can press Ctrl+A to save.
After you have added the required dimensions in the User Defined format of a cheque, you can print the cheques using the format.
Print amount in lakhs/millions on cheques
You can print the value in the cheque in lakh/million, by changing the settings for display of amounts.
![]()
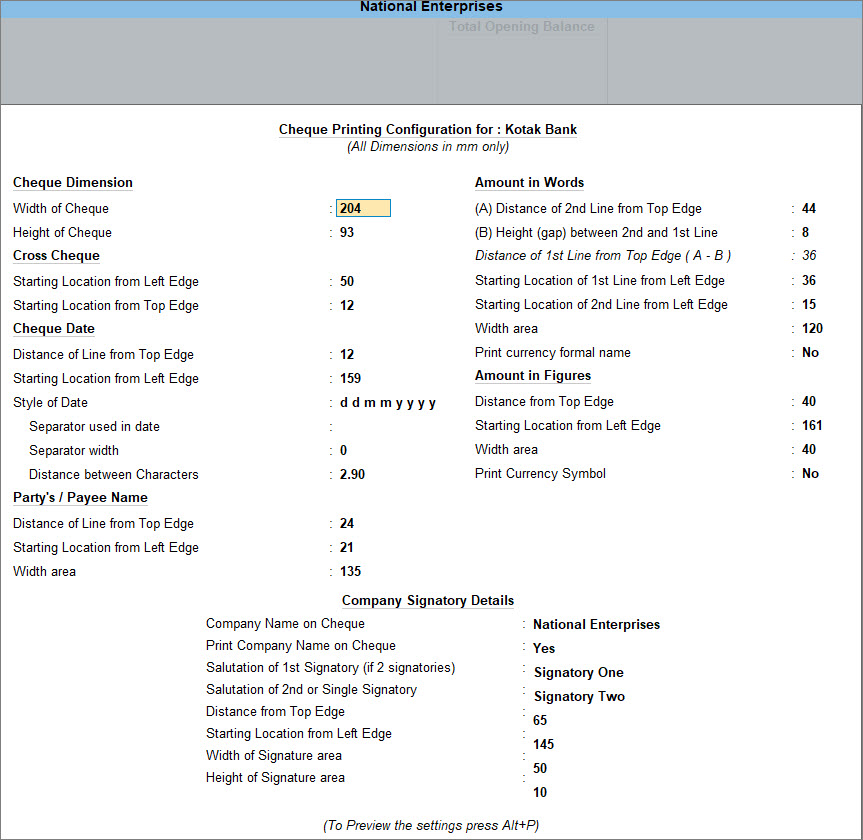
- Press Alt+K (Company) > select Alter.
- Select the company from List of Companies to view the Company Alteration screen.
- Press F12 (Configure) > set Provide Additional Base Currency details as Yes, to enable additional base currency options.

- Set the option Show amount in millions? to Yes to view the amounts in millions in the book as well as print it on cheques.
For example, once the option is set to yes, you can see the amount as 1,000,000 instead of 10,00,000. - Accept the screen. As always, you can press Ctrl+A to save.
During cheque printing, the amount will now be printed in millions.
Disable company name in the pre-printed cheques
In the case of pre-printed cheques with the company name, you can disable printing the company name again from the cheque printing configuration.
![]()
- Select the Bank ledger.
- Press Alt+G (Go To) > Alter Master > type or select Ledger > and press Enter.
Alternatively, Gateway of Tally > Alter > type or select Ledger > and press Enter. - Select the bank ledger. For example, Kotak Mahindra Bank.
- Press Alt+G (Go To) > Alter Master > type or select Ledger > and press Enter.
- Set Cheque Printing under Bank Configuration.
- Enable Set/Alter Cheque Printing configuration, to view the Cheque Format Selection screen.
- Select the required format from the List of Cheque Formats, to view the Cheque Dimensions screen.
- Print the cheque without the company name.
- In the Cheque Dimensions screen, set Print Company Name on Cheque to No under Company Signatory Details.
- Accept the screen. As always, you can press Ctrl+A to save.
Now you can print the pre-printed cheques with other details without overlapping the company name.
Print a Cheque to Withdraw Cash
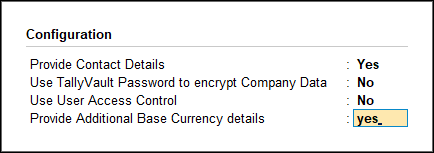
If you want to withdraw money from the bank through a cheque, then you can print a cheque after passing a contra entry in the books. In the Favouring Name field in the Bank Allocations screen, you can mention Self or the name of the person who is going to the bank. You can print the cheque as non-crossed and mention Self or the name of the person who is going to the bank to withdraw cash.
![]()
- Record the Contra entry.
- Press Alt+G (Go To) > Create Voucher > press F4 (Contra).
Alternatively, Gateway of Tally > Vouchers > press F4 (Contra). - Credit the Bank account and enter the amount.
- Press Enter to go to the Bank Allocations screen.
- Press F12 (Configure) > set Show favouring name as Yes, to enter Self as the Favouring name.
The Bank Allocations screen appears as shown below:
- Press Ctrl+A to accept and return to the Accounting Voucher Creation screen.
- Debit the Cash account.
- Press Alt+G (Go To) > Create Voucher > press F4 (Contra).
- Press Ctrl+A to accept the screen.
The Cheque Printing screen appears. - Print the cheque.
- In the Cheque Printing screen, press C (Configure) to set the print settings, if any.
- Press P (Print) to print the self-cheque.
You can print a cheque in your name and withdraw money from the bank.
Was this article helpful?
That’s Great!
Thank you for your feedback
Sorry! We couldn't be helpful
Thank you for your feedback
Feedback sent
We appreciate your effort and will try to fix the article