A Bank Reconciliation is a process to match all the transactions and bank balances of an organisation with the accounting records of the organisation for a particular period. You can perform the reconciliation manually as well as automatically. You can set the date from when you want to perform the reconciliation. The unreconciled transactions of the current year appear in the Opening BRS of the next year, you can remove the Opening BRS if not required. You can also compare the bank book with the cash book or two or more banks.
The Bank Reconciliation is one of the prerequisites of auditing and verification of the correctness of accounts at the year-end. The purpose of reconciling bank statements is to avoid any missing transactions or any mismatch in the bank book and in the cash book of your company. The reason for the mismatch can be cases where a cheque was issued but not presented, a cheque collected but not deposited or even in cases of the cheque was dishonoured.
TallyPrime provides you with the flexibility to perform reconciliation automatically. You need to configure your bank ledger for auto reconciliation and then import the bank statements in the format of Excel, MT940 or .CSV files. Once imported the reconciliation is done automatically. It is of utmost importance to record the transactions with the Instrument number and date, which is required while performing auto-reconciliation. This avoids the possibility of mapping the wrong entry while performing the reconciliation. If the auto-reconciliation option is enabled for your bank ledger, you can still perform manual reconciliation if needed. In manual reconciliation, you need to manually enter the bank date against each transaction.
You can reconcile or delete the unreconciled transactions one by one or in one go. The transactions that are not recorded in the company books but were executed by the bank can be recorded by creating vouchers directly from the Bank Reconciliation Statement.
If you want to split your current company to create a new company then all the unreconciled transactions automatically get updated in the Opening BRS. After creating a new company if you don’t need the unreconciled transaction details then you can remove the Opening BRS.
Reconcile Bank Transactions Automatically
If you want to reconcile your bank transactions automatically without spending much time then you can enable the option of auto-reconciliation in your bank ledger. Auto-reconciliation minimises the time spent on reconciling bank ledgers and the risk of making errors.
To reconcile the bank ledgers automatically,
- You need to download the bank statements and import the same in TallyPrime.
- After import, bank dates will automatically be filled in the Bank Dates field in the Bank Reconciliation Statement.
- At the time of reconciliation, TallyPrime matches the instrument number and instrument date between the bank statements and the transactions recorded in the system.
In case of any entries that are recorded in the books but not cleared in the bank, those are not reconciled and can be reconciled again by importing the statements once it is cleared in the bank. Additionally, entries such as bank charges or interest received which are executed at the bank’s end but not yet reflected in the books of accounts appear under the Amount Not Reflected in Company Books in the reconciliation statement. For those entries, you can record the transactions directly from the reconciliation screen and complete the reconciliation. You can access bank reconciliation to print the reconciliation statements, according to your requirements.
The statements can be imported in the format of Excel, MT940 or .CSV files.
Configure bank ledger to perform auto reconciliation
If you want to auto-reconcile your bank statement with the transactions, you can configure your bank ledger accordingly and set the path for new and imported bank statements. You can configure your bank ledger for auto-reconciliation only for selected banks.
- Openthe bank ledger.
- Press Alt+G (Go To) > Alter Master > type or select Ledger > and press Enter.
Alternatively, Gateway of Tally > Alter > type or select Ledger > and press Enter. - Select the bank ledger. For example, Kotak Mahindra Bank.
- Press Alt+G (Go To) > Alter Master > type or select Ledger > and press Enter.
- Enable auto-reconciliation in the bankledger.
- In the Ledger Creation/Alteration screen for bank ledger, press F12 (Configure).
- Enable Set Bank Reconciliation and e-Payments.
- Press Ctrl+A to accept the screen.
- Configure auto-reconciliation.
- In the bank ledger, under Bank Configuration, set Enable Auto Reconciliation as Yes.
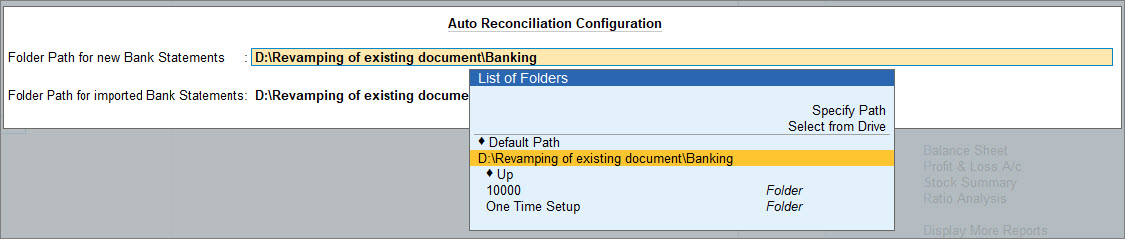
The option Set/Alter Auto Reconciliation configuration appears. - Enable Set/Alter Auto Reconciliation configuration to set the path for new and imported bank statements.
The Data Path can be any folder in your local computer, depending on your preference.
- In the bank ledger, under Bank Configuration, set Enable Auto Reconciliation as Yes.
- As always, press Ctrl+A to accept the screen.
After the bank ledger is configured with auto-reconciliation, you can automatically reconcile your bank transactions.
Set the effective date for auto reconciliation
TallyPrime provides you with the flexibility to set an effective date for your bank reconciliation. The effective date is generally the Books beginning from date which means that the auto-reconciliation can start from the Books beginning from date. However, you can also change the date as per your requirements.
- Openthe bank ledger.
- Press Alt+G (Go To) > Alter Master > type or select Ledger > and press Enter.
Alternatively, Gateway of Tally > Alter > type or select Ledger > and press Enter. - Select the bank ledger. For example, Kotak Mahindra Bank.
- Press Alt+G (Go To) > Alter Master > type or select Ledger > and press Enter.
- Enable effective date for reconciliation.
- In the Ledger Creation/Alteration screen for the bank ledger, press F12 (Configure).
- Enable Provide Effective Date of Bank Reconciliation for Bank Ledgers.
- Press Ctrl+A to accept the screen.
- Modify the effective date for reconciliation.
- In the bank ledger, Effective Date for Reconciliation is prefilled with Books beginning from date. You can modify the date as per your need.
Based on the effective date set for bank reconciliation, the transactions can be reconciled with the bank statements. - As always, press Ctrl+A to accept the screen.
- In the bank ledger, Effective Date for Reconciliation is prefilled with Books beginning from date. You can modify the date as per your need.
Once you set the effective date, you can perform auto-reconciliation from that date.
View and configure bank reconciliation
After you import the bank statement, the entries are auto-reconciled. You can see the Bank Date column updated with the bank dates when the transactions are cleared in the bank. You can also view the reconciliation screen by including the reconciled transactions or view either debit or credit entries. From the reconciliation screen of one bank, you can go to another bank reconciliation screen. Additionally, you can configure the screen and add other details as per your requirements.
- Press Alt+G (Go To) > type or select Bank Reconciliation > and press Enter.
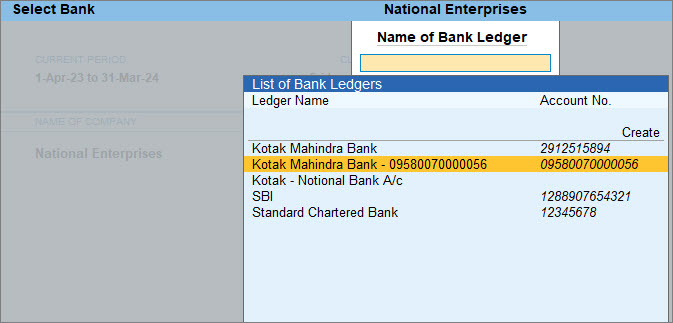
Alternatively, Gateway of Tally > Banking > Bank Reconciliation > and press Enter. - Select the required bank ledger from the List of Bank Ledgers, as shown below.
The Bank Reconciliation screen appears.
You can customise the Bank Reconciliation Statement to view it as per your requirements.
- F4 (Bank): You can switch to another bank to view the Bank Reconciliation Statement of that bank.
- Ctrl+B(Basis of Values): You can configure the Bank Reconciliation Statement with the details as per your business needs.
- Type of Voucher Entries: You can view all the vouchers together or select only debit or credit entries.
- Include Reconciled Transactions: Once the transactions are reconciled, it is removed from the reconciliation list. You can enable this option to include reconciled transactions.
- Include all Unreconciled transactions till date: Displays the list of unreconciled transactions till the date when you are performing bank reconciliation.
- Include Unlinked transactions: Displays the list of unlinked transactions.
- Ctrl+J (Exception Reports): You can view the Optional and Post-Dated Vouchers from this option.
- Alt+H (Opening BRS): From this option, you can view the Opening BRS for all the unreconciled transactions after you split the company.
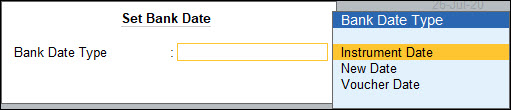
- Alt+S (Set Bank Date): To set a bank date for all the transactions for reconciliation, press Alt+S. The Set Bank Date sub-screen appears as shown below:

- Instrument Date: On selecting Instrument Date as the Bank Date Type, the Bank Date field for all the transactions in the Bank Reconciliation screen is filled with the instrument date entered for that transaction in the Bank Allocations screen.
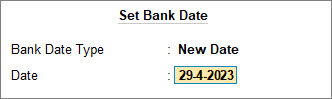
- New Date: On selecting New Date as the Bank Date Type, a new field Date appears in the Set Bank Date sub-screen.
Specify the required bank date that is to be filled for all the transactions in the Bank Reconciliation screen.
- Voucher Date: On selecting Voucher Date as the Bank Date Type, the Bank Date field for all the transactions in the Bank Reconciliation screen is filled with the Date of Voucher.
Apart from the above-mentioned options, you can further configure your report from F12 (Configure).
- Show Narrations: Set this option to Yes to display the narration in the Bank Reconciliation Statement.
- Show Favouring Name/Received From: Set this option to Yes to display the Payment Favouring/Received From details in the Bank Reconciliation Statement. The Favouring Name column displays only those names that are different from the Party/Ledger account names.
- Show Remarks: Set this option to Yes to display the remarks in the Bank Reconciliation Statement.
- Show Forex details: Set this option to Yes to display the Forex details in the Bank Reconciliation Statement. The options Show Forex details appear only in case the multiple currencies feature is enabled for the company.
- Show Difference in Bank Balance: Set this option to Yes to display the difference of balance as per bank balance and balance as per imported bank statement.
- Allow Back-dated Reconciliation: Set this option to Yes to allow reconciling back-dated transactions also.
Import bank statements to perform auto reconciliation
In the Bank Reconciliation Statement of TallyPrime, you do not need to update the Bank Date manually as you can import the bank statement to reconcile the transactions. You need to import bank statements of a specific bank to reconcile the payment transactions involving that bank in TallyPrime. The bank statements get imported in a format such that TallyPrime can derive date from the same. The format can be .xml, delimited or others, as applicable to the bank. Auto Reconciliations are done when the transaction details along with the amount and date as per the accounting records of the organisation match with the imported bank statement. If the transaction value and date match but the payment details such as the cheque number do not match then those transactions are not auto-reconciled. Hence, it is important to record the Instrument Number and Instrument Date while recording the transaction.
Furthermore, if the Instrument Number and Date are missing in a transaction, then importing bank statements will help you to link the unlinked transactions in TallyPrime. You can even create a voucher on the go if the transaction against a specific entry in the bank statement is missing.
- Open Bank Reconciliation Statement.
- Press Alt+G (Go To) > type or select Bank Reconciliation > and press Enter.
Alternatively, Gateway of Tally > Banking > Bank Reconciliation > and press Enter. - Select the required bank ledger from the List of Bank Ledgers, as shown below:
The Bank Reconciliation screen appears.
- Press Alt+G (Go To) > type or select Bank Reconciliation > and press Enter.
- Import bank statements.
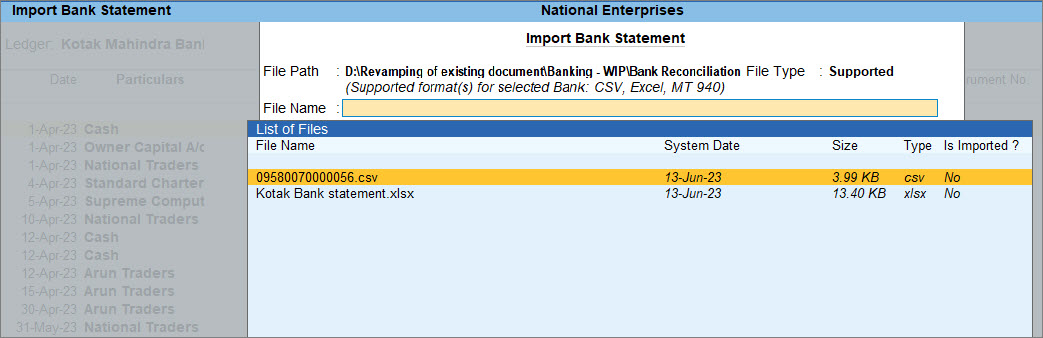
- In the Bank Reconciliation statement, click Alt+O (Import) > Bank Statement to import the bank statements.
- Select the File Name (bank statement downloaded from the bank) in the Import Bank Statement screen, as shown below:

- Press Enter. A confirmation message with the Total Entries in Bank Statement, the number of Reconciled transactions, and Additional Bank Entries appear, as shown below:

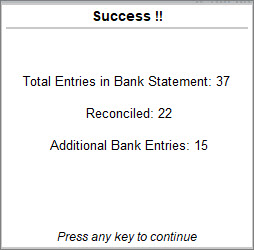
On importing the bank statement, the Bank Date appears for the reconciled transactions. The additional entries present in the bank statement appear under Amounts not Reflected in Company Books.
Reconcile or delete unlinked transactions from bank reconciliation
Once the auto-reconciliation is done, there might be certain transactions which remain unreconciled or unlinked. This can happen when the transaction details do not match with the bank statement or any transactions recorded in the books but not yet cleared in the bank. You can reconcile those unlinked transactions individually or together in one go. If there are duplicate unlinked transactions, you can delete those individually or together in one go.
You can reconcile unlinked transactions one by one.
- In the Bank Reconciliation Statement, select the transaction to be reconciled displayed under Amount Not Reflected in Company Books.
- Press Alt+Q (Reconcile Unlinked).
The transactions from the company books matching the unlinked transaction amount are displayed for selection in the Unreconciled Transactions screen. - Select the appropriate transaction using the spacebar and press Enter.
The status Reconciled Successfully is displayed.
You can also reconcile unlinked transactions in one go.
- In the Bank Reconciliation Statement, press Alt+R (Reconcile All Unlinked) in order to perform the reconciliation without changing the transaction details in the books.
The Unreconciled Transactions screen displays the matching transactions. The amount not reconciled in the bank statement is displayed under Transaction from Bank Statements to be Reconciled. - Press Enter to link the selected transaction and to reconcile. After the reconciliation, the status Reconciled Successfully is displayed. The reconciled lines will get saved as soon as the bank date is updated against the transaction.
- Press Esc to skip the current transaction and proceed to the next for reconciliation.
- Press Alt+S (Stop) to stop the reconciliation process if you want to perform the reconciliation properly by changing the transaction details and re-importing the bank statement to complete the auto-reconciliation.
Apart from reconciling you can also delete the unlinked transactions one by one or in one go in the Bank Reconciliation Statement. If there are transactions recorded in the books for which the payment was cancelled but the transactions were not deleted or if there are transactions recorded twice then you can delete such transactions in the bank reconciliation.
- Press Alt+V (Delete Unlinked) to delete the unlinked transaction one by one.
- Press Alt+W (Delete All Unlinked) to delete all the unlinked transactions in one go.
Create new vouchers to reconcile the unreconciled transactions
There are transactions that are executed from the bank side such as bank charges, bank interest or any cheque that is deposited directly into the bank. In such cases, the entries are not recorded in the books and at the time of reconciliation those entries show the difference between bank statements and company books. You can directly create vouchers from the bank reconciliation statement and record those missing transactions.
- In the Bank Reconciliation screen, select the transaction to be reconciled displayed under Amount Not Reflected in Company Books.
- Press Alt+J (Create Voucher). The Payment Voucher screen appears by default. You can switch to other vouchers as per your requirement.
Creating a voucher may impact the voucher numbering of your transactions. To know more, refer to Voucher Numbering. - Enter and accept the transaction according to the transaction displayed in the Amount Not Reflected in Company Books section.
The details displayed under the Amount Not Reflected in Company Books section are removed indicating that the corresponding entry is found in the books of accounts.
Print Bank Reconciliation Statement
In your business, if there is a practice to maintain the print copy of the reconciliation statement along with the bank statement after the reconciliation is done then you can print the Bank Reconciliation Statement screen for the required bank. Such documents can be a part of auditing where the auditors can match the bank balance as per the bank statement and the printed bank reconciliation statement for a particular period.
- Open Bank Reconciliation.
- Press Alt+G (Go To) > type or select Bank Reconciliation > and press Enter.
Alternatively, Gateway of Tally > Banking > Bank Reconciliation > and press Enter. - Select the required Bank account from List of Bank Ledgers.
The Bank Reconciliation screen appears.
- Press Alt+G (Go To) > type or select Bank Reconciliation > and press Enter.
- Print the Bank Reconciliation Statement.
- Press Ctrl+P.
The Print Report screen appears.
- Press C (Configure)to set the following options:
- Show Narrations: Set this option to Yes to display the narration in the Bank Reconciliation Statement.
- Show Favouring Name/Received From: Set this option to Yes to display the Payment Favouring/Received From details in the Bank Reconciliation Statement.
- Show Remarks: Set this option to Yes to display the remarks in the Bank Reconciliation Statement.
- Show Forex details: Set this option to Yes to display the Forex details in the Bank Reconciliation Statement.
- Type of Voucher entries: By default, this is selected as All Vouchers, select the required option from the Ledger Entries list.
- Include Reconciled transactions: Set this option to Yes to display the reconciled transactions also in the Bank Reconciliation Statement.
- Show all Unreconciled transactions till date: Set this option to Yes to display all the Unreconciled Transactions till the given date, irrespective of the From date set in the Bank Reconciliation Statement.
- Allow Back-dated Reconciliation: Set this option to Yes to allow reconciling back-dated transactions also.
- Press Ctrl+P.
- Press Esc to return to the print screen, and press P (Print) to Print or I (Preview) to view the print preview.

Re-import the Bank Statement
While performing the auto-reconciliation after importing the bank statement, there can be a few transactions that remain unreconciled due to differences in transaction details or transactions such as bank charges, bank interest or even any cheque that was cleared by the bank but not yet recorded in the books. In such cases, once the transaction details are corrected or new entries are recorded you can re-import the bank statement and perform the reconciliation for the unreconciled transactions.
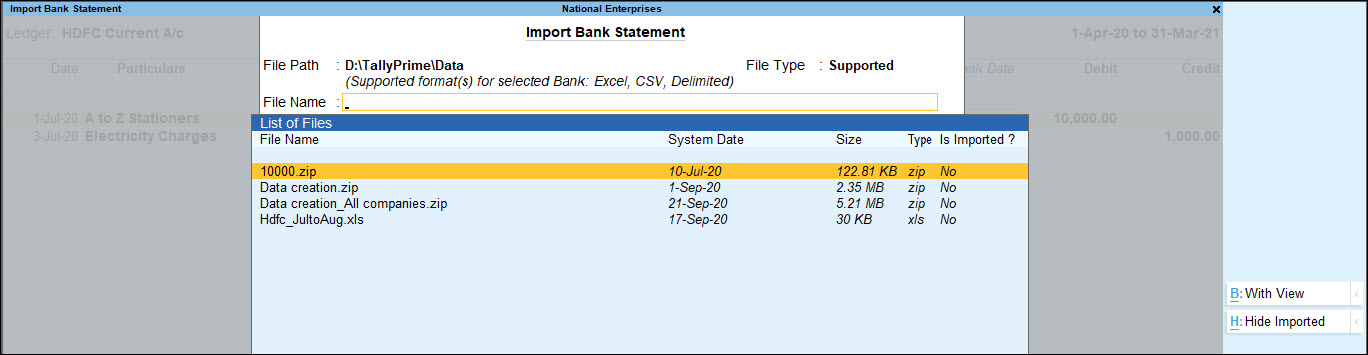
While selecting the bank statement for importing, all the statement including the ones which is already imported is displayed. You can hide the already imported statement.
- Press Alt+I (Import) > Bank Statement from the Bank Reconciliation Statement. The Import Bank Statement screen appears, as shown below:

- While re-importing the bank statement, if you want to view only the current downloaded statement then press Alt+H (Hide Imported) to hide the previously imported statement.
The Alt+H is a toggle button which can also be used to Show Imported statements.
If an attempt is made to re-import the bank statement, a message Bank Statement already Imported Continue? Yes or No is displayed, as shown below:
- Press Yes to re-import the bank statement.

Was this article helpful?
That’s Great!
Thank you for your feedback
Sorry! We couldn't be helpful
Thank you for your feedback
Feedback sent
We appreciate your effort and will try to fix the article