Efficient data management is vital for your business, especially when it comes to sharing essential information with stakeholders or transferring data to another company. Manually creating a copy of all your data can be a tedious task. The Export feature in TallyPrime allows you to export your company data like masters, transactions and reports in a few simple steps. The exported company data can be saved in formats like XML or ASCII, and you can even export financial reports as PDFs for easy sharing whenever required.
If your business uses the multi-user TallyPrime license, the Export feature becomes even more essential. It enables seamless data transfer in compatible formats, allowing collaboration among different users or sharing reports as per your business needs. Whether you are transitioning to a new version of TallyPrime or creating a new company, the Export feature ensures data consistency and efficiency. Moreover, by utilising the Export feature, you can reduce paper usage by opting to export transactions instead of printing hard copies, making it environmentally friendly and cost-effective.
Export and reuse masters and transactions data: You can reuse the exported data across multiple companies, avoiding the need for manual recreation of the business data. By simply importing master and transaction data from XML files, you can seamlessly integrate information into different companies within TallyPrime.
Share reports: Sharing reports with stakeholders helps them understand the financial status of the business and make informed decisions quickly. With this feature, you can export a variety of reports like Final Accounts, Reminder Letters, and Confirmation of Accounts, in PDF format and store them at an FTP location or your local drive.
Configure for export: TallyPrime offers flexibility in exporting reports, allowing customisations to meet your business requirements. Configure the masters, transactions, and reports accordingly before exporting them. For instance, while exporting the Trial Balance report, if you do not wish to include the Opening Balance, you can disable the Show Opening Balance option in the F12 (Configure) screen.
Reuse/Share Existing Data | Export Masters and Transactions
You may want to maintain the chart of accounts of the new company, with the same masters as that of the existing company. Also, you may want to copy the transactions up to a specific date from the existing company into the new company. In these scenarios, you can export the masters and transactions from the existing company in XML format and import them into the new company.
- Press Alt+E (Export) > Masters/Transactions.
- Press C(Configure) and configure the options as needed.
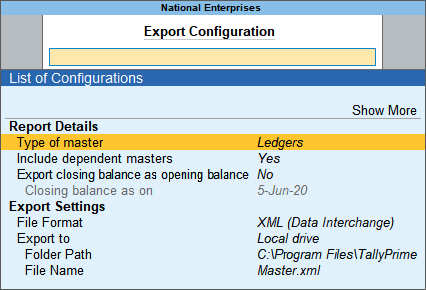
- To export Masters, set the options as needed.
- Select the Type of Masters for export.
You can select only a specific type of master (for example, ledger), or all the accounting/inventory masters, and so on. If you want to export all the masters available in the data, select All Masters.
- If you want to include the masters that are linked to the Type of Masters selected for export, set the option Include dependent masters to Yes.
- If you want to consider the closing balances of all the ledgers as opening balances for the next financial year, set Export closing balance as opening balance, set it to Yes. Otherwise, retain it as No.
- Select the Type of Masters for export.
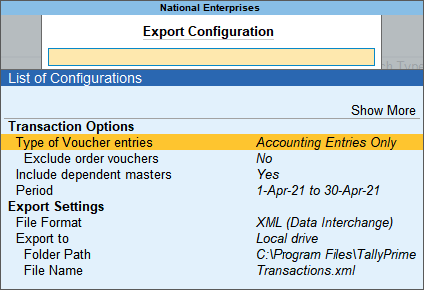
- To export transactions, set the options as needed.
- Select the Type of Voucher entries for export.
You can select only the accounting vouchers or inventory vouchers or all the vouchers. - If you want to include the masters that linked to the masters used in the Type of Voucher entries selected for export, set the option Include dependent masters to Yes.
- If you want to export the order vouchers linked to the selected voucher entries, set Exclude order vouchers to No.
- Select the period for which you are exporting the vouchers.

- Select the Type of Voucher entries for export.
- Specify the Export Settingsfor masters and transactions.
- Select the File Format.
- Select XML if you want to import this data into another company, or to any other software.
- Select ASCII if you want to export it as a comma separated text file, which is widely used for sending data using e-mail.
- Select the Folder Path.
- The File Name appears automatically. You can change it, if needed.
- Press Esc to return to the Export screen.
- Select the File Format.
- To export Masters, set the options as needed.
- Press E (Send) to export.
The exported file will be saved in the Folder Path selected while exporting the data.
Export Vouchers in PDF format | Export Vouchers from Day Book
If you need to view the transaction details of Day Book as a .pdf file, you can export it by selecting the file format as PDF.
- Press Alt+G (Go To) > select Day Book > press Enter.
Alternatively, Gateway of Tally > select Day Book > press Enter. - Select the period.
- Select the transactions for export.
- To export all the transactions, press Ctrl+E without selecting any transactions.
- To export only the required transactions, select the transaction using Spacebar > press Ctrl+E.
- Press C (Configure) > and select the File Format as PDF (Read-only document).
- Select the Folder Path. Set the other options as needed > and press Esc to return to the Day Book Export screen.
- Press E (Send) to export the report as a PDF.
Was this article helpful?
That’s Great!
Thank you for your feedback
Sorry! We couldn't be helpful
Thank you for your feedback
Feedback sent
We appreciate your effort and will try to fix the article