Create Mapping Templates for importing data from any Excel file
Create and save a template by mapping the data from your Excel sheet with the fields in TallyPrime. You can use this template while importing data from the corresponding Excel file so that the data gets imported based on the mapping you have created.
Create Mapping Templates for Masters
Say you maintain all the stock item details of your company for the financial year or quarter-wise in a worksheet named Sheet1 in the Excel file named Item List.xlsx. Let’s consider the following sample data for ease of understanding:
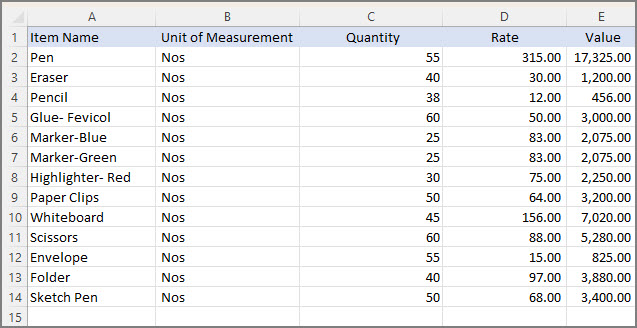
Now, let’s create a mapping template for the sample data shown in the image:
- Press Alt+O (Import) > Manage > Mapping Templates > MASTERS > Create.
- Provide the Excel file details for which you need to create a template, and press Enter.
- File Path: Enter the location of the Excel file that contains the master details.
- File to Import: From the List of Files, select the Excel file that you want to import.
- Worksheet Name: Lists all the worksheets available in the Excel file. Select the worksheet from the List of Worksheets for which you want to create a template.

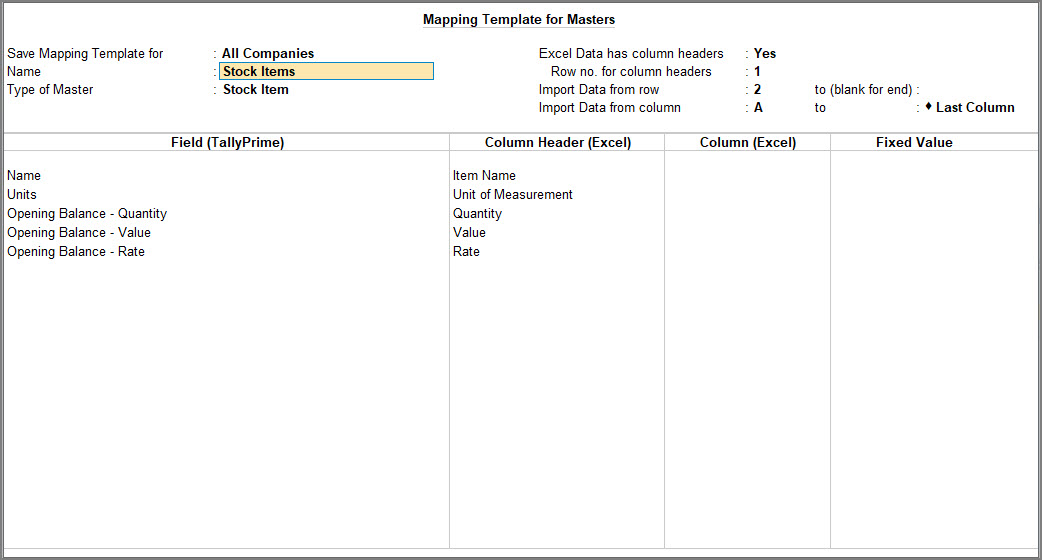
The Mapping Template Creation screen for masters appears, as shown below:
- Provide details required for saving the mapping template.
- Save Mapping Template for:
- All Companies: Opt for this option, when you want to save the mapping template in the current TallyPrime application folder.
- This Company: You can choose this option, when you want to save a mapping template at the company level so that users across different computers can also access the template.
- Name: Enter a name for the Mapping Template.
- Type of Master: Depending on the details of your Excel data, select the applicable set of masters.
- Save Mapping Template for:
- Provide row and column details of the Excel worksheet.
- Excel Data has column headers: If your Excel data has column headers for the columns, set this to Yes.
- Row no. for column headers: Enter which row of the Excel has the column headers. This helps the template to identify the header row while importing data.
- Import Data from row to (blank for end): Enter the starting row number and the ending row number that should be considered for importing data.
- blank for end represents the last row until which the data is available in the worksheet.
- Import Data from column to: Enter the starting column and ending column details that should be considered for importing data.
- Last Column represents the column until which the data has been entered in the Excel file. TallyPrime considers importing data from Excel up to 702 columns.
- Map Field (TallyPrime) with Column Header (Excel) or Column (Excel). Depending on the way you have maintained data, you can start mapping the field names with the data in the Excel file.
Name and Group Name are mandatory fields for creating a mapping template for Accounting Masters.
In this case, you can create the following mapping:
Before you save the mapping template, it is recommended to verify the mapping to ensure that the import does not fail. Save the mapping template. As always, press Ctrl+A to save.
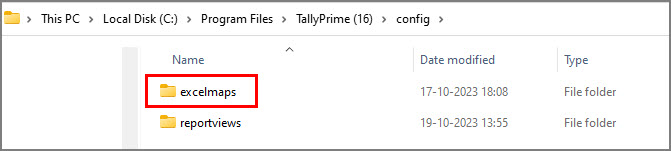
The template gets saved under the config > excelmaps folder available under the folder where your TallyPrime application is installed. You can use this template next time you import data from the Sheet1 worksheet.


You are now ready to import the data anytime from that Excel worksheet, using the mapping template created for master. When you import the master data, TallyPrime by default creates masters based on unique ledger names from the Excel worksheet.
Need to map data, reuse the saved templates, or even configure the mapping templates further based on your preferences? No worries! TallyPrime provides a host of flexible options to configure and use mapping the way it suits your data needs. To know more, refer to the Mapping Options Based on Types of Data in Excel section.
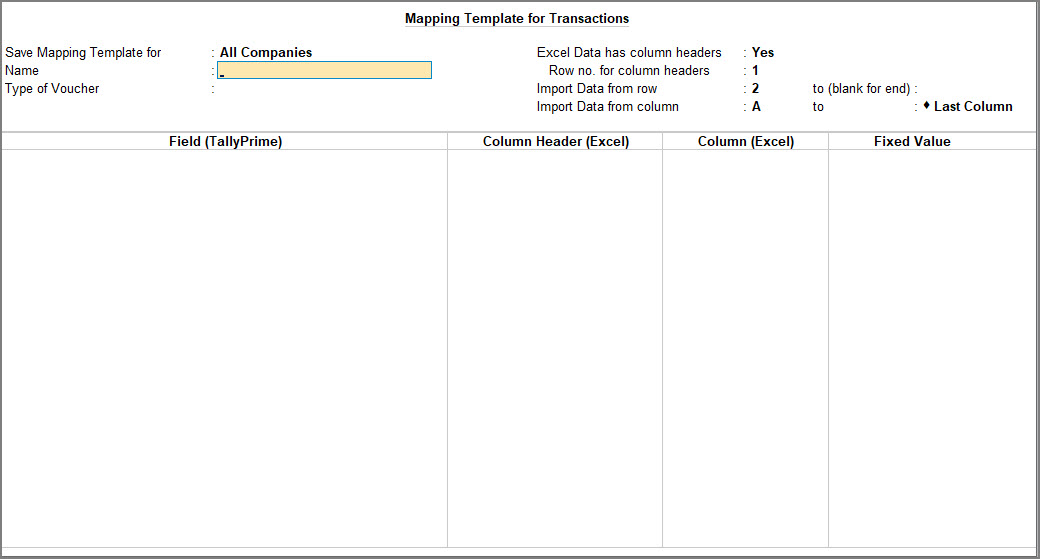
Create Mapping Templates for Transactions
Now let’s create a mapping template for the sample data shown in the image:
- Press Alt+O (Import) > Manage > Mapping Templates > TRANSACTIONS > Create.
- Provide the Excel file details for which you need to create a template, and press Enter.
- File Path: Enter the location of the Excel file that contains the transaction details.
- File to Import: From the List of Files, select the Excel file that you want to import.
- Worksheet Name: Lists all the worksheets available in the Excel file. Select the worksheet from the List of Worksheets for which you want to create a template.

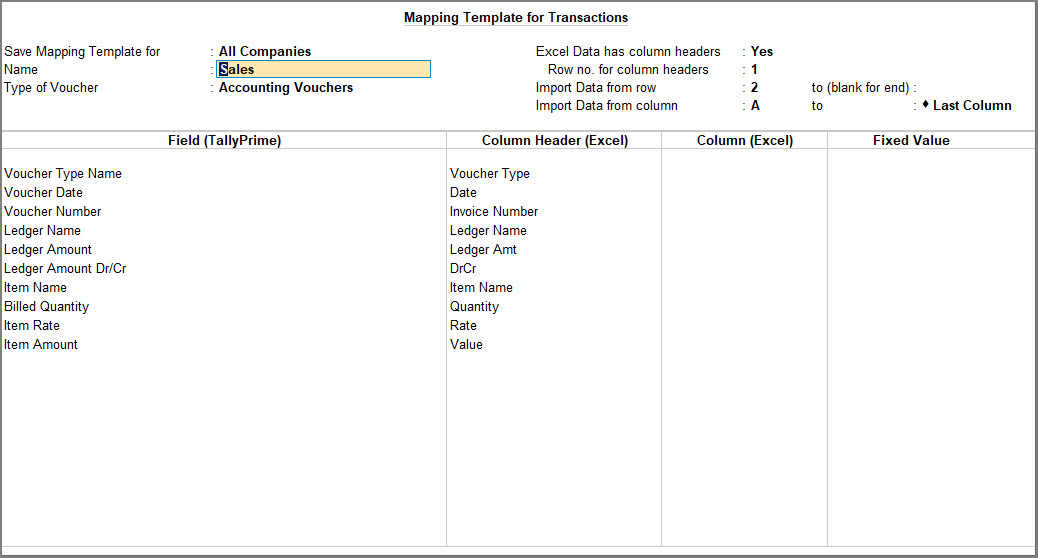
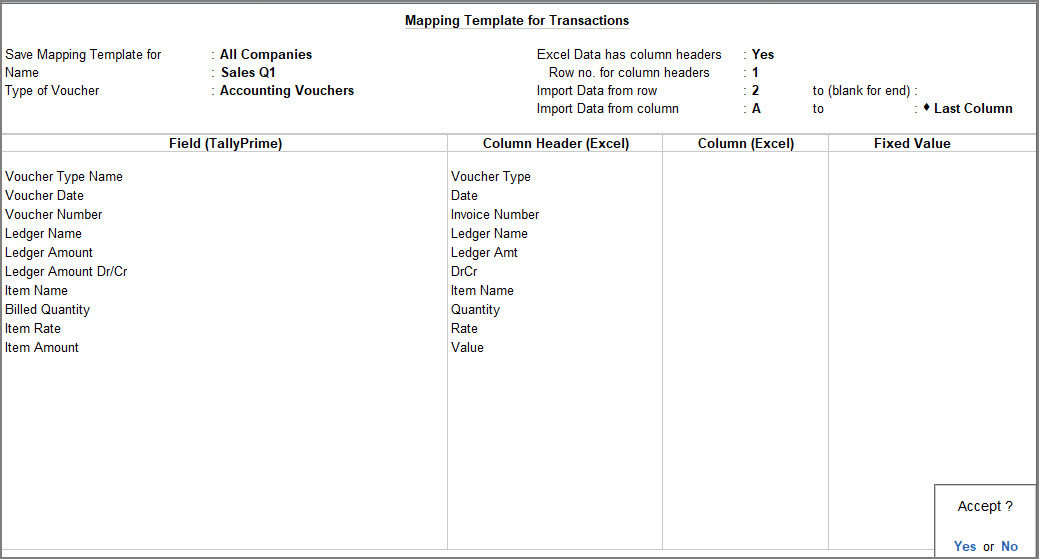
The Mapping Template Creation screen for transactions appears, as shown below:
- Provide details required for saving the mapping template.
- Save Mapping Template for:
- All Companies: Opt for this option, when you want to save the mapping template in the current TallyPrime application folder.
- This Company: You can choose this option, when you want to save a mapping template at the company level so that users across different computers can also access the template.
- Name: Enter the name of the Mapping Template.
- Type of Voucher: Depending on the details of your Excel data, you can select the applicable set of vouchers from the Types of Vouchers.
- Save Mapping Template for:
- Provide row and column details of the Excel worksheet. This is similar to how you would do in case of masters.
- Excel Data has column headers: If your Excel data has column headers for the columns, set this to Yes.
- Row no. for column headers: Enter which row of the Excel has the column headers. This helps the template to identify the header row while importing data.
- Import Data from row to (blank for end): Enter the starting row number and the ending row number that should be considered for importing data.
- blank for end represents the last row until which the data is available.
- Import Data from column to Last Column: Enter the starting column and ending column details that should be considered for importing data.
- TallyPrime considers importing data from Excel up to 702 columns.
- Map fields in TallyPrime with the columns in your Excel file. Depending on the way you have maintained data, you can start mapping the field names with the data in the Excel file.
Voucher Type Name, Voucher Date, Voucher Number, Ledger Name, and Ledger Amount are mandatory fields for creating a mapping template for Accounting Vouchers.
In this case you can create the following mapping:
Before you save the mapping template, it is recommended to verify the mapping to ensure that the import does not fail. - Save the mapping template. As always, press Ctrl+A to save.
The template gets saved under the excelmaps folder available under the folder where your TallyPrime application is installed. You can use this template next time you import data from the Sales worksheet.

You are now ready to import the data anytime from that Excel worksheet, using the mapping template created for transactions. By default, the mapping template considers creating vouchers based on Voucher Type Name, Voucher Date and Voucher Number found in the Excel worksheet. In case you need to configure the mapping template to set the way the vouchers should be created, TallyPrime provides you the additional flexibilities.
T0 refer to some sample data and corresponding Mapping Templates, click here to download.
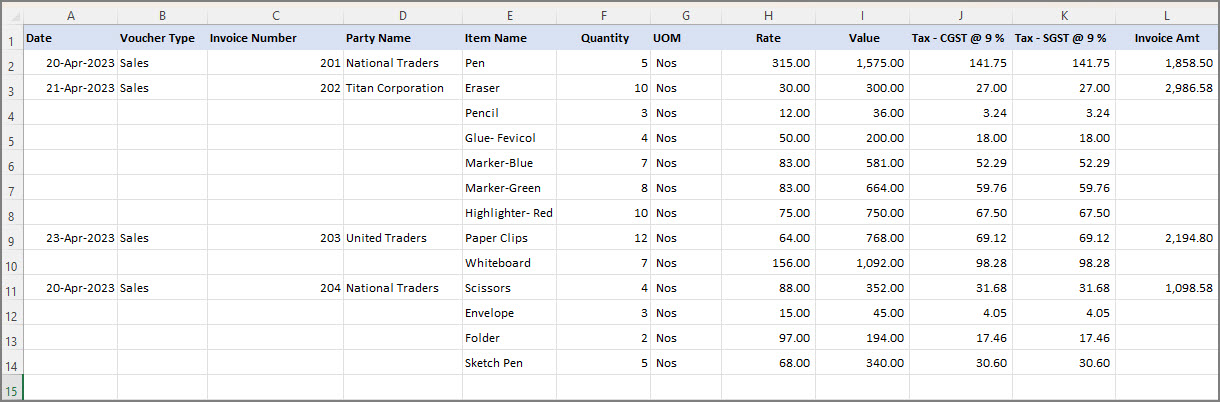
You can use the Ledger Details from Multiple Rows option in the mapping template to easily import this data into TallyPrime.
In the Mapping Template Creation screen,
- Map Voucher Type Name, Voucher Date and Voucher Number to the Voucher Type, Date and Invoice Number column headers available in the Excel file.
- Under Field (TallyPrime), from the List of Fields, select Ledger Details from Multiple Rows.
- Map the fields in TallyPrime with the corresponding column headers in your Excel worksheet.
The Ledger Name and Ledger Amount are mandatory fields for mapping under this option. - Map for the other fields in the voucher.
The Mapping Template appears, as shown below:
- Once you customise the mapping template, accept the screen to save the template.
Mapping of top and bottom entries in vouchers using Ledger Entries from Fixed Columns
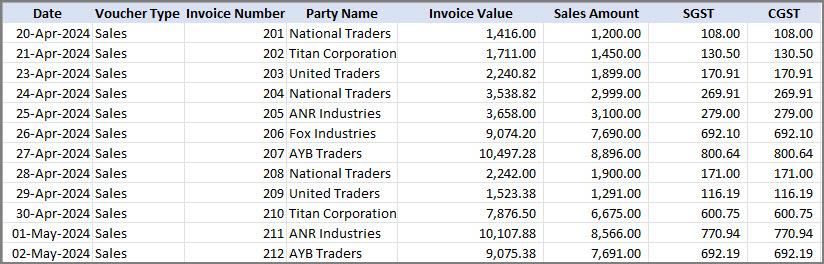
You may have entered the details of the sales vouchers in multiple columns in your Excel file. You may have entered the top ledger and bottom ledger details of the sales vouchers in different columns in your Excel sheet.
You can use the Ledger Entries from Fixed Columns option in the mapping template to easily group and import this data into TallyPrime.
In the Mapping Template Creation screen,
- Map Voucher Type Name, Voucher Date and Voucher Number to the Voucher Type, Date and Invoice Number column headers available in the Excel file.
- Under Field (TallyPrime), from the List of Fields, select Ledger Details from Fixed Columns.
You can then select which Column Headers in your Excel file contain details of the top ledgers in the sales voucher, say Party Name. - Under Field (TallyPrime), select Top Ledger (Party, Cash, Bank, & so on).
The Ledger Name and Ledger Amount are mandatory fields for mapping under this option. - Map the fields in TallyPrime with the corresponding column headers that contain details of the top ledgers in your Excel worksheet.
- Similarly, Under Field (TallyPrime), select Bottom Ledger (Tax, Discount, & so on) for mapping other ledger details like Sales, Taxes, Discount, Expenses and so on.
- Map the fields in TallyPrime with the corresponding column headers that contain details of the bottom ledgers in your Excel worksheet.
- Once you customise the Mapping Template, accept the screen to save the template.
After saving the template, you can use the same to import your transactions into TallyPrime. View the Day Book to view the imported transactions in TallyPrime.
Mapping Template for Sales Vouchers in Multiple Columns without Inventory
You may have entered the details of Sales vouchers without stock items in multiple columns in an Excel. You can easily import this data into TallyPrime.
In the Mapping Template Creation screen,
- Map Voucher Type Name, Voucher Date and Voucher Number to the Voucher Type, Date and Invoice Number column headers available in the Excel file.
- Map Field (TallyPrime) > Change Mode with Column Headers (Excel) > Specify Fixed Field Value > Accounting Invoice.
- Under Field (TallyPrime), from the List of Fields, select Ledger Details from Fixed Columns.
You can then select which Column Headers in your Excel file contain details of the top ledgers in the sales voucher, say Party Name. - Under Field (TallyPrime), select Top Ledger (Party, Cash, Bank, & so on).
The Ledger Name and Ledger Amount are mandatory fields for mapping under this option. - Map the fields in TallyPrime with the corresponding column headers that contain details of the top ledgers in your Excel worksheet.
- Similarly, Under Field (TallyPrime), select Bottom Ledger (Tax, Discount, & so on) for mapping other ledger details like Sales, Taxes, Discount, Expenses and so on.
- Map the fields in TallyPrime with the corresponding column headers that contain details of the bottom ledgers in your Excel worksheet.
- Once you customise the Mapping Template, accept the screen to save the template.
After saving the template, you can use the same to import your transactions into TallyPrime. View the Day Book to view the imported transactions in TallyPrime.
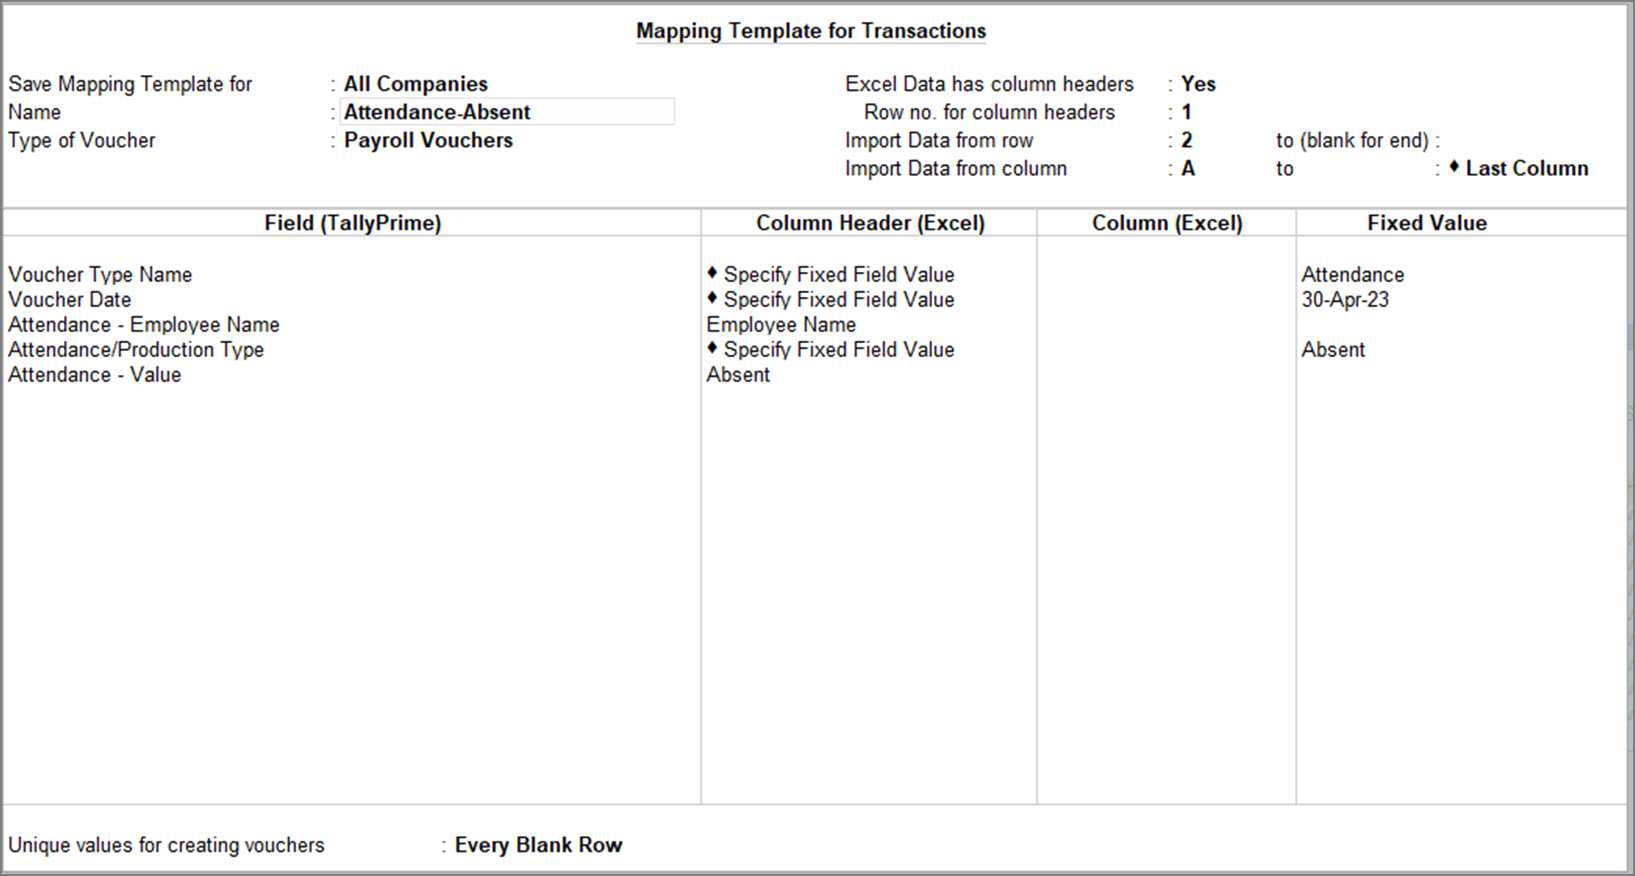
Create Mapping Template for Attendance data
In your business, the employee attendance details maybe stored in Excel files by the Admin/HR department or in an Attendance Machine by Biometric. To process the salaries, you may often need to transfer this data to the Accounts department. With TallyPrime’s Import feature, you can seamlessly import attendance details from Excel files into TallyPrime.
Let’s say you have recorded the Attendance of your employees in the following format:
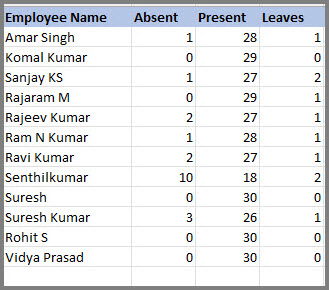
You can create a separate mapping template for each Attendance Type (Absent, Present and Leaves). The value of each Attendance Type will be recorded in separate vouchers.
In the Mapping Template Creation screen,
- Create a mapping template for Voucher Type Name and Voucher Date using the Fixed Field Value option.
- Map Field (TallyPrime) > Voucher Type Name with Column Headers (Excel) > Specify Fixed Field Value > Attendance.
- Map Field (TallyPrime) > Voucher Date with Column Headers (Excel) > Specify Fixed Field Value > set the Voucher Date.
Change the Voucher Date in the Mapping Template every month or alter the Voucher Date in the Attendance Register in TallyPrime.
- Map Attendance related details with the corresponding Excel data.
- Map Attendance – Employee Name with the Employee Name Column Header in your Excel file.
- Select Attendance/Production Type and Specify Fixed Field Value as the status of the Attendance Type, say Absent.
- Map Attendance – Value with the Absent Column Header in your Excel file.
- Set Unique values for creating vouchers as Every Blank Row. This will create single Voucher Type for each Attendance.
The mapping template will appear, as shown below:
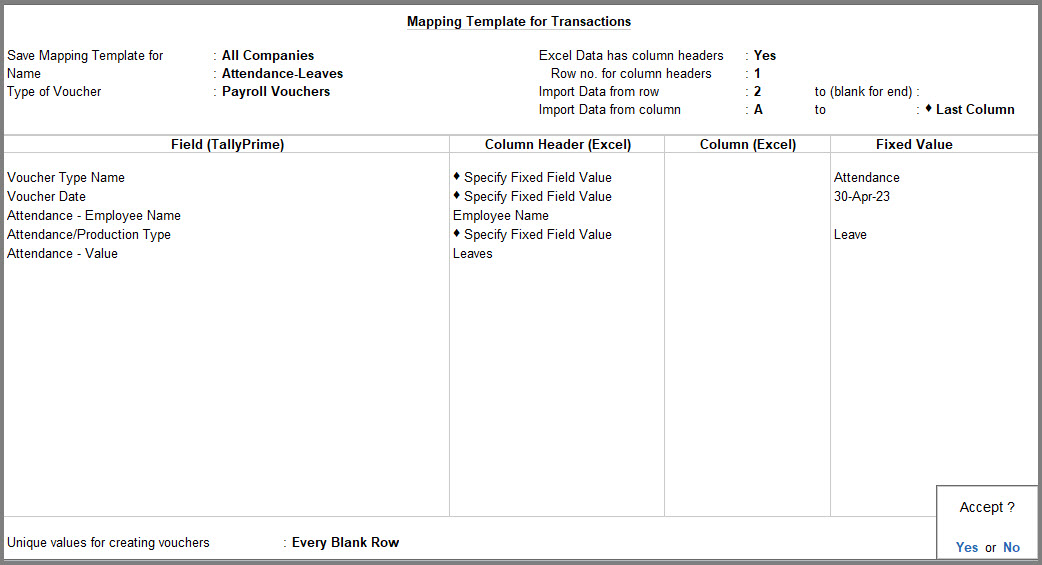
- Similarly, you can create mapping templates for other Attendance types (Present and Leaves).
- Mapping Template for Present:

- Mapping Template for Leaves:

- Mapping Template for Present:
- Once you customise the mapping template, accept the screen to save the template.
- Import the data in TallyPrime by using the respective mapping templates for the attendance data.

- Click the required sample file to download.
- You can download more than one zip files, if needed.
- You can also reach this table by selecting the Other Templates/Sample Files option available from the Import Masters or Import Transactions screen.
- Unzip the file in the downloaded folder.
- Move the mapping template (.tsf file) to the excelmaps folder under the TallyPrime application folder.
 This is needed to list the mapping templates under the List of Mapping Templates, while you select the template for importing data from Excel.It is also recommended that you keep a backup of these templates in a separate folder.
Just fill in the worksheet with relevant data based on your day-to-day transactions or master details, and import using the mapped templates. Isn’t that simple? Moreover, you can use the Excel files as is or make any necessary modifications to record data and alter the corresponding mapping files as needed.
If you are downloading the TSF files for Other Templates/Sample Excel Files for the first time, you must manually create the config > excelmaps folder under the TallyPrime installation folder.
Ensure that you check the Templates and Sample Excel Files and alter them according to the data that you want to import into TallyPrime.
Import Data by using Mapping Templates
You can create and customise your own template as per your business requirements and start the import process. You can manage the mapping template that you have created in TallyPrime. Similarly, if you have downloaded the Other Templates/Sample Excel File for mapping your data, you can manage those templates as well.
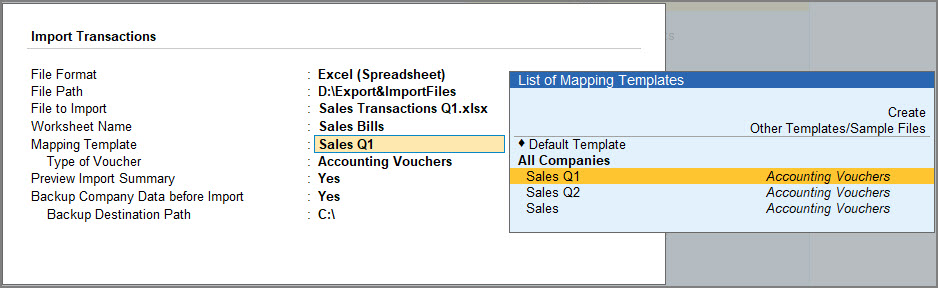
Let’s consider that you need to import the sales transactions data from the worksheet named Sales Bills from the Excel file Sales Transactions Q1.xlsx.
- Press Alt+O (Import) > select Transactions.
The Import Data screen appears. - Provide details of the Excel file from which the data needs to be imported.
- File Format: Select the file format as Excel (Spreadsheet).
- File Path: Prefilled with the location configured under Import > Configuration > Location of Import/Export files. Update the location, if you have the Excel file in a different location.
- File to Import: Select Sales Transactions Q1.xlsx.
- Mapping Template: Select the template you have saved for the selected Excel worksheet Sales Bills.
The Import Data screen appears, as shown below:
- Configure for the impact of import on existing masters using Behaviour of Import is Masters already exists.
- Combine Opening Balance: The Opening Balance of the existing master and the imported master will be combined.
- Ignore Duplicates: Any duplicate of the existing master in Excel format will be ignored.
- Modify with New Data: The imported master will replace the existing master.
- Preview Import Summary: You can see the preview of what will get imported based on the selected file.
- Configure for backup, if needed.
- Backup Company Data before import: Enabling this option will safeguard your Company Data from getting corrupted or lost.
- Backup Destination Path: Specify the location to store the backup of your Company Data.
- Press I (Import) to proceed with importing your masters into TallyPrime.
While importing, if you come across the error message ‘Unable to Read Message for Update’, delete the TMESSAGE.TSF file or move the file to another location.
Depending on the Import configurations you have set, TallyPrime imports the data successfully.
The data that has been successfully imported is displayed in different reports in TallyPrime.
- To view the Masters that got imported, press Alt+G (Go To) > Chart of Accounts > Ledgers.
- To view the Transactions that got imported, press Alt+G (Go To) > Day Book.
Was this article helpful?
That’s Great!
Thank you for your feedback
Sorry! We couldn't be helpful
Thank you for your feedback
Feedback sent
We appreciate your effort and will try to fix the article