Issuing a post-dated cheque is a common practice in every business. After you have issued or received a post-dated cheque you need to record it in your books. You can create a post-dated voucher to record the issue or receipt of a post-dated cheque. You can also view multiple reports for post-dated cheque management, such as Post-dated Transaction Report, Post-dated Issued Report, Post-dated Received Report and so on. All these reports in TallyPrime help you to view the list of post-dated entries you have passed, and the list of post-dated cheques received and issued.
A post-dated cheque is a normal cheque, with the date written for a future date. Such cheques are not payable until the date mentioned on the face of the cheque. In the accounting books of both the issuer and the recipient, either the transaction will not be recorded until the date provided on the cheque or is recorded on the date provided on the cheque and marked as post-dated. You can issue a post-dated cheque for many reasons. For example, when there is a shortage of funds and you need to make payment to your supplier you can issue a post-dated cheque or if you have given a credit period to your customer for 30 days, then you can ask for a post-dated cheque from the customer to ensure that the payment happens in that period.
The features of post-dated cheque management supported in TallyPrime are:
- You can manage all the receivables/payables considering the impact of receipt/issue of post-dated cheques along with real-time accounts. This will aid you in planning your cash flows.
- You can eliminate the need for additional transactions at the time of realisation.
- Avoid delay in revenue realisation by presenting the PDCs on time.
If you have received a post-dated cheque and you are not aware as to which bank you want to deposit the cheque and record the entry in your books, you can always record such entries under Notional Bank. The features of Notional Bank are similar to any other bank ledger, you only need to configure your bank ledger to enable using it as a Notional Bank for post-dated transactions.
Recording of Post-Dated Cheque Entry
When you receive or pay a post-dated cheque, you need to record the same in your books. While recording the transaction, change the current date and enter the date as mentioned in the post-dated cheque and mark the voucher as post-dated. You need to mention the date when you will encash the cheque. Such cheques are not payable until the date written on the face of the cheque.
TallyPrime facilitates the smooth management of post-dated cheques and the underlying transactions:
- You can record the entry mentioning the date as given in the post-dated cheque and mark the transaction as post-dated.
- The transaction will automatically affect the accounting books on the date of the post-dated cheque.
- You can obtain a comprehensive summary of all transactions involving post-dated cheques, using the Post-Dated Summary report.
- You can include post-dated transactions in other accounting reports such as Ledger Vouchers, Group Summary, Outstandings reports, and so on.
In this section
- Create a post-dated voucher
- View current and final balances of a party ledger
- View balance including post-dated transaction
Create a post-dated voucher
While recording the issue or receipt of a Post-dated cheque you need to record the transaction as a post-dated voucher.
![]()
- Press Alt+G (Go To) > Create Voucher > press F5 (Payment).
Alternatively, Gateway of Tally > Vouchers > press F5 (Payment). - Press F2 (Date) to change the Voucher Date and update the date as mentioned in the post-dated cheque.
- In the Payment Voucher screen, press Ctrl+T (Post-Dated).
The voucher will be marked with the status as Post-Dated as shown below:
- Select a bank ledger in the Account field.
- Under Particulars, select the party ledger to whom the post-dated cheque has been issued.
- Provide the Amount and Bill-wise Details for the payment.
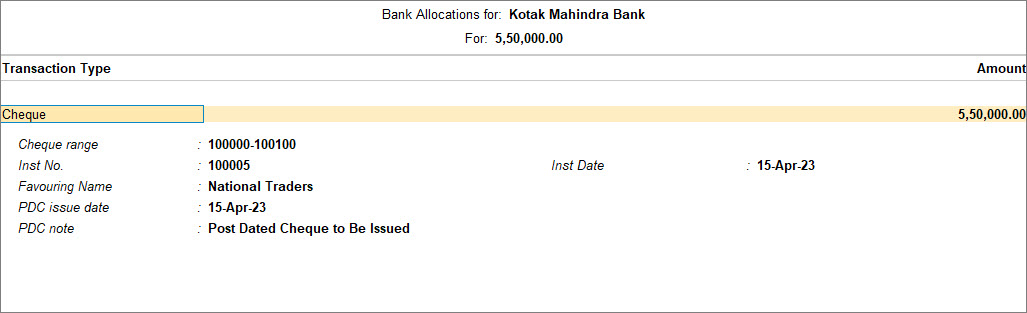
The Bank Allocations screen appears.
The fields PDC issue date and PDC note will be available on the screen. These fields are available for post-dated transactions only and to mention the post-dated notes. - Fill in the date on which the post-dated cheque was issued to the party and fill in the PDC note.

- As always, press Ctrl+A to save the Bank Allocations screen details.
- Accept the voucher. As always, you can press Ctrl+A to save.

Similar to the Payment Voucher, you can also record Receipt and Contra entries for post-dated cheques.
Was this article helpful?
That’s Great!
Thank you for your feedback
Sorry! We couldn't be helpful
Thank you for your feedback
Feedback sent
We appreciate your effort and will try to fix the article