

This page lists frequently asked questions (FAQ) about Licensing in TallyPrime. To learn more about specific error codes, refer to the Error Codes article.
After purchasing TallyPrime, you need to activate your license to enjoy the full benefits of this new and improved product. Apart from a valid license, you would need a Tally Software Services (TSS) subscription to enjoy a broad range of services, such as online e-Way Bill and e-Invoice generation, reports on browser, data synchronisation, and so on. What’s more, TallyPrime also comes with timely reminders that will help you manage your licensing and TSS needs.
License Editions and Options
TallyPrime is mindful of your unique business needs, and accordingly offers you various license editions, such as Silver or Gold, and license options, such as Regular, Rental, or Educational. You can select the best edition or option for your business based on the requirements.
| Check out our License Editions and Options topic to know more. |
License Activation, Reactivation, and Other Activities
Tally creates an account using the e-mail ID provided during license activation. You can use this account for all future communication and licensing activities, such as configuring, reactivating, surrendering, and updating. The license is valid for a lifetime. Depending on your requirements, you can choose a single-site license or a multi-site license.
| Check out our License Activation, Reactivation, and Other Activities topic to know more. |
Tally Software Services (TSS)
Tally Software Services (TSS) is a subscription for a collection of services that add great value to your TallyPrime by giving you the latest developments in technology and statutory laws. Your business performance will be enhanced by leaps and bounds by continuous product upgrades, connectivity-driven functionalities such as online data exchange, seamless banking and payment services, and much more.
License Activation | Reactivation | Surrender | Update
Once you purchase TallyPrime, you need to activate your license to enjoy the full benefits of this new and improved product. Going forward, TallyPrime will help you easily manage other licensing activities such as license surrender, reactivation, configuration, and so on.
To manage licenses, TallyPrime has the concept of site licensing. A site refers to a single license of TallyPrime, TallyPrime Developer, or TallyPrime Server that has been installed and activated. You have the flexibility to choose between two types of site licenses: single-site and multi-site.
Activate License
After purchasing TallyPrime, your first step should be to activate the license, so that you can avail the full benefits of the product. After activation, a Tally.NET account will be created, which you can use for all your licensing needs.
![]()
In this section
Activate Single Site License
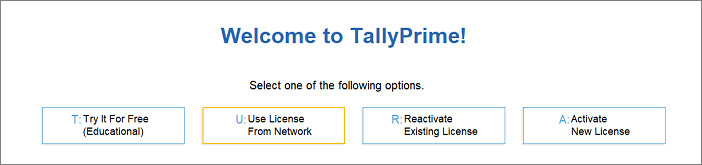
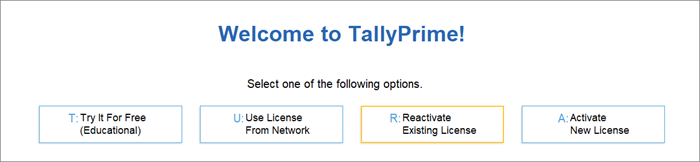
- Start TallyPrime. The Startup screen appears as shown below.

- Press A (Activate New License) in the Startup screen.
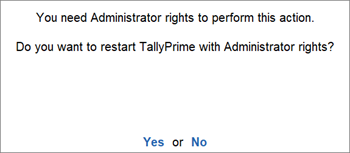
Alternatively, press F1 (Help) > Settings > License > Manage License > F6 (Activate).- If you do not have the rights to activate TallyPrime, then the following screen will appear:

- Press Enter. TallyPrime will restart with administrator rights.
- If you do not have the rights to activate TallyPrime, then the following screen will appear:
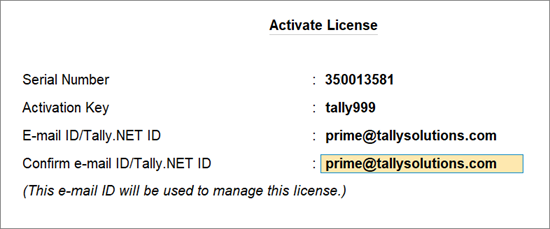
- In the Activate License screen, enter your Serial Number, Activation Key, and Administrator e-mail ID.

The e-mail ID provided here will be linked to your account, and used for all future communication and licensing activities. If you want to use an e-mail ID which is already associated with another license, then you can choose multi-site licensing.
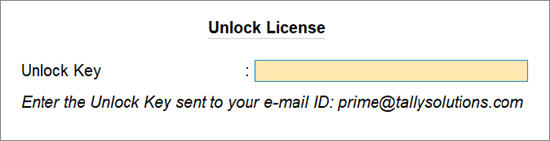
- Press Enter to proceed. The Unlock License screen appears as shown below:

- Enter the Unlock Key sent to your e-mail ID.
If you have not received the unlock key, press F2 (Get Unlock Key).
- Press Enter to unlock your license.
Your license is now active. An activation message will appear as shown below:
Activate Multi-Site License
- Start TallyPrime.

- Press A (Activate New License) in the Startup screen.
Alternatively, press F1 (Help) > Settings > License > Manage License > F6 (Activate).- If you do not have the rights to activate TallyPrime, then the following screen will appear:

- Press Enter to restart with administrator rights.
- If you do not have the rights to activate TallyPrime, then the following screen will appear:
- Press Alt+S (Multi-Site) to view the Site License Activation screen.
- Enter the Serial Number and Activation Key.
- Enter the Account ID to which you want to add this license.
If you are not aware of the Account ID, then contact your Tally administrator. - Enter the Site ID. The Site ID should be a unique name to help you identify this license.
- Enter the e-mail ID/Tally.NET ID of the Site administrator.
The Site administrator is authorised to perform all licensing operations for this Site.
- Press Enter to save. The License screen appears as shown below:

- Click Create New Site to activate the license for a new site.
You can also choose to reactivate an existing Site. - Press Enter to view the Unlock License screen.
- Enter the Unlock Key sent to the site administrator e-mail ID.

- Press Enter to unlock your license.
A confirmation message appears after you unlock your license. You have successfully activated license for a new site in your account.
Use License from Network
When there are multiple users in the network, you need to connect your client computers to the Tally Gateway Server to access the license. Tally Gateway Server is a Windows service that is required to access a licensed version of your Tally product. You can access the license via LAN by connecting your computer to the Tally Gateway Server where the license is active.
You can configure the License by either selecting an available Tally Gateway Server, or by manually entering the details.
In this section
Select License
- Start TallyPrime. The Startup screen will appear as shown below:

- Press U (Use License from Network) in the Startup screen.
Alternatively, press F1 (Help) > Settings > License > Manage License > F4 (Use License from Network).
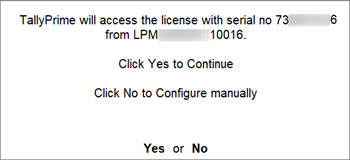
A message appears prompting you to connect to an available license.
- Click Yes to connect to the license. Click Noto configure the license manually.
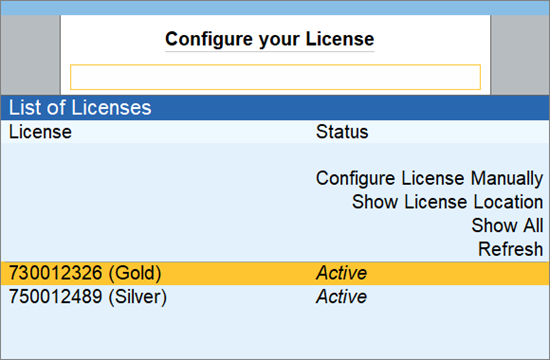
- If you have more than one license, then the following screen appears:

- If you have more than one license, then the following screen appears:
- Select the required license and press Enter.
If a license is in Educational Mode, then the status License Unavailable will be displayed. Click Show All to see all the licenses, including the ones in Educational Mode.
Once you configure the license to the Tally Gateway Server, you will receive a message to restart TallyPrime and apply the changes. Press Enter. Your TallyPrime application now has access to license.
Configure Existing License
If the license that you are looking for is not available, then you can configure your license manually by entering the Tally Gateway Server and port.
- Start TallyPrime.
- Press U (Use License from Network) in the Startup screen.
Alternatively, press F1 (Help) > Settings > License > Manage License > F4 (Use License from Network).
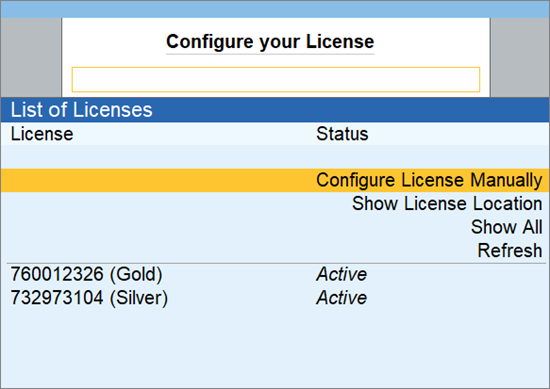
A message appears prompting you to connect to an available license. Click No to configure the license manually. The Configure your License screen appears as shown below:
- Click the Configure License Manually option. The Configure Existing License screen appears.
- Enter the Tally Gateway Server and port, as shown below:

- Press Enter. TallyPrime application connects to the Tally Gateway Server to access the License
Configure Multi-Site License
The Account/Site Administrator can configure or surrender a site belonging to an account. The configuration can be set for each site by the Account/Site administrator. Further, the Account administrator can allow or deny the Site administrator or user from making any changes to the configuration set locally.
In the Licensing and Configuration screen, you can view the details such as the Total Number of Sites, the Number of Active Sites, Site Pending for Confirmation, Number of Sites Not Used, and Number of Sites Surrendered.
For more details, refer to the Control Centre.
Surrender License
If you want to use your TallyPrime license on another computer, then you have to surrender the license from the existing computer. You can surrender the license directly from the applications, or through the Tally website.
You can surrender the License under the following scenarios:
- To upgrade the operating system (OS) of your computer
- To carry out any maintenance activity on your computer
- To upgrade the antivirus or firewall
- To move the Tally Gateway Server to a different computer, path, drive, and so on
In this section
Surrender License from TallyPrime
- Start TallyPrime.
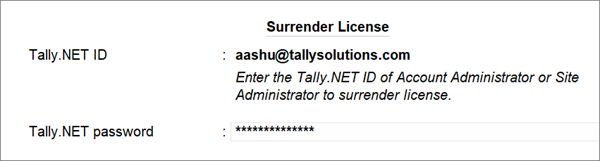
- Press F1 (Help) > Settings > License > Manage License > Ctrl+F7 (Surrender).
- Enter the Administrator e-mail ID and Tally.NET password, as shown below:

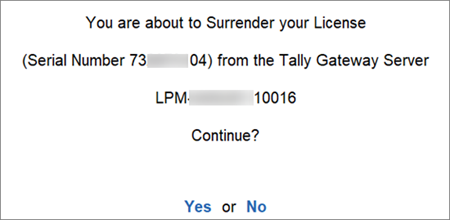
The following screen appears:
- Press Enter to surrender your license.
Once you surrender the license, a confirmation message appears on the screen.
Surrender License from Tally Website
- Log in to the Tally website.
- Go to Control Centre > Account Management > License Management.
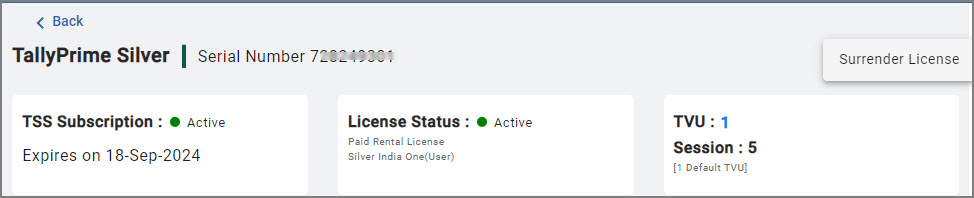
- Click the ellipsis icon under the Actions column and select View/Edit Site Profile.
- In the Site Information screen, click the ellipsis icon and select Surrender License.

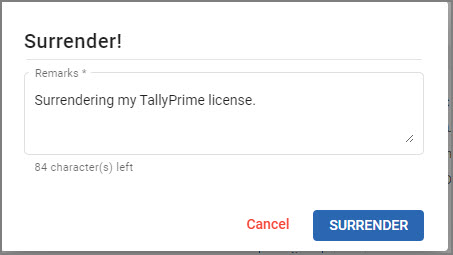
- Click SURRENDER in the confirmation window.

You have surrendered the license successfully.
Reactivate License
If you want to use your TallyPrime license on another computer, then you have to surrender the license and reactivate it on the required computer. However, you will need to reactivate the license on the same computer, if your license has gone into Educational Mode.
Additionally, you can reactivate the license under the following scenarios:
- Your computer is formatted or crashed, and you had to reinstall TallyPrime.
- The operating system has been updated; for example, you have moved from Windows 8 to Windows 10.
- You have moved your Server to a different computer.
In this section
Reactivate Single Site License
- Start TallyPrime.

- Press R (Reactivate Existing License).
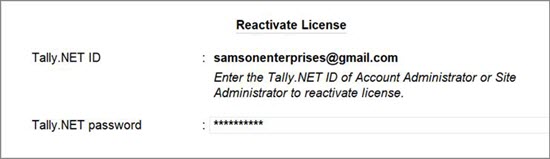
Alternatively, press F1 (Help) > Settings > License > Manage License > F7 (Reactivate). - Enter the Administrator e-mail ID and Tally.NET password, as shown below:

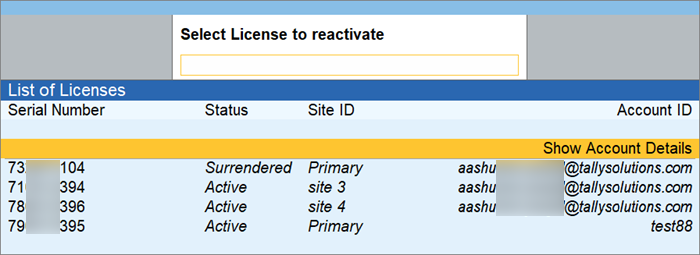
If you are the administrator of more than one site, then the License Reactivation screen displays a List of Sites that you can reactivate, as shown below:
- Select the license and press Enter to reactivate.
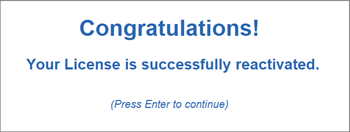
A confirmation message appears once reactivation is successful.
If a multi-user (Gold) license needs to be reactivated/configured, you need to reactivate the server system first and configure the client system using the same license. Do not reactivate the license on the client system.
Reactivate Multi-Site License
If you want to use your TallyPrime license on another server computer, then you have to reactivate it on the required computer. However, reactivation can also be done on the same server computer, if your license has gone into Educational Mode. In case your client computer has gone into Educational mode, then you need to configure the license according to the server computer.
Additionally, you can reactivate the license under the following scenarios:
- Your computer has been formatted or crashed, and you had to reinstall.
- The operating system has been updated; for example, you have moved from Windows 8 to Windows 10.
On your server computer
- Start TallyPrime as shown below:

- Press R (Reactivate Existing License).
Alternatively, press F1 (Help) > Settings > License > Manage License > F7 (Reactivate). - Select the relevant license (as per the Site ID) from the License Reactivation screen.

A confirmation message will appear after successful reactivation of license. - To check the license details, press F1 (Help) > Settings > License > Manage License, or click the top left corner on the screen below the TallyPrime icon.

If the Tally Gateway Server appears as Localhost XYZ, then you can view the computer name by pressing F1 (Help) > About > Computer Name, under the Computer Information section.
On your client computer
- Start TallyPrime.
- Press U (Use License from Network) in the Startup screen.
Alternatively, press F1 (Help) > Settings > License > Manage License > F4 (Use License from Network). - Select the license that was reactivated on the server computer.

- Click Configure License Manually, if the license is not available in the List of Licenses.
- Enter the computer name and the port number of the server computer.

The following message will appear:
- Click Yes. The license configuration in the client computer is successful.
Update License
You may need to update your TallyPrime license due to any of the following reasons:
- If the Tally Gateway Server is not connected to the Internet at least once in 30 days, then the License becomes inactive and switches to Educational Mode.
- In order to use TDL or other configurations linked to your account.
- In order to use Add-ons purchased from TallyShop.
- Renewal of TSS subscription.
- In order to extend the validity of a Rental License.
- When you have purchased additional TVU licenses.
- When you change the License details, such as Account ID and Site ID details.
- When you are converting your Silver license to Gold.
Under such circumstances, the Update feature will reload the status of your TallyPrime license.
- Start TallyPrime.
- Press F1 (Help) > Settings > License > Manage License > F5 (Update).
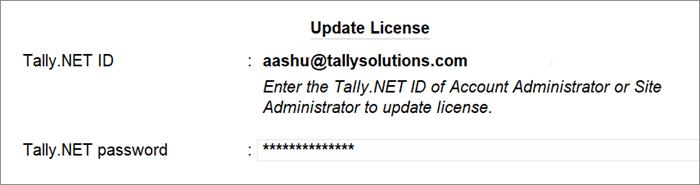
- Enter the Administrator e-mail ID and Tally.NET password in the Update License screen, as shown below:

- Press Enter to update your license.
You have now successfully updated the TallyPrime license.
License Information | Manage License
At any time, you can find about your product mode and the associated Licensing actions that you can perform from Manage License Report. You can navigate to Manage License Report by clicking the product identity that can be found on the top left corner of your Tally Application.

In this section
License Information screen in Licensed mode
Current
- Application Status – Educational/Licensed
- License Error – This field appears only if the application is in Educational mode. And this field provides information on what has caused Tally application to turn to Educational mode.
- Tally Gateway Server – The Gateway Server to which Tally application is currently connected to.
Other License in Network
- This section appears only if the Tally application can automatically identify other Licenses running in the network. If Tally application is in Educational mode and this section appears, then you can select F4: Use License from Network option to configure to gateway having other licenses.
Previous
- This section provides previously used valid license by Tally Application before it turns into educational mode.
Remote License Information
- It provides the Serial Number and Tally.NET ID of the logged-in user. In case there are multiple serial numbers associated to the Tally.Net ID, the serial number will be displayed as Multiple.
Manage License report also provides you to perform various License actions. The actions are:
- F4: Use License from Network: This button provides you with the list of Valid License available in the LAN network and connect to it. If the license you want to connect is not available in the list, you can configure it manually as well.
- F5: Update: This appears if the Tally Gateway to which your Tally Application is pointing needs to have a license. You can use Update to update your license information from Tally License data base to your Tally Application.
- Ctrl+F5: Refresh: This button helps you to refresh the information of License from gateway server to the client. To do that, it restarts the TallyPrime client as well.
- F6 Activate: This appears only if the Tally Gateway to which your Tally Application is pointing do not have any license. You can Activate a new License using this button.
- F7 Reactivate: This button is available when the license is not available at the Tally gateway server. You can reactivate an existing license.
- Ctrl+F7 Surrender: This button is available when the license is available at the Tally gateway server. You can surrender the license.
- F9: Renew TSS/Renew Rental: This button is available when the license is available at the Tally gateway server. You can renew your TSS/Rental validity with this.
- Ctrl+F9: Buy TVU: This button is available when the license is available at the Tally gateway server. You can purchase TVU with this. After this you need to Update (F5) the license.
- F10: Buy New License: This button helps you to reach to the buy page of Tally website. You can buy a new license there.
- Ctrl+F10: Change Edition: This button is available when you are using a rental license. You can change the license edition from Silver to Gold or Gold to Silver. One day of Gold license is counted as three days of Silver license and vice versa.
License Information screen in Educational mode
When you license is in educational mode, the following screen is displayed, where:
- Application Status is shown as Educational Mode
- License Error is shown as Unable to find License
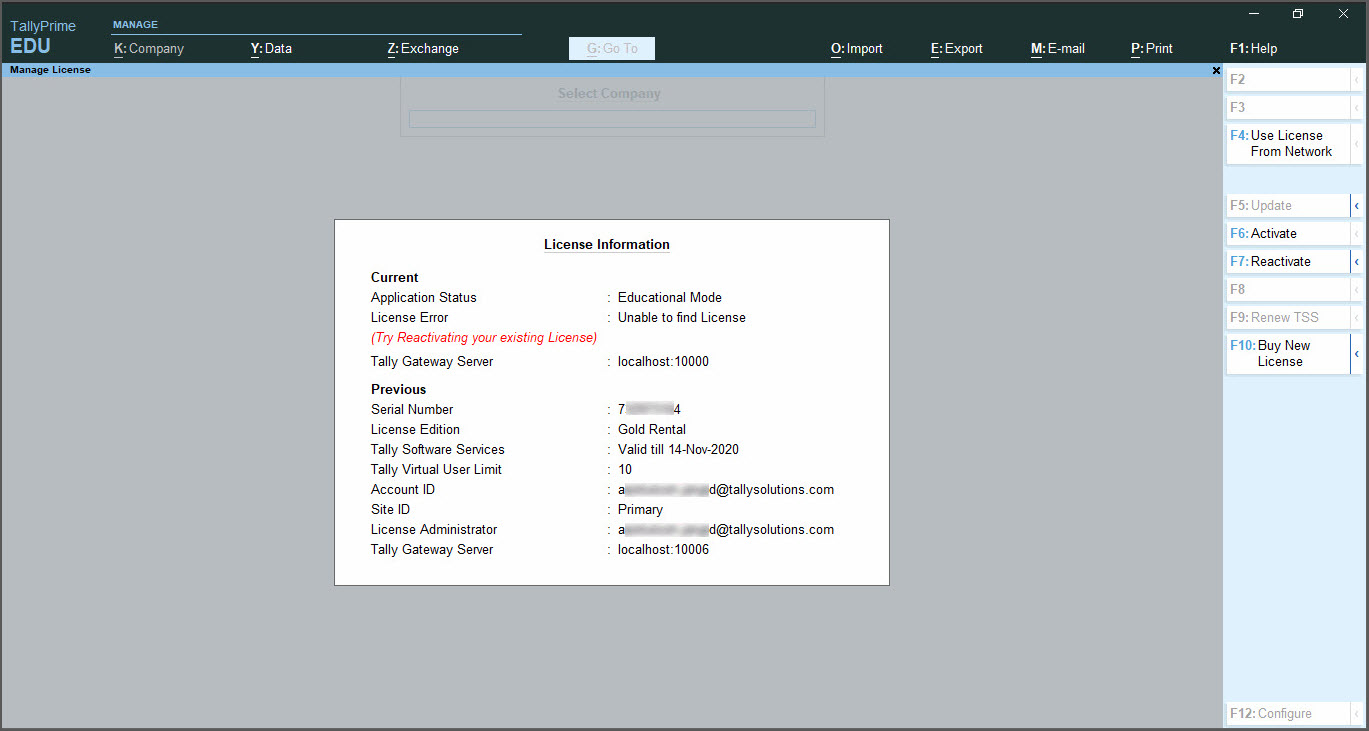
In such a case, the following message appears below License Error field:
- Try Reactivating your existing License
License Editions and Options
TallyPrime is mindful of your unique business needs, and accordingly offers you various license editions, such as Silver or Gold, and license options, such as Regular, Rental, or Educational. You can select the best edition or option for your business based on the requirements.
Editions
Silver Edition (Single User): The Silver edition is a single-user license. Only one user can access the license at a time in a LAN environment. If another user has to access the same license, then you have to close all other instances of TallyPrime currently using the license.
Gold Edition (Multi-User): The Gold edition is a multi-user license. Multiple users can access the license at the same time in a LAN environment. You can use TallyPrime Server along with TallyPrime to manage the concurrent usage of company data. TallyPrime Server also provides a secure environment for your company data.
Options
Regular: Using a regular license, you can use TallyPrime on your computer forever. When you purchase any edition of the product, you will get free product updates and TSS for a year. Thereafter, you have to renew TSS once a year to get continuous product updates and other services.
Rental: Using a rental license, you can avail the license for a certain period, such as one, three, or twelve months, and use TallyPrime on your computer. Thereafter, you can extend the rental period by renewing TSS, or you can buy a regular license.
Educational: In the Educational Mode, you can use TallyPrime on your computer, but with certain limitations. For example, you can enter data only for the 1st, 2nd, and final days of a month. However, you can use all the features of TallyPrime in this mode.
Site Licensing
To manage licenses, TallyPrime has the concept of site licensing. A site refers to a single license of TallyPrime, TallyPrime Developer, or TallyPrime Server that has been installed and activated. You have the flexibility to choose between two types of site licenses: single-site and multi-site.
Single site: A single license of TallyPrime, TallyPrime Developer, or TallyPrime Server is called a single site. The licensing operations are managed by the administrator.
Multi-site: In multi-site licensing, more than one license of TallyPrime, TallyPrime Developer, or TallyPrime Server are activated on different machines or locations, associated to a primary account. Each site is given a unique identification by the user, which is called a Site ID.
Tally Software Services (TSS)
Tally Software Services (TSS) is a subscription for a collection of services that add great value to your TallyPrime by giving you the latest developments in technology and statutory laws. Your business performance will be enhanced by leaps and bounds by continuous product upgrades, connectivity-driven functionalities such as online data exchange, seamless banking and payment services, and much more. Check out our Tally Software Services (TSS) topic to know more.
Tally Virtual User (TVU)
TVU technology will help you access your TallyPrime anywhere, anytime. Using a valid TVU pack, you can access TallyPrime running on a virtual environment using tools like Windows RDP, Windows Thin Client, Citrix, or similar technologies. Check out our Tally Virtual User (TVU) topic to know more.
Benefits of Using Licensed Version of TallyPrime
- Record transactions on all days of a month: Having a valid license allows you to enter data for your transactions for all days of any month. Without a valid license, TallyPrime runs in Educational Mode, where you can enter data only for the 1st, 2nd, and 31st of any month.
- Avail TSS subscription: With a valid license, you can subscribe to TSS and enjoy the benefits of TSS subscription.
- Ensure reliability of data: Using a licensed version of TallyPrime ensures the product is genuine and your data remains reliable and secure.
Licensing – FAQ
TallyPrime Turned to Educational Mode on the Server Computer or Client Computer
Your TallyPrime license may turn to Educational Mode due to different reasons. You can resolve the issue in most of the situations by referring to the solutions listed on this page.
Change in Microsoft Windows Version
If you have upgraded to Microsoft Windows 11 or later versions, you might experience licensing issues, where the TallyPrime license can turn to Educational Mode.
Here is what you can do to get your license up and running again.
- Delete the license file:
- Press F1 (Help) > About, and click Application path. The TallyPrime folder will open.
- Delete the license file (tallyprime.lic).
- Restart Tally Gateway Server:
- Press Windows + R to open the Run command window.
- Enter services.msc. The Services window will open.
- Go to Tally Gateway Server, right-click, and select Restart.
- Reactivate your license:
After deleting the License file and restarting Tally Gateway Server, you only have to reactivate your TallyPrime License, and you are good to go!
TallyPrime Turned to Educational Mode on the Server Computer
Your TallyPrime may turn to Educational Mode on the server computer due to the reasons listed below. You can check the cases one after the other to identify your situation and follow the instructions to resolve the issue. These cases are applicable for Silver and Gold editions.
Case 1: Message – The license is compromised
Reason: Reactivated the same license for multiple instance of TallyPrime on the same computer or on different computers.
Single User
- You cannot use a single user license concurrently on different computers. If you want to use the license on another computer, configure the license on the second computer by closing all instances of TallyPrime on the computer on which the license is active.
Multi-User
- If you have a Multi-user license, activate the license on a Server and configure all the clients to point to the server computer.
- If there are multiple releases, always activate the license on the latest release and configure all other clients to it.
Case 2: Change of computer
Reason: Server computer is formatted, hard disk is changed, and so on.
Solution: Reactivate the license.
Case 3: Missing TallyPrime.lic file
Reason: The file TallyPrime.lic is not available or is deleted from the TallyPrime installation folder.
Solution: Reactivate the license.
Case 4: Change in Windows version (other than Windows 11)
Reason: Windows upgraded to a newer version.
Solution: Reactivate the license.
Case 5: Message – Unable to access the license. The license is offline.
This message appears on the start-up page or on License info screen.
Reason: License is inactive as the system was not connected to the internet.
Solution: Connect to the Internet and refresh the license.
Case 6: Message – The Rental license has expired.
Solution: Renew your rental license or upgrade to a regular license and reactivate your license.
Case 7: Message – License invalid in this release.
Reason: TSS has expired and license is reactivated on a later version, which you are not eligible for based on your TSS.
Solution: Renew the TSS to reactivate in the latest release or roll back to an eligible release.
Case 8: Message – Silver license with serial number “xxx” is in use on “System name”. Exit all instances of TallyPrime & try again.
Reason: The Silver license is used on another computer in the network.
Solution: Close the TallyPrime application running on the other computer, and refresh the license on your computer.
Case 9: The Gateway service is not running
You can follow either of the two methods given below to ensure that the gateway service is running.
Method 1: If the Tally Gateway Server is stopped, start the service
- Press Windows+R > type services.msc and press Enter. The service management window opens.
- Check the status of Tally Gateway Server. If it has stopped, right-click and Start the service.
If more than one Tally Gateway Server exists, uninstall the unused gateway servers.
Method 2: If the gateway service stops intermittently, configure the recovery options at the Service level
Licensing – Errors & Resolutions
This section lists all the error codes and error messages that can appear while installing and using your TallyPrime license and their corresponding resolutions, to ensure that you have a seamless experience of the product.
Installation
Listed below are the error codes that you might receive during license installation.

Activation/Surrender/Reactivation
Listed below are the error codes that you might receive during license activation, surrender, or reactivation.
Rental License
Listed below are the error codes that you might encounter with regards to a rental license.
Connectivity
Listed below is the list of error codes you might encounter when experiencing connectivity issues.
Licensing Configuration
Here is a list of possible error codes that may appear while performing licensing configuration in TallyPrime.
TallyPrime Gateway Server
Listed below are the error codes you may encounter when configuring the TallyPrime Gateway Server.
TallyPrime License
Listed below are the error codes that you may encounter during license configuration in TallyPrime.
Error Messages and Resolutions
This section lists all the error messages that can appear while installing and using your TallyPrime license and their corresponding resolutions, to ensure that you have a seamless experience of the product.


Add IP Addresses, URLs, and Hostnames to Windows Proxy or Firewall Exceptions List
When you work in a secured network environment Proxy or Windows Firewall will restrict requests and responses from certain IP addresses or hostnames. To overcome this, whitelist these IP addresses, URLs, and hostnames by adding them to Windows Proxy or Firewall Exceptions list. As a result, you can bypass Proxy or Firewall when accessing these addresses.
To seamlessly enjoy Tally Software Services (TSS) and other services like e-Way Bill, e-Invoice, banking, Tally product licenses, TallyShop, customer portal, and so on, list the required URLs as exceptions in the Windows Proxy and Firewall. Thereafter, Proxy or Firewall will not block the services from such URLs, and will allow requests and responses from such servers.
Adding IP addresses, URLs, and hostnames to Windows Proxy or Firewall Exceptions will help in resolving potential issues in:
- Connecting company to Tally.NET
- Opening TallyShop
- Connectivity for synchronisation
- Product update (Capsule download)
- Activation or reactivation of license
You may add either the URL or the IP address in the Proxy or Firewall Exceptions list. In case you need to add the IP address, you can find the IP address using the URL.
List of IP Addresses, URLs, Hostnames, and Ports for Different Services
Whitelist the following URLs or hostnames and IP addresses in your Firewall or Proxy settings to seamlessly avail the services provided by Tally. For that, you have to identify the required IP addresses or URLs for the services you need and add them to Windows Proxy or Firewall Exceptions.
Tally Servers – Firewall Exceptions
| URL | Services |
| *.tallysolutions.com | e-Way Bill, e-Invoice, License Service, TSS Renewal, TallyShop, Tally Reports in Browser, Customer Portal on Tally Website |
| *.tallyenterprise.com | Synchronisation, Remote Access, Banking Services, Capsules for Product Update, TCS, TDS, Banking, and so on |
If your firewall does not allow you to use wildcards like * in the Exceptions list, then you can add the specific URLs listed in the tables below. You just need to add the URLs for the services that you want to avail.
Tally Servers – Proxy Exceptions
| URL | Port | Services |
| *.tallysolutions.com | 80 | License Service, TSS Renewal, TallyShop |
| *.tallysolutions.com | 443 | e-Way Bill, e-Invoice, Tally Reports in Browser, Customer Portal on Tally Website |
| *.tallysolutions.com | 9009 | Tally Reports in Browser |
| *.tallyenterprise.com | 80 | Synchronisation, Remote Access, Capsules for Product Update, TCS, TDS, Banking, and so on |
| *.tallyenterprise.com | 9050 | Synchronisation, Remote Access |
In case your network policies do not allow you to use wildcards like * in the Exceptions list, then you can add the specific URLs listed in the tables below. You just need to add the URLs for the services that you want to avail.
e-Way Bill Services
| URL | IP Address | Port |
| (Applicable to TallyPrime Release 2.0 onwards) | Multiple IP addresses | 443 |
e-Invoice Services
| URL | IP Address | Port |
| einvoice.tallysolutions.com | Multiple IP addresses | 443 |
einvoice-demo.tallysolutions.com (To use e-Invoice sandbox services) | Multiple IP addresses | 443 |
License Service, TSS Renewal, and TallyShop
| URL | IP Address | Port |
| experts.tallysolutions.com | Multiple IP addresses | 80 |
| licensing.tallysolutions.com | Multiple IP addresses | 80 |
Tally Reports in Browser
| URL | IP Address | Port |
| browser.tallysolutions.com | Multiple IP addresses | 9009 and 443 |
| tallysolutions.com | Multiple IP addresses | 443 |
| browser1.tallysolutions.com | 3.6.186.43 | 9009 and 443 |
| browser2.tallysolutions.com | 13.126.1.106 | 9009 and 443 |
| browser3.tallysolutions.com | 3.6.203.219 | 9009 and 443 |
Customer Portal on Tally Website
| URL | IP Address | Port |
| customer.tallysolutions.com | Multiple IP addresses | 443 |
| iam.tallysolutions.com | Multiple IP addresses | 443 |
Synchronisation and Remote Access
| URL | IP Address | Port |
| tallynet.tallyenterprise.com | 180.179.20.215 | 80 |
| tallynet.tallyenterprise.com | 180.179.20.208 | 80 |
| trb001.tallyenterprise.com | 180.179.20.103 | 80 |
| trb002.tallyenterprise.com | 180.179.20.141 | 80 |
| trb003.tallyenterprise.com | 180.179.20.153 | 9050 |
| trb004.tallyenterprise.com | 180.179.20.154 | 80 |
| trb005.tallyenterprise.com | 180.179.20.155 | 80 |
| trb006.tallyenterprise.com | 180.179.20.194 | 80 |
| trb007.tallyenterprise.com | 180.179.20.213 | 80 |
| trb008.tallyenterprise.com | 180.179.20.214 | 80 |
| trb009.tallyenterprise.com | 203.112.143.45 | 9050 |
Capsules for Product Update, TCS, TDS, Banking, and so on
| URL | IP Address | Port |
| tallynet.tallyenterprise.com | 180.179.20.215 | 80 |
| tallynet.tallyenterprise.com | 180.179.20.208 | 80 |
| cds001.tallyenterprise.com | 180.179.20.172 | 80 |
| cds002.tallyenterprise.com | 180.179.20.209 | 80 |
Banking Services
| URL | IP Address | Port |
| tallynet.tallyenterprise.com | 180.179.20.215 | 80 |
| tallynet.tallyenterprise.com | 180.179.20.208 | 80 |
| bis001.tallyenterprise.com | 180.179.20.29 | 80 |
| bis002.tallyenterprise.com | 180.179.20.31 | 80 |
Find IP Address Using URL
You may add either the URL or the IP address in the Proxy or Firewall Exceptions list. In case you need to add the IP address, you can find it using the URL.
For example, you can find the IP address for e-Way Bill or e-Invoice services using the following procedure. However, this procedure does not apply to the e-Invoice demo URL used for sandbox services.
- Open Command Prompt.
Either search for Command Prompt or enter cmd in the Windows search bar and select Command Prompt.
If you do not see the Windows search bar, click the Start button at the bottom-left corner of your desktop. - In the Command Prompt window, enter nslookup ewaybill.tallysolutions.com or nslookup einvoice.tallysolutions.com.
 Address – Refers to the IP address of your computer.
Addresses – Refers to the IP address of the URL provided.
Add Tally Server URLs to Windows Proxy Exceptions
![]()
- Go to Control Panel > Internet Options > Connections.
- Click LAN Settings > Use proxy server for your LAN > Advanced.
- Specify the proxy address to use.
- Under the Exceptions section, type *.tallysolutions.com:80; *.tallysolutions.com:443; *.tallysolutions.com:9009; *.tallyenterprise.com:80; *.tallyenterprise.com:9050;, as shown below.

- Click OK.
- On the Local Area Network (LAN) Settings screen, click OK.
- On the Internet Properties screen, click OK.
Hereafter, the Proxy will allow requests and responses from all Tally servers under tallysolutions.com and tallyenterprise.com.
You can follow the same steps to add specific URLs for the services that you want to avail. Refer to the List of URLs, IP Addresses, and Ports for Different Services for the complete list.
Add IP Addresses or URLs in Third-Party Firewall Exceptions
In case you are using third-party tools for network security, then you have to add the required IP addresses, URLs, and hostnames to the Firewall Exceptions. Refer to their official sites for the required procedures.
Add TallyPrime EXE and Ports to Firewall Exceptions List
To ensure that TallyPrime functions seamlessly on your computer you need to whitelist the program files and relevant ports. For this, add TallyPrime EXE and ports to the Firewall Exceptions list. You can follow similar steps in Windows 7, Windows 8, Windows 10 and Windows 11.
Add TallyPrime EXE to Windows Firewall Exceptions List
![]()
- Go to Control Panel > Windows Defender Firewall > Advanced settings.
The Windows Defender Firewall with Advanced Security on Local Computer screen appears. - Define Inbound Rules.
- Click Inbound Rules.
- Under Actions > Inbound Rules, click New Rule.
The Rule Type screen appears. - Select Program and click Next.
The Program screen appears.
- Select This program path.
- Click Browse to specify the program file on your computer.
- Click Next.
The Action screen is displayed to specify the action for the rule. - Select Allow the connection and click Next.
The Profile screen is displayed to specify the profile for which this rule applies.
- Select the required options, and click Next.
The Name screen appears.
- Enter the Name and the Description (optional), if required.
- Click Finish.
The Inbound Rules list will display the new rule created, as shown below.
- Similarly, select Outbound Rules and define the rules.


Hereafter, the specified TallyPrime program files will be excluded from screening by Windows firewall.
Add Ports to Windows Firewall Exceptions List
![]()
- Go to Control Panel > Windows Defender Firewall > Advanced settings.
The Windows Defender Firewall with Advanced Security on Local Computer screen appears. - Define Inbound Rules.
- Click Inbound Rules.
- Under Actions > Inbound Rules, click New Rule.
The Rule Type screen appears. - Select Port and click Next.
The Protocol and Ports screen appears.
- Under Does this rule apply to TCP or UDP?, select TCP.
- Under Does this rule apply to all local ports or specific local ports?, select Specific local ports.
- Enter the port number that you want to exclude and click Next.
The Action screen appears. - Select Allow the connection and click Next.
The Profile screen appears.
- Select the required options and click Next.
The Name screen appears.
- Enter the Name and the Description (optional), if required.
- Click Finish.
The Inbound Rules list will display the new rule created, as shown below.
- Similarly, select Outbound Rules and define the rules.

Hereafter, the specified ports will be excluded from screening by Windows firewall.
Add TallyPrime Data Extensions in Antivirus Exceptions List
If you are using antivirus software, it could lead to potential interference with your TallyPrime company data due to safety protocols. This interference may cause performance issues and interruptions within TallyPrime data as the antivirus scans these files. To overcome this issue, you can configure your antivirus software to exclude specific file types or folders related to TallyPrime. Antivirus programs often have settings that allow you to create exceptions or exclusions.
The entire process involves,
- Identifying and locating your TallyPrime data extensions that are to be excluded from the antivirus scan
- Adding the TallyPrime data extensions to the exceptions list of the antivirus
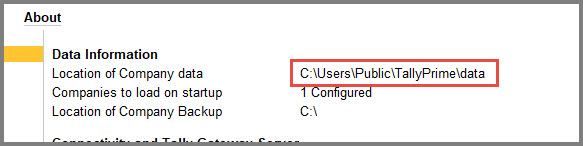
- Locate and note the TallyPrime company data extensions.
Gateway of Tally > F1 (Help) > About and press Enter.
About screen opens.
Under Data Information you can see Location of Company data.
- Note down the company data location path.
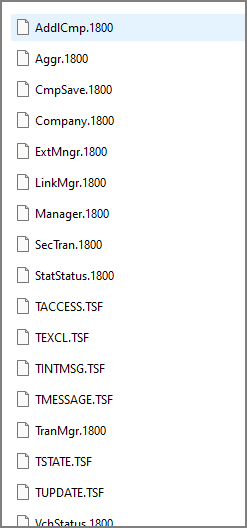
- Open this path on your local desktop and identify the .1800 and .TSF data extensions located in the data folder that are to be added to the antivirus exceptions list.

Add TallyPrime company data extensions to the antivirus exceptions list.
Open your antivirus software and look for settings or options related to “Exclusions,” “Exceptions,” or “Allow List.”
This feature is usually found within the settings or configuration menu.Add TallyPrime company data extensions to the exceptions list.
Within the exclusions or exceptions settings, there should be an option to add files or folders to be excluded from scanning.
Specify the data extensions ( .1800 and tsf files) used by TallyPrime via the company data location path noted earlier.
After adding the necessary company data extensions, save the changes in your antivirus settings.
Some antivirus software might require a system restart for the changes to take effect.
The steps may vary based on the software. It is recommended to refer to your antivirus software’s documentation or support resources for precise instructions tailored to the version you’re using, as the steps may vary between different antivirus programs.
Exclude TallyPrime Program and Ports from Third-Party Firewall
In case you are using third-party tools for network security, then you have to add the program files and ports to the Firewall Exceptions list. Refer to their official site for the required procedures.
Was this article helpful?
That’s Great!
Thank you for your feedback
Sorry! We couldn't be helpful
Thank you for your feedback
Feedback sent
We appreciate your effort and will try to fix the article