Having a consolidated list of all the accounting masters in TallyPrime can save a lot of time while looking for a particular accounting master or any information related to it. To make your job easier, the Chart of Accounts in TallyPrime provides you with an index or list of all masters, such as accounting, inventory, payroll, and so on, created within the Company along with the information related to those masters. What’s more? You can also stay abreast with the necessary information about the party, opening balance in masters, quantity and value of stock items, and other masters.
In the Chart of Accounts of TallyPrime, you can create multiple masters from a single screen, which speeds up your data entry process. Furthermore, the facility to alter multiple masters helps you avoid the need to open specific masters to enter the data. The Chart of Accounts also helps you to identify the unused masters and delete them in one shot. Moreover, if Edit Log is enabled, then you can view masters that were altered or deleted from your Company.
View Financial Accounts with Chart of Accounts
You can view Chart of Accounts in TallyPrime for any type of master such as ledgers, stock items, stock groups, and others, and you can also change the view, as needed.
For instance, you can view Chart of Accounts for ledgers.
- Press Alt+G (Go To) > type or select Chart of Accounts > select Ledgers and press Enter.
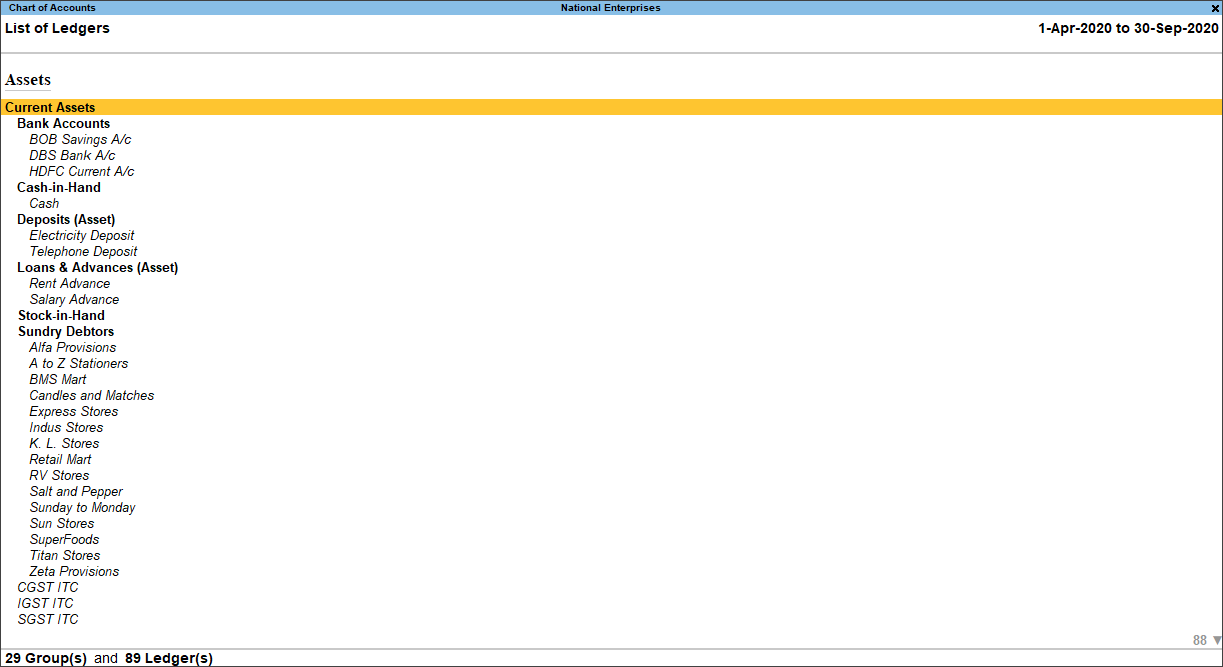
Alternatively, Gateway of Tally > Chart of Accounts > Ledgers and press Enter. At the highest level, accounts are classified into Capital or Revenue – and more specifically into Assets, Liabilities, Income and Expenditure.
Moreover, the report opens as per the accounting groups under which the ledgers are created. - Press F2 (Period) to change the Period, if needed.
- View the report, as needed.
- Press F12 (Configure) and view with Name Only, Alias Only, Name (Alias), and Alias (Name), as needed.
- Press F10 (Other Master) > select the master for which you want to view the report and press Enter.
- Press F5 (Ledger View).
Alternatively, press Ctrl+H (Change View) > Ledger View and press Enter.
This helps you get information such as accounting groups of the respective ledgers, State Name, GST Registration Type, GSTIN/UIN, and Opening Balance.The Change View option using F5 or Ctrl+H is provided for Ledgers (Ledger View) and Stock items (Stock Item View). In all other masters, Ctrl+H (Change View) is not relevant and therefore, inactive. However, pressing F5 enables you to view report in the Condensed and Detailed form.
- Press F5 (Group View) to switch back to the default view.
Validate Changes and Deletion of Masters
In TallyPrime Edit Log and TallyPrime Release 2.1 and later releases, when Edit Log is enabled, your auditor or you can view altered and deleted masters in Chart of Accounts.
If you want to enable Edit Log in TallyPrime, then refer to the Create a Company section in the Setup Your Company topic.
- Open Chart of Accounts.
- Press Alt+G (Go To) and type or select Chart of Accounts and press Enter.
Alternatively, Gateway of Tally > Chart of Accounts > Ledgers and press Enter. - Type or select Ledger press Enter.
- Press Alt+G (Go To) and type or select Chart of Accounts and press Enter.
- Press Ctrl+B (Basis of Values).
The Basis of Values sub-screen appears.
By default, the report is configured for All Ledgers (Altered & Non-Altered). - Configure Chart of Accounts to view Altered ledgers.
- Select Show Report for and press Enter.
 The Report Details screen appears.
 - Press Enter on Altered Ledgers.
Consequently, the option Include Deleted Ledgers will also be set to Yes. This will include the ledgers that you have deleted in TallyPrime with Edit Log enabled. Press Enter to set it as No, if you do not want to view the deleted ledgers.
- Press Enter on Non-Altered Ledgers and the report will open for ledgers that are never altered in TallyPrime.
Consequently, the option Include Deleted Ledgers will be set to No. You cannot set it to Yes, if you are viewing the report for Non-Altered Ledgers, as deletion is also a form of alteration. - Press Ctrl+A.
The List of Altered Ledgers appears as shown below.
- Select Show Report for and press Enter.
Similarly, you can view the Chart of Accounts for Altered and Deleted stock items and groups.
To view Edit Log for masters, refer to the following sections:
- View Edit Log for Ledgers section in the Ledgers in TallyPrime topic.
- View Edit Log for Stock Items section in the Manage Your Stock Items topic.
- View Edit Log for Groups section in the Groups in TallyPrime topic.
Create/Alter Multiple Masters on Single Screen
You may have a list of Ledgers or Stock Items to be created in a Company. Chart of Accounts provides you with a facility so that you can create multiple masters on a single screen, thereby easing the data entry process and saving a great deal of time. It also provides you with the flexibility to create masters of different types based on the parent group.
Quickly set up Opening Balance Sheet
- Press Alt+G (Go To) > Chart of Accounts > Ledgers > press Enter.
Alternatively, Gateway of Tally > Chart of Accounts > Ledgers and press Enter. - Press Alt+H (Multi-Masters) > Multi Create and press Enter.
- In the Multi Ledger Creationscreen, provide the required ledger details.
- Under Group: Press Backspace to change the parent group, if needed. By default, the primary group for ledger creation is set as All Items. You can also press Alt+H (Change Parent Group) to alter the group.
- Name of Ledger: Enter the ledger name.
- Under: Select the parent group for that ledger from the List of Groups.
If you have selected a specific parent group in Under Group, the Under field gets prefilled in each row without you having to select the group again. Press Alt+C to create a parent group if needed.
- Enter the Opening Balance.

- To provide other details based on the ledger you have created, press Ctrl+I(More Details).
- If you are creating a Bank ledger, under More Details, select Bank A/c Details or Bank Configurations.
- If you are creating a Party Ledger, you can similarly select Mailing Details or Contact Details.
The details will be added to the selected ledger.
- Once you have provided the details for all the ledgers, as always, press Ctrl+A to save.
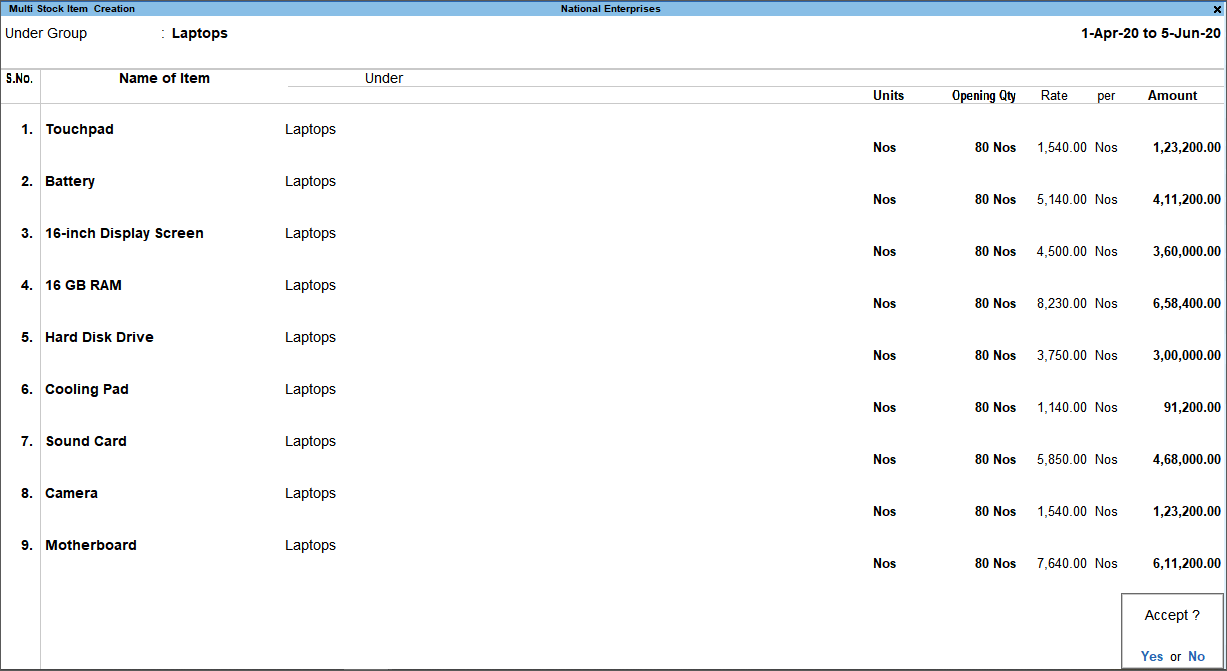
Quickly Setup Opening Stock Summary
- Press Alt+G (Go To) > type or select Chart of Accounts > Stock Items and press Enter.
Alternatively, Gateway of Tally > Chart of Accounts > Stock Items and press Enter. - Press Alt+H (Multi-Masters) > select Multi Create.
- Select the stock group in the field Under Group.
- All Items: If you need to assign different stock groups for each stock item that you are creating.
- An existing group: If you are creating multiple stock items under an existing stock group.
- Create: If you need to create a new stock group under which you will be creating multiple stock items.

You can add any number of sub-groups to an already created or selected group. The sub-groups inherit the characteristics of the parent groups.
- Enter the Name of Items, Units, Opening Qty, Rate, and Amount, as applicable to the stock items you want to create.
- Accept the Multi Stock Item Creation screen.
As always, press Ctrl+A to save.
Alter Multiple Masters
You may want to update the details such as Opening Balance of ledgers or Opening Quantity of stock items. You may also want to update the group of specific ledgers or assign units to some stock items in which the unit was not specified at the time of stock item creation. You do not have to go to each master individually.
Chart of Accounts has a facility to alter multiple masters on a single screen, which eases the data entry process and saves a great deal of time.
Say you want to change the Bank A/c Details for your bank ledger.
- In Chart of Accounts, press Alt+H (Multi-Masters) > Multi Alter > press Enter.
- Select the bank ledger, press Ctrl+I (More Details) > Bank A/c Details > alter the required details.
Similarly, you can alter other details quickly without having to open the ledgers individually.
You can also select a ledger name, press Ctrl+Enter to open the Ledger Alteration screen and make necessary alterations.
Use Ledgers from another Company
In your business, you might be opening a new branch or office at a specific location and therefore, want to maintain the transactions from the new branch separately. In this case, if you need to use the same set of ledgers and stock items that you are already using in the main branch, you can reuse them without any hassle. Simply export the existing company masters and import them to the new company for the new branch. Remove the opening balances from all the ledgers and stock items in one shot. Thereafter, enter the opening balances applicable to the new branch or office.
- Press Alt+G (Go To) > type or select Chart of Accounts > Ledgers and press Enter.
Alternatively, Gateway of Tally > Chart of Accounts > Ledgers and press Enter. - Press Alt+H (Multi-Masters) > Multi Alter > All Items or select the group from the List of Groups and press Enter.
The Multi Leger Alteration screen appears. - Press Alt+B (Zero Opening Balance).

- Press Ctrl+A to save.
Once the Opening Balances for all ledgers are zero, you can enter the applicable Opening Balance for the new branch or office and continue working.
You can alter multiple ledgers to provide opening balances. To know how to do it, refer to Alter Multiple Masters.
Use Stock Items from other Company
You can remove opening quantity from all stock items in one shot and then use those items in a new Company.
- Press Alt+G (Go To) > type or select Chart of Accounts > Stock Items and press Enter.
Alternatively, Gateway of Tally > Chart of Accounts > Stock Items and press Enter. - Press Alt+H (Multi-Masters) > Multi Alter > All Items or select the group from the List of Groups and press Enter.
The Multi Leger Alteration screen appears. - Press Alt+B (Zero Opening Balance).

- Press Ctrl+A to save.
Change Parent Group of Ledgers
You may have created all your ledgers under Sundry Debtors or Sundry Creditors, as applicable. However, your business has grown to different regions and you want to update the existing ledgers under parent groups created based on their region like Sundry Debtors North, South, East, or West.
You can do this while altering multiple ledgers, which helps you to quickly change the group of a set of ledgers in one go.
- In Chart of Accounts > press Alt+H (Multi-Master) > Multi Alter.
- Select the group, say Sundry Debtors.
- Press Alt+H > select the respective group created for the ledgers and press Enter.
If you have not created the group already, then press Alt+C to create it on the fly.
- Press Ctrl+A to save.
Set Credit Limits for parties
You might be having some parties with who you do business on a regular basis. Considering your business practice and relationship with your parties, you can set a credit limit in Chart of Accounts. The same Credit Limit will be applicable when you make a sale to the parties.
- In Chart of Accounts, press Alt+H (Multi-Master) > Credit Limits > select the group.
You can set credit limits for ledgers created under Sundry Creditors, Sundry Debtors, and Branch / Divisions. - In the Credit Limits column against each party name, enter the desired amount. This means, you have allowed the party to purchase items on credit up to the limit set here.
- As always, press Ctrl+A to save.
View and Delete Multiple Unused Masters
If there are certain masters such as party ledgers with no recorded transactions or no possibility of a business transaction in the future, then you can delete those ledgers.
In TallyPrime, you do not need to look around for such masters. Chart of Accounts displays all such masters so that you can delete those in one shot.
Delete Unused Ledgers at once
- In Chart of Accounts, press Ctrl+J (Exception Reports) > Show Unused and press Enter.
The List of Ledgers (Unused) appears.
- Delete the ledgers.
- Select the ledgers you want to delete using Spacebar.
- Press Alt+D.
- Press Y to accept deletion.

Similarly, you can delete any set of masters in Chart of Accounts.
If you want to view Ledgers Already used in transactions, then press Ctrl+J (Exception Reports) > Show Unused and press Enter.
Delete Unused Stock Items at once
If you want to delete the unused stock items that you do not trade with anymore, then you can so in Chart of Accounts.
- Press Alt+G (Go To) > type or select List of Accounts > type or select Stock Items and press Enter.
Alternatively, Gateway of Tally > Chart of Accounts > type or select Stock Items and press Enter. - Press Ctrl+J (Exception Reports) > Show Unused > and press Enter.
The unused stock items appear.
- Select the stock items to be deleted. To select multiple stock items, press Spacebar, and select the required stock items.
- Press Alt+D > select Yes to confirm deletion.
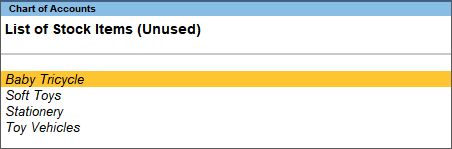
The selected stock items will be deleted.
Validate Contact Details of Ledgers
You can easily validate if the contact details entered in the ledgers with the data real-time data available with you.
- In Chart of Accounts, press Ctrl+J (Exception Reports) > E-mail Validations and press Enter.
- Drill down to the respective ledgers and update the contact details, if needed.
Update Party GSTIN/UIN
If there are some parties with Regular GST registration, and you have not provided the GSTIN/UIN in the ledger, then you can easily identify such ledgers in Chart of Accounts. Moreover, you can update the GSTIN/UIN of the respective parties on a single screen.
- In Chart of Accounts, press Ctrl+J (Exception Reports) > Update Party GSTIN and press Enter.
- Select Group and Ledgers for which you want to update GSTIN.
- Name of Group: select the group from the list or All Groups, as needed.
- Name of Ledger: select All Ledgers.
The Update Party GSTIN/UIN screen appears.
- Enter GSTIN/UIN of the parties, based on the availability of the data with you.
- Press Ctrl+A to save.
Validate UoM with UQC
If you are a GST-registered dealer, then you will be filing returns along with HSN Summary to the tax department at the end of the return period. As per the department, it is mandatory that the units of measurements (UoMs) in the HSN Summary are mapped to the department’s Unit Quantity Code (UQC). Mapping the UoM with UQC ensures that the HSN Summary reported in the return is correct.
- Press Alt+G (Go To) > type or select Chart of Accounts > Stock Items and press Enter.
Alternatively, Gateway of Tally > Chart of Accounts > Stock Items and press Enter. - Press Ctrl+J (Exception Reports) > Map UoM – UQC and press Enter.
The report appears with units that are not mapped with UQC. - Press F5 (Update UQC) > type or select from List of UQCs and press Enter.
- Press Ctrl+A to save, once you have updated UQC for all the UoMs.
Accounting Masters in Chart of Accounts
Accounting masters are the pre-defined masters for your accounting information system. For instance, a ledger is a pre-defined master in the report, and the groups are the pre-defined masters under which ledgers are classified. TallyPrime has several accounting masters for recording transactions.
Groups
Groups are a collection of ledgers of the same kind that are maintained to determine the hierarchy of ledger accounts. This helps in presenting reports that are meaningful and compliant with the government and department laws. Chart of Accounts displays all the ledgers.
To know more about Groups in TallyPrime, refer to the topic Groups in TallyPrime.
Ledgers
Ledgers are used to store bookkeeping entries and affect assets, liabilities, income, or expenses in the Balance Sheet. Cash, accounts receivable, investments, and expenses are some examples of ledgers. Ledgers help in maintaining all the transactions. Once you record a transaction with appropriate ledgers, you can view the impact on Balance Sheet and Profit & Loss A/c. The report displays all the ledgers.
To know more about Ledgers in TallyPrime, refer to the topic Ledgers in TallyPrime.
Voucher Types
TallyPrime has a total number of 24 pre-defined Voucher Types for recording accounting entries, inventory vouchers, payroll transactions, and sales & purchase orders. You have the flexibility to create more voucher types in TallyPrime under the pre-defined ones as per your requirement. You can view Voucher Types in the report.
To know more about Voucher Types in TallyPrime, refer to the topic Voucher Types in TallyPrime.
Cost Categories
By default, all the cost centres created in TallyPrime are under Primary Cost Category. However, you can create a cost category to allocate the same incomes and expenses to parallel sets of cost centres or profit centres. Chart of Accounts displays all the Cost Categories created in TallyPrime.
To know more about Cost Categories, refer to the Use Cost Category for Parallel Allocation section in the topic Cost Centre or Profit Centre Allocation.
Cost Centres
With cost centres in TallyPrime, you can maintain your incomes and expenses as per different business units, departments, projects, and so on. You can create one or more cost centres in TallyPrime and allocate the breakup of incomes and expenses to different cost centres or profit centres. Thereafter, you can view your incomes and expenses under the cost centres using various reports provided in TallyPrime. You can view cost centres in Chart of Accounts too.
To know more about Cost Centres in TallyPrime, refer to the topic Cost Centre or Profit Centre Allocation.
Currencies
Your business may be having multi-currency transactions, especially when a foreign party (customer or supplier) is involved. You can record transactions either in the base currency or foreign currency based on your requirement. All the currencies created in TallyPrime are displayed in the report.
To know more about Currency in TallyPrime, refer to the topic Create, Alter, and Delete Currencies in TallyPrime (Multi-Currency Accounting).
Budgets
In your business, you may be preparing a plan for the flow of funds containing financial guidelines for the future or a selected period. Budgeting helps you to use your funds effectively and also provides information for an evaluation of financial activities in your organization. You can prepare budgets in TallyPrime for specific purposes. You can view budgets in the report.
To know more about Budgets in TallyPrime, refer to the topic Budgets in TallyPrime.
Scenarios
TallyPrime provides a management tool that you can use for projecting the accounts and inventory-related information. You can create, select, and include only certain types of vouchers without affecting the source data and create scenarios in TallyPrime. You can also use the management tool to forecast the expenses by recording provisional vouchers and including them in your reports. The report displays all the scenarios created in TallyPrime.
To know more about Scenarios in TallyPrime, refer to the topic Scenarios in TallyPrime.
Inventory Masters in Chart of Accounts
Your business may involve movement, sales, or purchase of a set of stock items. The inventory masters in TallyPrime enable you to manage your inventory and track the movement of stock items.
Stock Groups
Stock Groups help you in managing stock items and locating them, especially when a set of stock items share a common feature such as brand, product type, the material used, and others. In TallyPrime, you can get a consolidated view of total stock items available under a specific stock group and the report displays all the stock groups.
To know more about Stock Groups in TallyPrime, refer to the section Classify Stocks Items | Stock Groups and Stock Categories in the topic Manage Your Stock Items.
Stock Items
You may be selling or purchasing a set of stock items in your business, because of which you need to manage your inventory. In TallyPrime, you can create stock items so that you can manage your inventory. Furthermore, you can view all the stock items in chart of accounts.
To know more abut Stock Items in TallyPrime, refer to the topic Manage Your Stock Items.
Stock Categories
There can be stock items under different groups with some common properties such as cost, material used, or brand. In such cases, you can create Stock Categories and assign the same to related stock items to manage your inventory. Chart of Accounts displays all the Stock Categories created in TallyPrime.
To know more about Stock Categories in TallyPrime, refer to the section Classify Stocks Items | Stock Groups and Stock Categories in the topic Manage Your Stock Items.
Units
You may be selling or purchasing stock items measured as per specific units, depending on your business practice. In TallyPrime, you can create units and also alternate units to manage stock items and the report displays all the units created in the product.
To know more about Units in TallyPrime, refer to the section Create Units for Stock Items in the topic Manage Your Stock Items.
Godowns
You may be storing stock items in warehouses or godowns. In TallyPrime, you can create godowns and manage the movement of the incoming or outgoing stock item as per the actual movement of items from the corresponding godowns. You can view Godowns in the report.
To know more about Godowns in TallyPrime, refer to the topic Manage Inventory Storage Using Godowns/Locations in TallyPrime.
Payroll Masters in Chart of Accounts
Your business may be involving a number of employees to which you must be making payment on a particular date as per the salary cycle followed in your business. In TallyPrime, you can maintain payroll of employees using Payroll masters. This enables you to keep an account of sum transferred to your employees.
Employee
The Employee master in TallyPrime helps you record all the payments made to a particular employee in your organisation. Along with basic details, you can also enter the details of Payment, Statutory, and Contract details. Chart of Accounts displays all the Employees created in TallyPrime.
To know more about Employee master in TallyPrime, refer to the topic Create Employees in TallyPrime (Payroll).
Employee Groups
Employee Groups in TallyPrime help you classify employees based on their function or roles that they perform in your organisation. You can also define salary structures at the employee group level to apply a common salary structure to a set of employees in your organisation. You can view all the Employee Groups in the report.
To know more about Employee Groups in TallyPrime, refer to the topic Create Employee Groups in TallyPrime (Payroll).
Employee Categories
Employee categories help you classify employees so that you can track salary paid to employees working on a particular project or region. This helps you analyse the cost of the project or a particular region/office. The report displays all the Employee Categories created in TallyPrime.
To know more about Employee Categories in TallyPrime, refer to the topic Create Employee Categories in TallyPrime (Payroll).
Pay Heads
Basically, pay head is the salary components constituting an employee’s pay structure. You can define Pay Heads in TallyPrime, which you can use while processing payroll of employees. You can view all the Pay Heads in Chart of Accounts.
To know more about Payheads in TallyPrime, refer to the topic Create Pay Heads and Define Income Tax Details in TallyPrime (Payroll).
Attendance/Production Types
Attendance/Production Type is the basic unit used to calculate the pay of employees. This helps you track productivity of employees. Attendance/Production Types depend on the Pay Heads that comprise of the employees’ pay structure. All the Attendance/Production Types created in TallyPrime can be viewed in the report.
Accounting and Financial Reports in TallyPrime
Accounting reports and financial reports in TallyPrime provide a comprehensive overview of the financial performance, position, and cash flows of a business. They are essential tools for evaluating a business’s financial health by summarising and analysing all of its transactions over a period of time. By organizing and presenting raw financial data in a meaningful way, accounting reports help businesses transform complex financial information into actionable insights.
TallyPrime simplifies the process of generating accounting reports, allowing you to easily create reports such as the Balance Sheet, Profit and Loss A/c, Receivables and Payables, Cash Flow statement, and more. These reports provide an in-depth view of your business’s performance, including identifying your most profitable customers, top-selling products, and the state of your cash flow. Additionally, these reports can help you determine your eligibility for business financing or loans.
Overall, TallyPrime’s accounting reports are an essential tool for any business owner or manager seeking to make informed financial decisions. With easy access to critical financial data and insights, businesses can confidently plan for growth, identify areas for improvement, and take action to achieve their financial goals.
Balance Sheet is a real-time snapshot of your company’s financial position at any point in time. It provides a clear picture of your assets, liabilities, and equity, and also shows the resources that your company owns and owes, along with the sources of financing for those resources.
To know more, refer to the Balance Sheet topic.
Profit & Loss (P&L) A/c is an overview of your total revenue and total expenses incurred over a period of time. You can use this information to determine your company’s total profit or loss over the accounting period. The P&L statement is a good indicator of a company’s ability to generate sales, manage expenses, and create profits.
To know more, refer to the Profit and Loss Statement topic.
Cash Flow statement summarizes the flow of cash into and out of your business over a period of time. It also indicates which areas of your business are generating and using the most cash, and which areas could benefit from a boost of cash. You can also estimate the future cash flow through Cash Flow Projection Report in TallyPrime. By referring to the Cash Flow Projection Report, you can anticipate the cash to be generated or spent for a specific period in the future, such as a month, quarter, or year, which will help you with budgeting and decision-making for your business.
To know more, refer to the Cash Flow and Cash Flow Projection topic.
Funds Flow statement shows the inflow and outflow of funds (or sources and applications) for a particular period. Analysis of the Funds Flow statement will help you find out whether the working capital has been used effectively or not, and whether the level of working capital is adequate for the requirements of the business.
To know more, refer to the Funds Flow Report topic.
Receivables: When you do sales on credit, you would certainly need to keep track of the due amounts that your parties owe you. All such dues from your parties will be your outstanding receivables. Managing the outstanding receivables can be critical to your business because it not only helps to understand how much your parties owe you but also helps you to recover the dues on time and use it for your business, as needed.
To know more, refer to the Manage Outstanding Receivables topic.
Payables: When you make some purchases or obtain services from your vendors, you need to keep track of all the payments that you have to make within the due dates. All such pending payments to your parties are outstanding payables. The Outstanding Payables report in TallyPrime gives you an overview of what your business owes for supplies, inventory, and services.
To know more, refer to the Manage Outstanding Payables topic.
Trial Balance shows the total of the debit and credit balances recorded in various ledger accounts. It helps you ensure that the entries in your company’s books are mathematically correct at the end of every reporting period. The Trial Balance ensures that for every debit entry, there is a corresponding credit entry in the books. Thus, the sum of all debits has to be equal to the sum of all credits.
This is in accordance with the double-entry accounting principle, which says that for every debit, there has to be an equal credit.
To know more, refer to the Trial Balance topic.
Day Book is a book of original entries in which daily logs of transactions are recorded as they occur. All kinds of transactions – financial vouchers, reversing and memorandum vouchers, as well as inventory vouchers – finds a place in Day Book. You can configure the Day Book for a specific period and the type of transactions you want to view.
To know more, refer to the Day Book topic.
Accounting Registers bring together transactions of a particular type so that you can easily view (or print) the required details. For example, in a Sales Register, you can see the summary of your sales transactions for a particular period. Similarly, you can make use of a number of accounting registers depending on your needs, such as Purchase Register, Journal Register (Credit/Debit Note Register), Payment Register, and so on.
To know more, refer to the Sales Registers topic.
Ratio Analysis is used to mathematically compare various accounts or categories in your books, such as Working Capital, Bank Balances, the amount due from Sundry Debtors/Creditors, Nett Profit, and so on. This comparison will help you look at the financial position of your business from different lenses, and assess the areas that are doing well and the areas that need improvement.
This report includes a number of financial ratios, such as Current Ratio, Debt/Equity Ratio, Gross Profit %, Quick Ratio, and so on.
To know more, refer to the Ratio Analysis topic.
Cash Book records all the transactions that affect cash, that is, all the receipts and payments of cash.
To know more, refer to the Cash Book topic.
Bank Book records all the receipts and payments that are made through the bank.
To know more, refer to the Bank Book topic.
Statistics gives the number of all the vouchers that are created under each voucher type and all the types of accounts in your books of accounts. You can configure this report to view different details, such as the Voucher Types with different accounting entries, and so on. As in other reports, you can drill down to the transaction level, if needed.
To know more, refer to the Statistics topic.
Print Multi Account Reports: TallyPrime not just provides you with the facility to generate various accounting and financial reports but also prints them in one go. You can print multiple vouchers and the primary Books of Accounts, like the Cash and Bank Books, Account Ledgers, Sales and Purchase Registers, and so on, without having to select the accounts one at a time and print them.
Balance Sheet in TallyPrime
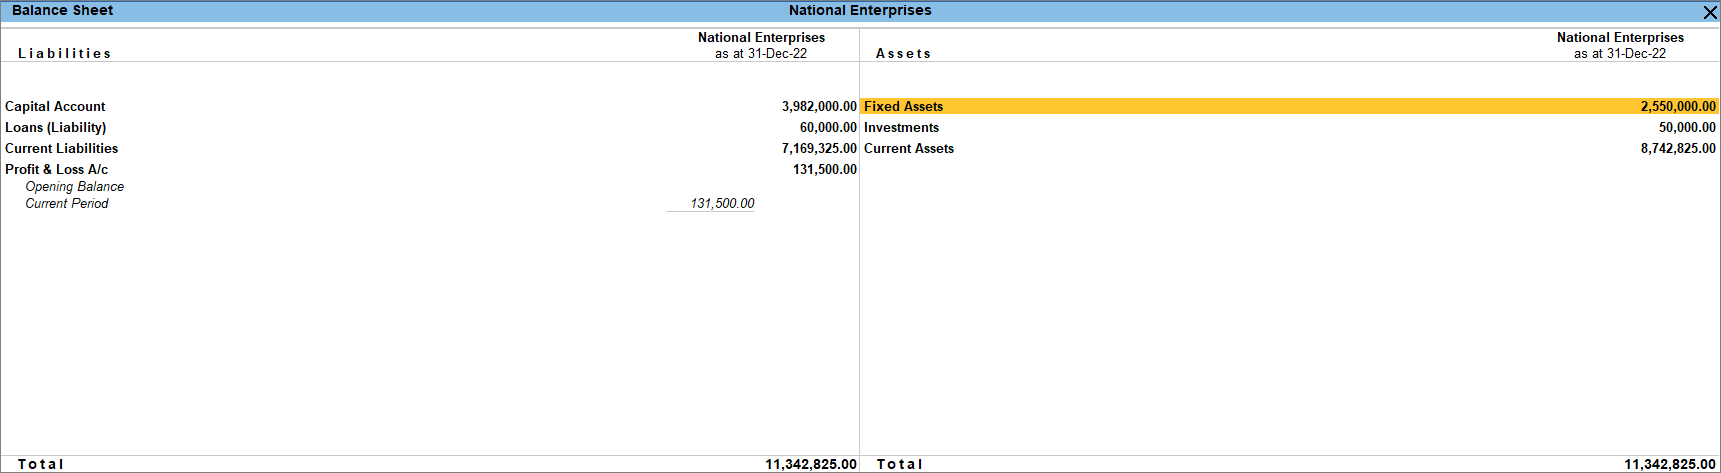
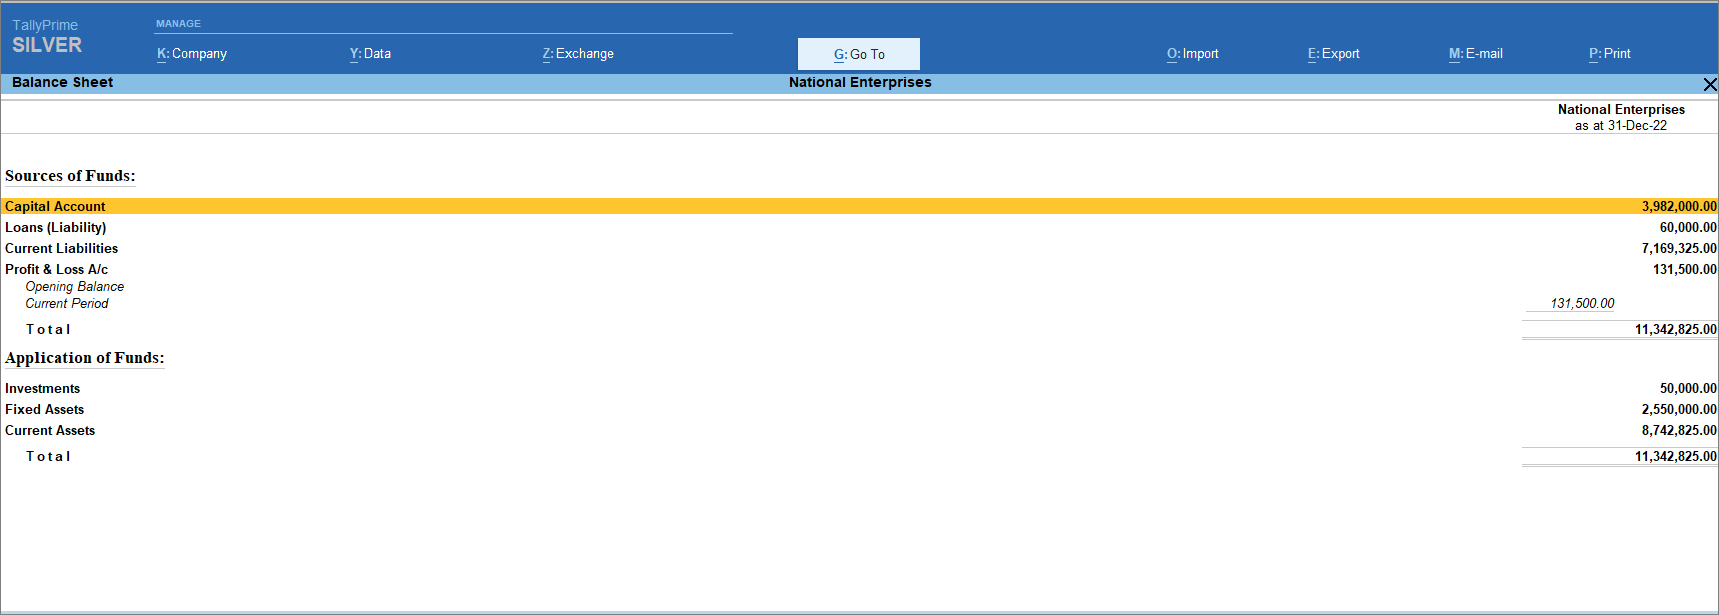
The Balance Sheet in TallyPrime provides you with a neat snapshot of your business. You can also expand the report for a comprehensive view of your assets such as cash in the bank, inventory, vehicles, equipment, buildings, and accounts receivable and liabilities such as taxes, loans, mortgages, and accounts payable. You can change the Order of Groups and view the Balance Sheet as per your requirement. You can also view the Balance Sheet in vertical format displaying the source and application of funds in a single column which makes it easier to compare the information. In TallyPrime, you can set your Closing Stock manually. In case you own a group company, you can view the consolidated Balance Sheet as well.
Balance Sheet is one of the primary financial statements that you can use to monitor the health of your business. It is a picture of the financial position of your company – what you own (assets) and what you owe (liabilities) – at a given time. The difference between what you own and what you owe determines the Net Worth (or Owner’s Equity) of your business.
The Balance Sheet helps you understand the performance of your business. The Balance Sheet also proves essential when your business is applying for a loan or investment. Thereby, external entities, such as investors, creditors, and banks, study the Balance Sheet to understand the financial health of a business.
You can also measure the growth of your business by comparing the Balance sheets of different years. In TallyPrime, you can use the Auto Column feature and select the current year and previous year Balance Sheet to measure the comparison. You can compare the Balance sheets of two or more of your companies to analyse which company is generating more profit. Thus, you will be able to take timely decisions for your company. For example, you can easily plan future projects and meet unexpected expenses. What’s more, you can also view the TallyPrime Balance Sheet in your browser!
View Balance Sheet
The Balance Sheet in TallyPrime helps you monitor the health of your business and also take timely decisions for its growth and betterment. By default, the Balance Sheet has a horizontal display.
![]()
- Press Alt+G (Go To) > type or select Balance Sheet > press Enter.
Alternatively, go to Gateway of Tally > Balance Sheet.
You can see the Liabilities for your company on the left and the Assets on the right.
A few of the critical uses of a Balance Sheet are as follows:
Stock Valuation
The default Valuation Method maintained in Balance Sheet is Default which is the Avg Cost method. However, you can change the valuation method and select the method that suits your business. You can press F8 (Valuation) or you can also select the Stock Valuation Method form Ctrl+B (Basis of Values). The most common valuation method used is FIFO where the goods which are bought first are sold first. If your business deals with physical goods or perishable goods, then you can follow the valuation method of FIFO. If you are a manufacturer or retailer, then you use the valuation method of LIFO which is Last In First Out. You can also decide which valuation method to be used for your business depending on the price of the products. If the goods bought earlier is having a higher price as compared to the goods bought later, you can decide which valuation method to be used. Apart from FIFO and LIFO methods, there are other valuation methods as well such as, At Zero Cost where you can see the quantity of your closing stock but without the purchase price, At Zero Price where the sale price is not visible, or Avg. Cost, Avg. Price and so on.
To learn more about Stock Valuation Method, click here.
Include Working Capital
Working Capital is the money that is used to cover the operating expenses of your business. It is the difference between Current Assets and Current Liabilities. You can analyse the financial condition of your business by Working Capital. The financial condition is considered to be stable if you can meet all your current liabilities with your current assets. You can view the Working Capital in the Balance Sheet from Ctrl+B (Basis of Values). Once you include Working Capital in the Balance Sheet, you can make informed decisions regarding your expenses and future investments.
Comparison using Auto Column
You can also perform a comparative study of your Balance Sheet for Monthly, Weekly, Fortnightly, and so on. The comparison helps you to get a better picture of how your business is performing and what is the growth rate of your business. Such comparison can also be done for Stock Valuation Method which helps you to identify which valuation method to be followed. You can do such a comparison by pressing Alt+N (Auto Column).
Apart from the above-mentioned configuration options, you can further configure your Balance Sheet from F12 (Configure).
- Exclude Accounts with zero Closing Balance: While displaying your company Balance Sheet to your investor, you may want to hide the accounts with zero balance and have no impact on the financial report. This helps to focus on the important accounts that reflect the financial condition of your business. You can remove such accounts with zero balance by pressing F12 (Configure) and enabling Exclude Accounts with zero Closing Balance.
- Show Loss also under Liabilities: In Balance Sheet the Loss is shown under Assets and similarly, by default, TallyPrime also displays the Loss under Assets. However, you can view the Loss under Liabilities as well. You can do so by pressing F12 (Configure) and enabling Show Loss also under Liabilities. This option is available only when the Balance Sheet display is horizontal.
- Method of showing Balance Sheet: The default view of the Balance Sheet shows Liabilities on the left side and Assets on the right. Depending on your requirement to view the Balance Sheet, TallyPrime has provided an option to alter the view and display Asset on the left side and Liabilities on the right. You can do so by pressing F12 (Configure) and selecting the required view from the Method of showing Balance Sheet.
To know more about the features of reports in TallyPrime, refer to Working with Reports.
View Balance Sheet for a Group Company
If you have a group company in TallyPrime, you can use the Balance Sheet to view the consolidated financial data and measure the overall performance of your business. You can also compare the Balance Sheet of your Group company along with its member companies.
- Press Alt+G (Go To) > type or select Balance Sheet.
Alternatively, Gateway of Tally > Balance Sheet. You can see the consolidated Balance Sheet. - Press Alt+F3 (Select Company), and load the group company.
- To compare the Balance Sheet of the member companies, press Alt+N and select Member Companies.
To know more about Group Companies refer to Group Company in TallyPrime.
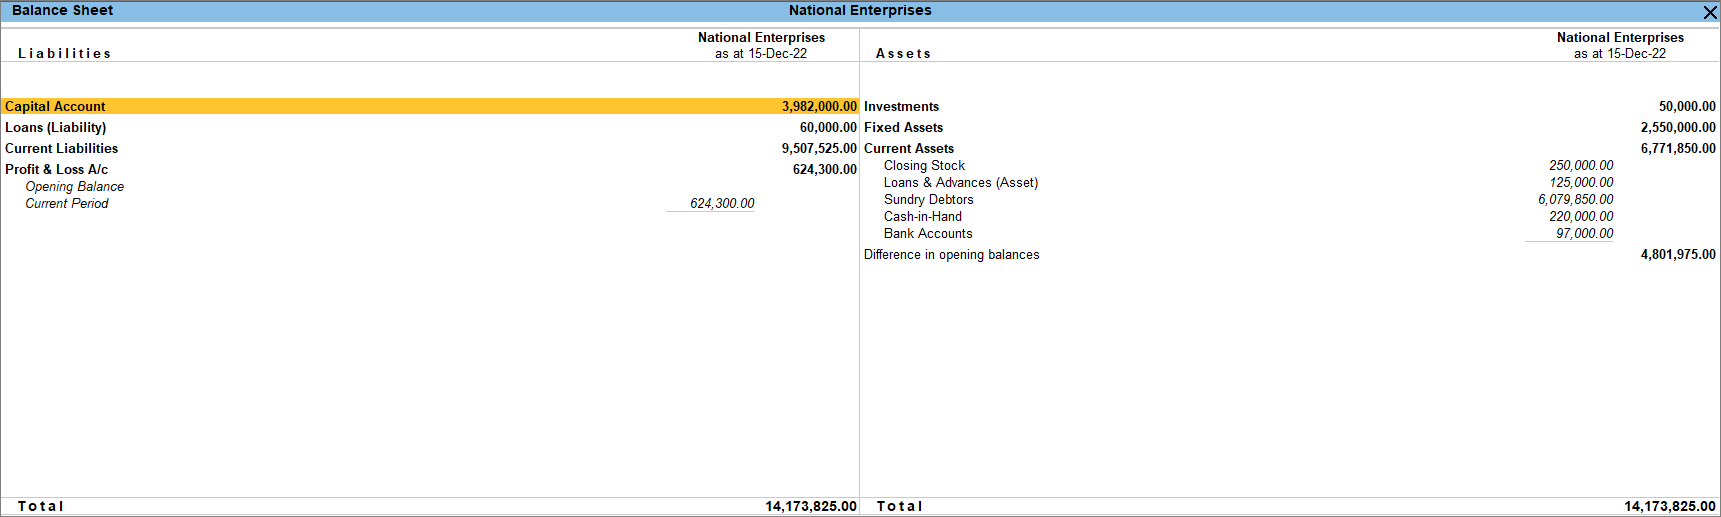
Sources and Application of Funds | Vertical Balance Sheet
Vertical Balance Sheet shows us the Source and Application of the funds of your business. Such representation of Balance Sheet is helpful while applying for loan. The lender looks into the Balance Sheet to see how and where the funds were used. Similarly, before investing in your business the investors also look into your Balance Sheet to understand what are the source of your funds and how that is used in your business. In this new format of the Balance Sheet, you can view the Liabilities (under Sources of Funds) on the top and the Assets (under Application of Funds) on the bottom. All the details will be captured in a single column. Using the vertical Balance Sheet, you can easily compare the information on the Balance Sheet for a single period. For example, you can compare the current assets to the current liabilities to estimate the liquidity of the business on a given date.
The vertical Balance Sheet also helps you understand how your company has sourced its funds and how it has utilized them as it displays the Source and Application of funds.
![]()
- Press Alt+G (Go To) > Balance Sheet > press Ctrl+H (Change View) > Click on Vertical.
You can enable Vertical Balance Sheet from F12 (Configure) as well.
You can view a detailed Balance Sheet by pressing Alt+F5 (Detailed).
You can view the Liabilities (under Sources of Funds) at the top and the Assets (under Application of Funds) at the bottom. If you want to see the Assets on the top and the Liabilities on the bottom, then press F12 (Configure) > Method of Showing Balance Sheet > Source/Application.
You can use this information to assess if funds are flowing smoothly to the appropriate areas of your business, or if you need to change the way in which your company receives funding.
Stripe View: You can enable Stripe View for Balance Sheet through F12 configuration. After doing so, you can view the report with stripes, ensuring a neat representation of data with maximum readability. In case, you wish to enable Stripes for all the reports, including Balance Sheet, you can enable it at the application level.
To enable Stripe View only for Balance Sheet:
- Open Balance Sheet > press F12 (Configure) > set Enable Stripe View to Yes.
Once you have enabled Stripe View for Balance Sheet, you can view the report, as shown below:

Similarly, you can enable Stripe View and Print, Export, as well as Share the reports with stripes with your parties for better readability. For more information, refer to the Enable Stripe View section in the Get Familiar with TallyPrime and TallyPrime Edit Log Features topic.
Set Closing Stock
If you are maintaining your inventory in TallyPrime, then by default, TallyPrime considers your stock summary balance as your closing stock. However, you can manually set your closing stock value in TallyPrime. The need to set the value manually might be because certain transactions of your inventory are yet to be recorded and currently there is a difference between your physical stock and the stock appearing in your books. In such a case, if you need to finalise the books you can manually enter the closing stock amount. You can also enter the closing stock value manually when you are not maintaining inventory in TallyPrime. You can set the closing balance for the stock ledger created, which will then be carried forward as the opening balance in the next year.
If you want to enter the closing stock value manually even when you are maintaining the inventory in TallyPrime, you need to disable the option Integrate Accounts and Inventory. Once the recording is done correctly for your inventory, you can enable the option.
![]()
For example, the opening balance of the stock on 01-04-2022 is Rs. 2,50,000 and the closing balance of the stock on 31-12-2022 is Rs 5,00,000. To set this amount as the Closing Stock:
- Press F11 (Features) > Set Integrate Accounts and Inventory to No.
- Create a ledger stock item under Stock-in-Hand.
- Set the Opening Balance as Rs 2,50,000, and accept.
Instead of displaying the stock summary balance as your closing stock, now you can see that the closing stock is displaying the value you have manually set which is Rs 2,50,000.
To know more about setting closing stock manually, refer to Define your Closing Stock.
Compare Information
You can use the Balance Sheet as a powerful medium for comparison. You can compare financial information across companies, time periods, valuation methods, and so on. By comparing time periods, you can easily measure the growth rate, the pattern of expenses, and so on. You can choose different time periods such as daily, weekly, monthly, quarterly, and so on.
Similarly, in your business, if you follow the FIFO method for stock valuation, then you can view a comparison between two or more valuation methods, such as FIFO, LIFO, Average Cost, Average Price, and so on, in the Balance Sheet. Such comparison can be seen through multiple columns which helps you to analyse your current method of stock valuation with other methods, as shown in the following illustration.
![]()
- Press Alt+G (Go To) > Balance Sheet > Alt+N (Auto Column).
- Select Stock Valuation Methods in the Auto Column field.

- Press the right arrow key to view all the valuation methods.
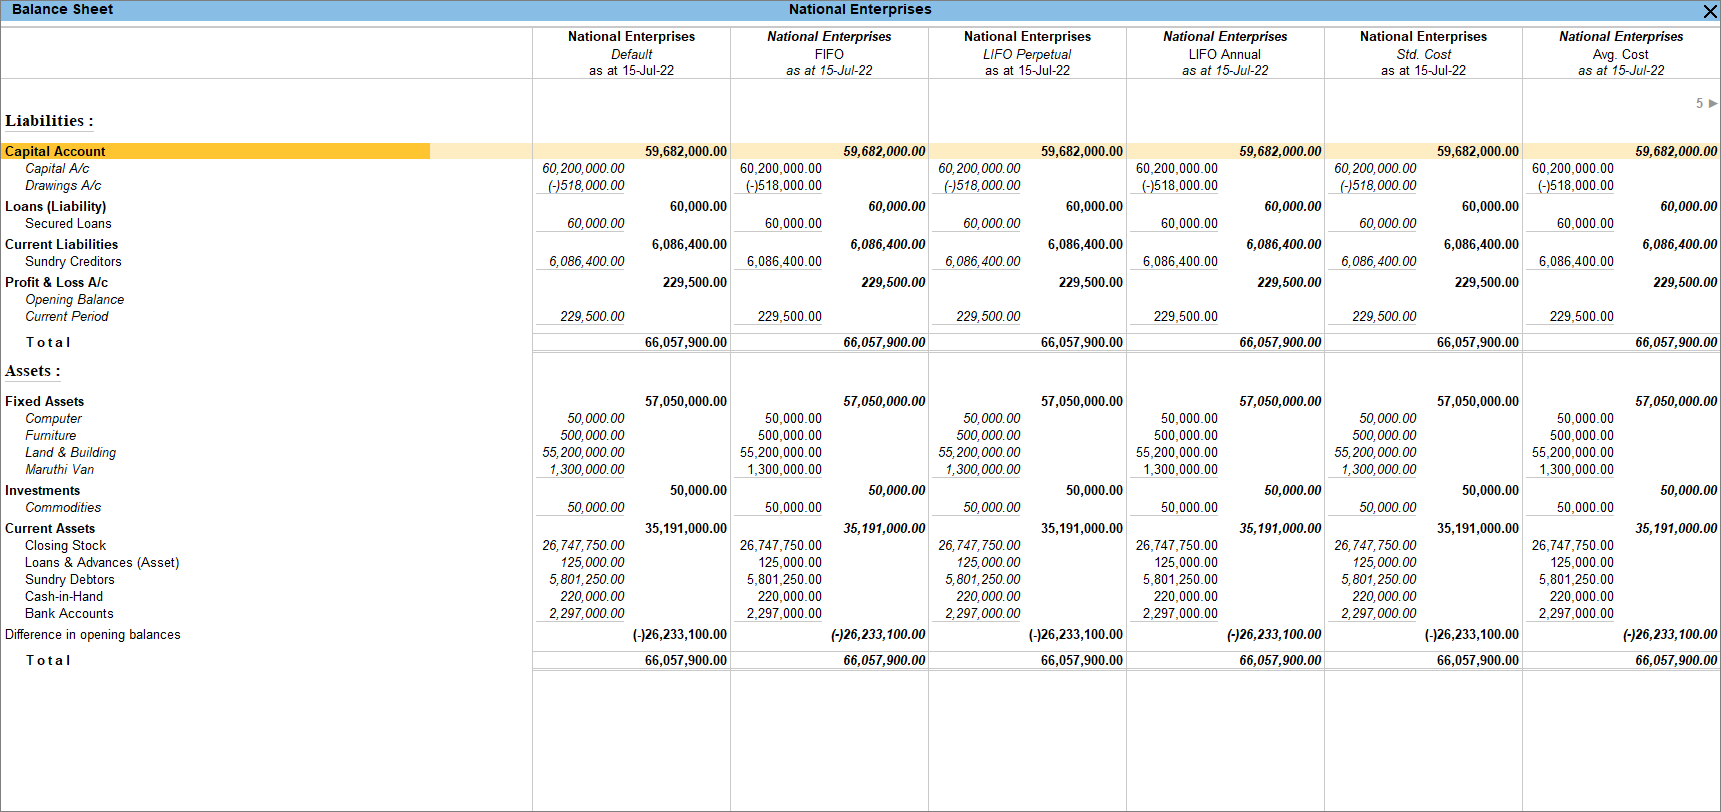
A comparison study of the Balance Sheet helps you to analyse the performance of your business better. It helps you to take important decisions towards the growth of your business.
Change the Order of Groups
In Balance Sheet, the order of the Groups should be maintained keeping the assets with the highest liquidity at the top following the lowest liquidated asset. However, the default view of the Balance Sheet shows Fixed Assets at the top followed by Investments and Current Assets on the Asset side. You can change the order of the group heads in the Balance Sheet as per your requirements. For example, if you want to place the Investments group above Fixed Assets on the Balance Sheet.
![]()
- In the Balance Sheet, select the required group, which is Investments in this case.

- Press Ctrl+Enter to open the Group Alteration screen.

- Press Ctrl+I (More Details) > Show More > Position Index in Reports. You can see that the position index of the Investments group is 50.

Similarly, note the Position Index for the Fixed Assets group. You can see that the position index of the Investments group is 40.
- Increase the Position Index for the Fixed Assets group, and decrease the position index of the Investments group. For example, you can enter the new Position Index for Investments as 40 and for Fixed Assets as 50. Enter the required Position Index.
- Save the details, and return to the Balance Sheet.


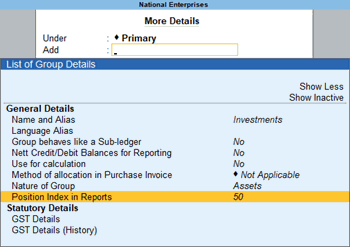


Now you can see that the Investments group appears above Fixed Assets in the Balance Sheet.
View Profit and Loss Statement in TallyPrime
Profit and Loss A/c is one of the primary financial statements that you can use to monitor the health of your business. It summarises the revenues, costs, and expenses for a specific period, such as a quarter or a year. Thus, you can easily gather the net result of the business operations.
Using the Profit and Loss A/c in TallyPrime, you can measure the ability of your business to generate profit. Accordingly, you can take various measures to increase revenue, reduce costs, and so on. What’s more, you can view the Profit and Loss A/c in the browser!
View Profit & Loss A/c
By default, the Profit & Loss A/c report will be generated as on the date of the last voucher entry. You can change the date to view the report for the required period.
- Gateway of Tally > Profit & Loss A/c.
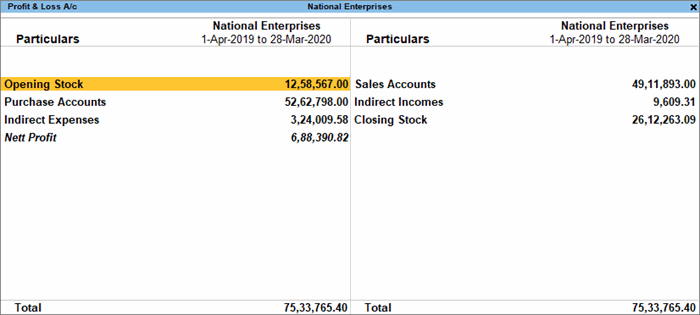
Alternatively, Alt+G (Go To) > type or select Profit & Loss A/c > press Enter.
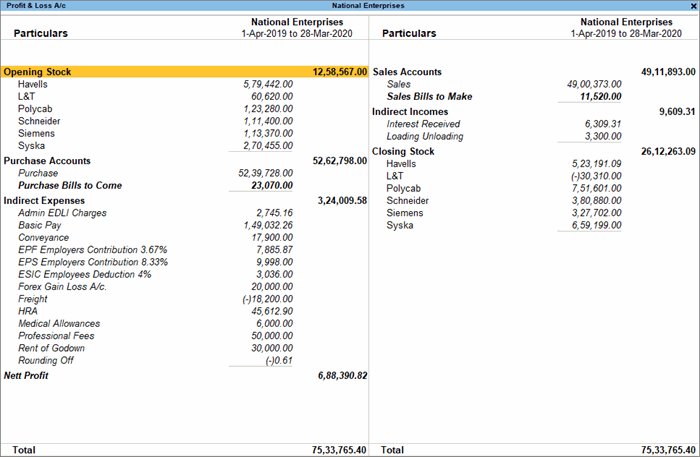
- Press Alt+F5 (Detailed) for a detailed format of the report.
The Profit & Loss A/c is generated from the date of opening of the books till the date of last entry.
- Press F2 (Period) to change the period as required.
Configure Profit & Loss A/c
You can view Profit & Loss A/c for profit and loss statement in a number of formats. Press F12 to explore and apply the required format.
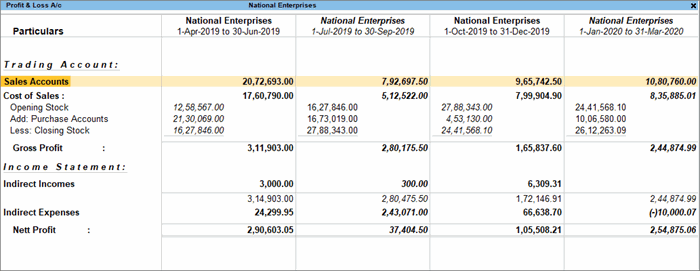
- Vertical format: By default, the Profit & Loss A/c appears in the horizontal format. If your business prefers the vertical format, then you can set the option Show Vertical Profit & Loss to Yes.

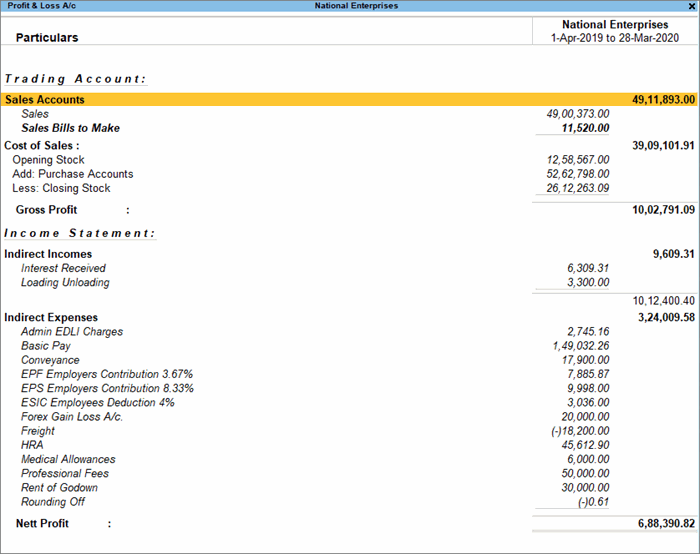
In the vertical format of the Profit & Loss A/c, you can see that the groups now appear under Trading Account and Income Statements.
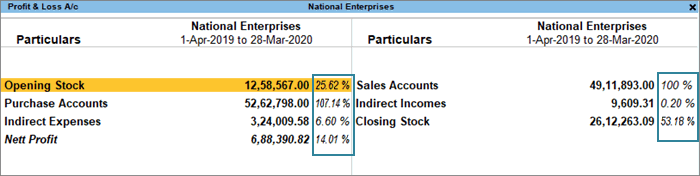
- Percentages: If you want to view each line in the Profit & Loss A/c as a percentage of the sales accounts, then set the option Show Percentages to Yes. The sales accounts will be considered as 100%, and the rest of the lines would be represented as a percentage of the sales accounts.

- Gross Profit: If you want to split the Profit & Loss A/c to see the trading profit, then set Show with Gross Profit to Yes. This will consider only Cost of Sales and Direct Expenses. Indirect Expenses will be deducted from the Gross Profit to show the Nett Profit. This option is available only in the horizontal form of the Profit & Loss A/c.


Compare Information Using Profit & Loss A/c
You can use the Profit & Loss A/c to compare financial information across companies, time periods, valuation methods, and so on. By comparing time periods, you can easily measure the profits, pattern of expenses, and so on. You can choose different time periods such as daily, weekly, monthly, quarterly, and so on.
- Profit & Loss A/c > Alt+N (Auto Column).
- Select Quarterly in the Auto Column field.
Now you can view the information in the Profit & Loss A/c according to quarters, and compare the components that interest you. Similarly, if you want to view the Profit & Loss A/c for two or more valuation methods, such as FIFO, LIFO, Average Cost, Average Price, and so on, then you can easily view them in separate columns in the Profit & Loss A/c.
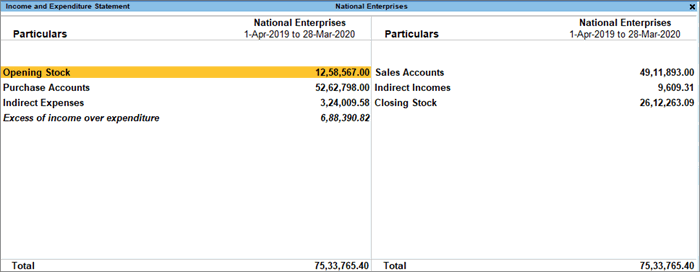
Income and Expense Statement
If your organization does not engage in the trading of goods or services, then you can use the Income & Expense Statement instead of Profit & Loss A/c. For such organisations, the books of accounts generally comprises only the sources of income and the expenditure, which are earned or incurred during a given period. This is useful for non-profit organizations such as trusts, educational institutions, NGOs, hospitals, and so on. You can also view the Income & Expense Statement in the browser.
To use the Income & Expense Statement instead of Profit & Loss A/c, you have to configure the Profit & Loss A/c ledger accordingly.
- Press Alt+G (Go To) > Alter Master > type or select Profit & Loss A/c > press Enter.
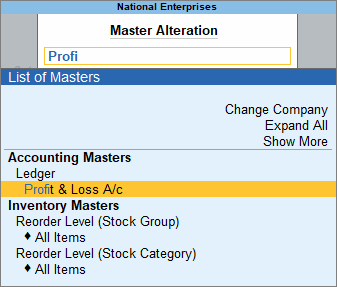
The Ledger Alteration screen appears as shown below:

- Set the option Use as Income & Expense A/c to Yes, and press Enter.
- Save the Profit & Loss A/c ledger.
Now you can see the Income & Expense A/c in the Gateway of Tally. Alternatively, press Alt+G (Go To) > type or select Income & Expense A/c.
Cash Flow & Cash Flow Projection
Cash Flow refers to the movement of money in and out of a business in a particular period. Apart from helping you monitor the incoming and outgoing money in your business, the cash flow statement can also be used as a Receipt and Payment statement across any kind of business dealings. At the same time, the Cash Flow Projection report helps you forecast the incoming and outgoing of money for your business. In TallyPrime, you can view the Cash Flow Statement to summarise and view the inflow and outflow of money for a particular financial period or for a particular month.
View cash inflow and outflow using Cash Flow Summary
Through the Cash Flow statement in TallyPrime, not only you can keep view the inflow and outflow of cash during a particular period, such as sales and customer payments, but at the same time, you will be able to track your positive cash flow and negative cash flow, as well. When you have more cash coming into your business than you have leaving it, it is called positive cash flow. In TallyPrime, you can also have a detailed view of your inflow and outflow for a particular month along with your Nett Inflow, as you drill down further from your Cash Flow statement.
View Cash Flow Projection Report in TallyPrime
Unlike the Cash Flow, which highlights the already occurred flow of cash, the Cash Flow Projection is a prediction of a business’s expected cash inflows and outflows. Through the Cash Flow Projection report in TallyPrime, you can anticipate the cash to be generated or spent for a specific period in the future, such as a month, quarter, or year. This will help you to make informed decisions about various business scenarios such as resource allocation and risk management. Apart from that, you can also set the limit for your Bank Overdraft accounts through the Cash Flow Projection report in TallyPrime to monitor the cash flow according to the desired limit. As a businessman, you can use Overdraft accounts to draw money from the bank up to the set overdraft limit, apart from the balance available.
You can also view the Cash Flow Reports in the browser.
Cash Flow in TallyPrime
![]()
Cash Flow is the inflow and outflow of cash during an accounting period, that portrays how businesses manage their cash. Here, the term ‘cash’ stands for cash and bank balances. Playing a crucial role in analyzing the economic standing of a business, a cash flow statement keeps track of the amount of money that flows in and out due to business handling.
- Press Alt+G (Go To) > type or select Cash Flow > press Enter.
Alternatively, Gateway of Tally > Display More Reports > Cash Flow.
A sample image of the Cash Flow statement appears, as shown below:
To select any period like a month, a quarter, or a year, you can press F2 (Period) and view Cash Flow for the particular period. You can select a particular month and drill down further to access Cash Flow Summary report. Going further, you will have an intrinsic idea about the overall Cash Flow along with the current assets, current liabilities, voucher types used for a particular transaction, and so on. You can have your Nett Flow in negative, if you have more cash outflow and less cash inflow for a particular month, as shown in the Cash Flow report above for the month of July.
One of the key features of the Cash Flow Report in TallyPrime is the graph that comes at the end of the Cash Flow Report. The graph represents the overall inflow and outflow of cash happened for each month, as demonstrated in the horizontal axis of the graph. The vertical axis represents the overall cash limit under which the incoming and outgoing of funds happened. Like shown in the graph above, two different colors represent inflow and outflow of money. For example, the color red here represents the inflow of money and color blue represents the outflow of money. You can click on the graph for a particular month and drill down further to access Cash Flow Summary report.
You can also customise the Cash Flow report in TallyPrime and modify the data in terms of Hundreds, Lakhs, Millions, Thousands, and so on by selecting the Scale Factor in the Basis of Value configuration. To do so,
- Press Ctrl+B (Basis of Value) > Scale Factor and select the required option.
You can also change the view of the report and add periodic columns like monthly, quarterly, weekly, and so on, for a comparative view of the cash flow across periods. To do so,
- Press Ctrl+H (Change View) and select the required period in the List of Views field.
For example, if you want to see the cash flow in your business for every quarter you can select Quarterly.
If you want to compare your cash flow, either on a weekly basis or fortnightly basis, you can configure the columns to appear quarterly, weekly, daily, fortnightly, and so on, from the Auto Repeat Columns screen. To do so,
- Press Alt+N (Auto Column) and select the required period in the Column Details field.
To know further about reports and their features in TallyPrime, go to Working with Reports in TallyPrime.
Cash Flow Projection in TallyPrime
Cash Flow Projection is an integral part of business planning. It takes into account the flow of cash and helps you anticipate the cash to be generated or spent over a period of time. TallyPrime allows you to view your Cash Flow Projection report through distinctive filters which include setting Overdraft limits of your bank, along with including Cash Account, Scenarios, and Overdues to your report. These features give you an inclusive overview of your Cash Flow Projection. Now, you can take more informed decisions such as, expanding into new markets, investing in new products, recruiting new staff, and so on.
In this section
View Cash Flow Projection report
![]()
The Cash Flow Projection Report forecasts the amount of cash that you expect to come into and flow out of your business, for a particular period.
- Press Alt+G (Go To) > type or select Cash Flow Projection > press Enter.
A sample image of Cash Flow Projection report appears, as shown below: The Cash flow Projection report displays the data for the remaining days of a financial year, for which no transaction has been passed. For instance, assume that the DATE OF LAST ENTRY for your company’s financial year is 25th February, 2023, and your financial year ends by 31 March, 2023. In this case, the projection data for the remaining days of the report, which are 25th Feb, 2023 to 28th Feb, 2023, and for the month of March will be displayed.
 - Press Alt+N (Auto Column) to compare your data on the basis of a particular period.
In Cash Flow Projection report, the columns appear on a monthly basis, by default. If you want to compare your cash flow projection, either on a weekly basis or fortnightly basis, you can configure the columns to appear quarterly, weekly, daily, fortnightly, and so on, from the Auto Repeat Columns screen. This feature is helpful for you if you want to keep a close eye on your cash inflow and outflow.
- After selecting the desired option, the Cash Flow Projectionscreen displays the data for the particular period.
For example, if you select weekly from the Column Details, Cash Flow Projection screen appears, as below.

Current Balance: This row displays the projected opening balances of Cash/Bank/Bank OD accounts available for each period.
Receivables: This row displays the amounts that are receivable from customers for each period. You can drill down to view the party details, due dates, and transaction amount in the Receivable column for the periods you have chosen in the Column Details.
Payables: This row displays the amounts that are payable to suppliers for each period. Drill down to view the party details, due dates, and transaction amount in the Payables column for the periods you have chosen in the Column Details.
You can Press Alt+F5 to have a detailed view of the report. A sample image of Cash Flow Projection report with detailed view appears, as shown below:
After pressing Alt+F5, you can see the rows Bank Accounts and Bank OD A/c rows appearing just below A. Current Balance section, which sum up to become the Current Balance. Similarly, Sundry Creditors and Sundry Debtors rows appear under the B. Receivables section, and Sundry Debtors row under the section C. Payables. Just like mentioned in the report below, your Nett Balance is the difference between the sum of your Current Balance and Receivables, that is (A+B) and your Payables (C).
Set Overdraft Limit
![]()
The Cash Flow Projection report in TallyPrime allows you to set the overdraft limit for your bank Overdraft accounts, so that you can project the cash flow based on the required limit. Overdraft accounts are for providing overdraft facilities to businessmen, through which they can draw more money from the bank apart from the balance available.
- Open Cash Flow Projection > press Alt+S (Set OD Limit). The Bank OD Limit screen appears.
- Enter the OD limits for the required banks, as shown below:

- Accept the screen. As always, press Ctrl+A to save.
The Overdraft limit specified for a bank account either excludes or includes the opening balance brought forward, depending on whether it is a credit balance or a debit balance.
You can also set OD limit from Ledger Alteration screen.
- Press Alt+G (Go To) > select Alter Master > select Ledger under Accounting Masters from Master Alteration screen.
- Select the Bank for which you want to set the OD limit from the List of Ledgers. The Ledger Alteration screen appears.
- Set the OD limit.

- Accept the screen. As always, press Ctrl+A to save.
The alteration of Overdraft limit from either of the screens is acceptable and is reflected automatically in the bank ledger.
Viewing Cash Flow Projection
TallyPrime allows you to have a detailed view of your Cash Flow Projection report by adding few other parameters such as Cash Account, Overdues, including the Scenarios, and so on. You have to include these parameters in the Cash Flow Projection report, by pressing Ctrl+B (Basis of Values), as they do not get reflected in the projection report by default. After enabling Cash Account, you can see your overall Cash-in-Hand under Current Balance. When you set the Include Scenarios option to Yes, you can see your entries passed using Memorandum vouchers, Reversing Journal, and Optional vouchers, getting reflected in the Cash Flow Projection report. Similarly, the Include Overdues option is for projecting your Overdue Receivables and Overdue Payables in the report.
Cash account
![]()
By default, the Cash Flow Projection displays the Bank Accounts and Bank OD A/c. Hence, payments made towards expenses and purchases through cash is not displayed. However, you can configure the Cash Flow Projection to include the cash account.
- Open Cash Flow Projection > press Ctrl+B (Basis of Values).
- Change Include Cash Account to Yes.

After the option Include Cash Account is changed to Yes, you can see the row Cash-in-Hand option appearing below Current Balance section along with Bank Accounts and Bank OD A/c, which now sum up to become the Current Balance.
Memorandum, Reversing Journal, and Optional Vouchers
![]()
By default, the Cash Flow Projection excludes Memorandum Vouchers, Reversing Journals, and Optional Vouchers. However, you can configure the Cash Flow Projection to include these vouchers. If you want to include Memorandum Vouchers, Reversing Journals or Optional Vouchers, then you need to create Scenarios first. Once the Scenarios are created, you can see the option Include Scenarios in Basis of Values.
- Open Cash Flow Projection > press Ctrl+B (Basis of Values).
- Change Include Scenarios to Yes.
Now, if you have recorded any entry using Memorandum vouchers, Reversing Journal, and Optional vouchers, you can see those data reflected in the Cash Flow Projection report. You can also know more about Memorandum, Reversing Journal, and Optional vouchers.
Overdues
![]()
By default, the Cash Flow Projection excludes uncleared and overdue bills. However, you can configure the Cash Flow Projection to include such bills.
- Open Cash Flow Projection > press Ctrl+B (Basis of Values).
- Change Include Overdues to Yes.

After the option Include Overdues option is changed to Yes, you can see the Overdue Receivable row added to the Receivables section and Overdue Paybles row added to the Payables section.
This report briefly summarizes the various aspects of your current business scenario according to Cash Flow and Cash Flow Projection report and gives you an idea to plan for the future of your business accordingly.
Funds Flow Report
For any business, it is of utmost importance to track its funds, especially working capital to monitor the status of the business. TallyPrime provides you with the Funds Flow report which tracks the movement of funds during an accounting period, including the opening and closing values of working capital and the flow during the period. You can change the scale factor, or compare the values across different factors for better analysis. There is a separate view available to analyse the ledgers with negative flow.
Tracking working capital can indicate improvements or detect areas of improvement in funds flow by highlighting the sources and application of funds. If you are unaware of your working capital it may lead to decisions that might have adverse effects on your business. On the other hand, if you are aware of your working capital, you can plan your sources and applications of funds accordingly.
The Funds Flow report which tracks the movement of funds during an accounting period includes the difference between the sources and application of funds to show the net change in the working capital during the period. A positive working capital indicates that the source of funds was more than the application of funds and a negative sign indicates that the source of funds was lesser than the application of funds. Consequently, the Funds Flow report will let you know the status of your working capital so that you can plan the course of your business accordingly.
Now you may want to know the factors impacting your working capital, all you have to do is just drill down from the monthly report. The Funds Flow Summary report displays the sources from which additional funds were derived and where these funds were used. It is represented in terms of the sources of funds and the application of funds. The transactions that increase the working capital are marked as sources of funds, while the transactions that decrease the working capital are marked as applications of funds.
In the Funds Flow Summary report, you can also see the balance of your current assets and liabilities which will assist you in prioritising the source of funds or its application as required. You can also view this report in the browser.
View Funds Flow

You can view the Funds Flow report in TallyPrime to track the changes in your working capital as it displays the opening and closing working capital of a period and the net change as funds flow.
- Press Alt+G (Go To) > type or select Funds Flow > press Enter.
Alternatively, Gateway of Tally > Display More Reports > Funds Flow. - Press F2 (Period) to set the required period. The Funds Flow statement appears as shown below:

The Funds Flow displays the movement of working capital for each month. You can see the Opening Balance and Closing Balance of each month with a column for Funds Flow.
In some cases, you might see that the Funds Flow column is blank which indicates that there was no movement in the source or application of the fund. Similarly, a fund flow becomes negative when the application of funds is more than the source.
You can drill down from the required month to further analyse the factors responsible for the change in working capital which will be displayed under the Sources and Applications columns as Nett Profit and Nett Loss. The Funds Flow Summary report also displays other aspects that impacted the funds flow during that period like assets and liabilities. You can drill down further from the Nett Profit or Nett Loss till you reach the exact transactions responsible for the change in the working capital.
You can also customise the Funds Flow report in TallyPrime as required by selecting the Scale Factor in the Basis of Value configuration. To do so,
- Press Ctrl+B (Basis of Value) > Scale Factor and select the required option.
You can also change the view of the report and add periodic columns like monthly, quarterly, weekly, and so on for a comparative view of the funds flow across periods. To do so,
- Press Alt+N (Auto Column) and select the required period in the Auto Column field.
For example, if you want to see the fund flow in your business for every quarter you can select Quarterly.
On the Funds Flow Summary report, you can also view the Negative Ledgers under Exception Reports. To do so,
- Press Ctrl+J (Exception Reports) and select Negative Ledgers.
To know further about reports and their features in TallyPrime, go to Working with Reports in TallyPrime
Manage Outstanding Receivables in TallyPrime
When you do sales on credit, you would certainly need to keep track of the due amounts that your parties owe you. All such dues from your parties will be your outstanding receivables. Managing the outstanding receivables can be critical to your business because it not only helps to understand how much your parties owe you, but also helps you to recover the dues on time and use it for your business, as needed. You can manage outstanding receivables in TallyPrime and keep record of all the dues.
Record and track dues in TallyPrime: If you have a good relationship with your parties and trust them, and have sold goods or services on credit, TallyPrime takes care of tracking all your outstanding receivables from the parties. By referring to the corresponding reports, you can simply follow up with your parties, when needed, for recovery of the due amounts.
For example, if you have made a credit sale with 100 pieces of item 1 worth Rs. 6,00,000 and 50 pieces of item 2 worth Rs. 4,00,000 to Customer A, you can view the total outstanding amount of Rs. 10,00,000 as On Account against Customer A.
Use credit period: To ensure that all the credits are tracked systematically, it is always advisable to maintain your accounts by specifying the credit period or due date for the party. You can specify a credit period of say 30 days in the party ledger for the party to make the payments. On recording a credit sale for such parties, TallyPrime reflects the pending amount and the due date based on the credit period specified for the party. This helps to avoid conflicts with your parties, systematically track your outstanding receivables, and recover the payments from your parties in a timely manner.
Bill-by-Bill: At times, when you have made a credit sale that your party may not be able to pay at a time, you can mutually agree with your party to make part payments and recover the total due within a specified time. In such a case, you can use the bill allocation capability in TallyPrime to create one or more bill references as per the breakup decided. Each bill reference can also be specified with a credit period or a due date.
For example, you can record the credit sale of Rs. 10,00,000 by creating bills references against each part payment – C1 for Rs. 5,00,000 in first 30 days, C2 for Rs. 2,00,000 in 60 days, and C3 for the remaining Rs. 3,00,000 in 90 days.
Whether you have recorded your credit sales to the party as On Account or Bill-wise, you can track the outstanding receivables using reports in TallyPrime and manage your accounts systematically on receipt of the payments. The benefit of tracking your outstandings receivables bill-by-bill is that you can easily settle the due amounts by linking
the bill reference in your transactions.
Based on your business process if you charge interest on the overdue payments, you can do so by defining the interest rates for the corresponding parties. For more information, see Interest Calculations.
Credit Sale Without Bill-wise
When you do a sale on credit, you will certainly need to track and manage the amount due against the party. Once you record a sale, TallyPrime reflects the sale amount as Debit against the party in the corresponding report. Anytime you receive the payment from your party, you can simply enter a receipt entry for that amount to clear the outstandings for that party.
In this section
- Record a credit sale
- Maintain Credit Sales Bill-by-Bill
- Change Bill Allocation
- Manage Credit Period
- Settle dues for credit sales made without bill-wise
- Ledger Vouchers
- Group Summary
Record a Credit Sale
A sale transaction without a corresponding receipt entry is a sale on credit – until the party has made the payment. Record a credit sale.
Maintain Credit Sales Bill-by-Bill
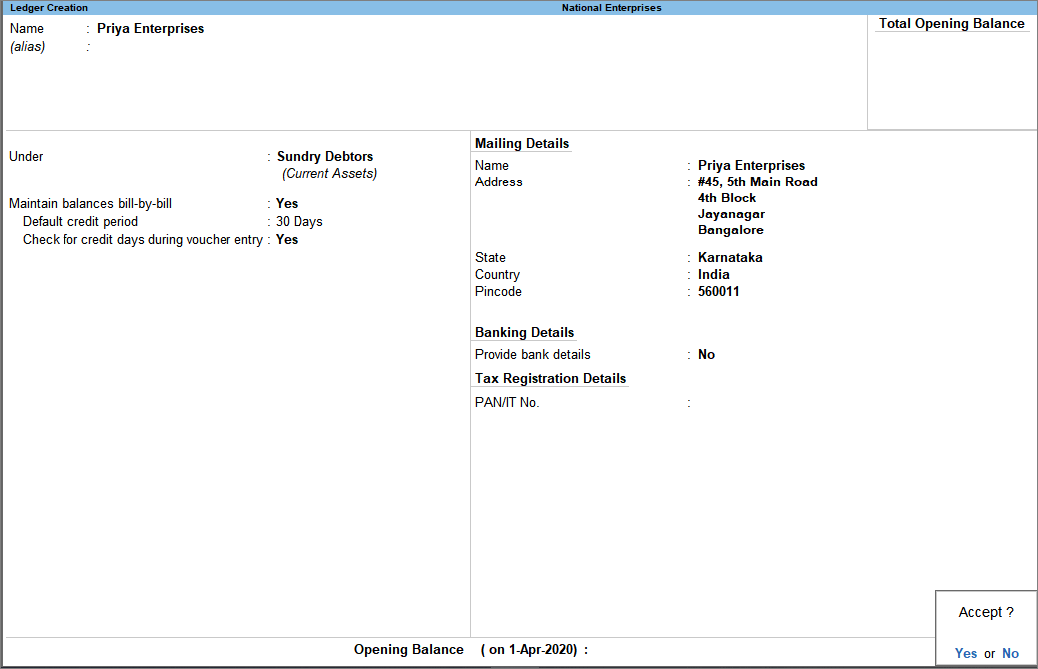
You may need to track bill-wise details for each party, to know the bill-by-bill details of payable or receivable amount. In TallyPrime, you can enable bill-wise details feature for the company, and enable the bill-wise tracking for the required party ledgers. You can then record transactions with bill-wise details and track the payable and receivable amounts.
- Enable bill-wise details in party ledger.
- Gateway of Tally > Alter > Ledger > select the party ledger > and press Enter.
Alternatively, press Alt+G (Go To) > Alter Master > Ledger > select the party ledger > and press Enter. - Set the option Maintain balances bill-by-bill to Yes.
If you do not see this option, press F12 (Configure) and set Maintain balances Bill-by-Bill to Yes.
All the bills generated earlier for this ledger, will reflect as On Account bills. You can link each bill to the respective sales and receipts. - Enter the Default credit period which you want to allow for this party.
- Set the option Check for credit days during voucher entry to Yes to manage the credit limit while recording an invoice.

- Accept the screen. As always, you can press Ctrl+A to save.
In the party ledger, the cursor will skip the field Maintain balances bill-by-bill when the option Inventory Values are affected is enabled. Also, if you select a foreign currency in the Currency of ledger field, the option Maintain balances bill-by-bill will not be displayed.
We recommend that you maintain the currency of party ledger in the base currency selected for the company. In case of bank ledgers used to maintain foreign currencies, you can select the required foreign currency. Only when you maintain a ledger account in base currency, you can configure bill-wise details, record transactions by selecting any other currency to track outstanding and also generate your MIS or Final Reports. Hence, if you select a foreign currency for party ledger, the option Maintain balances bill-by-bill will not be displayed.
- Gateway of Tally > Alter > Ledger > select the party ledger > and press Enter.
- Record the sales transaction.
When default bill allocation is enabled (Use default Bill-wise details for Bill Allocation set to Yes in the F12 configuration options) of sales invoice, you will not see any difference in the voucher. On saving the sales transaction, the bill gets linked to the party as default bill allocation. The voucher number appears as the bill reference. This bill starts appearing in the outstanding reports of the party.
Change Bill Allocation
If you receive advance payments from your customers and have accounted as receipts, you will need to settle these advance receipts when you record the sales transaction. In TallyPrime, you can allocate your sales bills against your receipt entries. You can also configure your sales invoice to decide the bill allocations (including method of adjustment, bill no., etc.)
- Configure the invoice to change the bill allocation.
- Ensure the option Maintain balances bill-by-bill is set to Yes.
- In the sales voucher, press F12 (Configure) > set Use default Bill-wise details for Bill Allocation to No.
Henceforth, you can select the bill references in the Bill-wise Details screen, until you change the option in F12 (Configure) of the invoice. - In the invoice total field, place the cursor and press Enter to view the Bill-wise Details screen.

- Specify the bill-wise details.
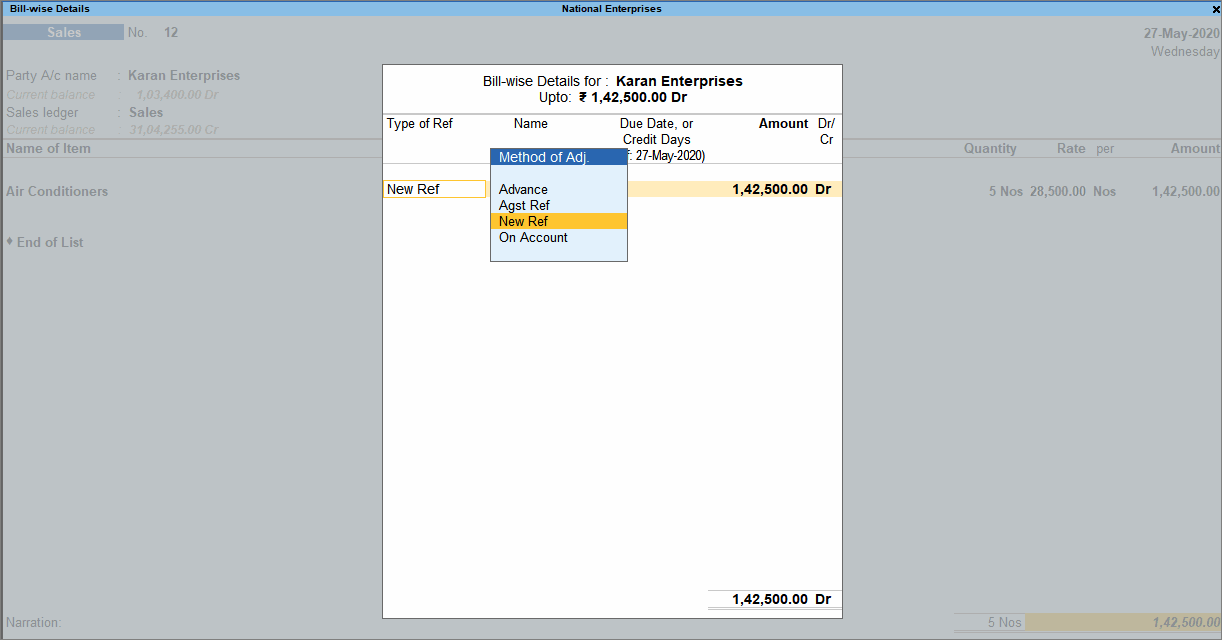
Bill-wise Details allows users to track details of payments or receipts/advanced received which have already been made, or that are due, and also generate payables or receivables reports. It allocates bill numbers as defined in the voucher type master, in ascending order.- In Type of Ref, select the method of adjustment.
This field enables you to make adjustments against any other transaction with the party, which you can do by providing the corresponding bill number against which the transaction is recorded.- Advance – This is not applicable for sales.
- Agst Ref – Select when you need to adjust the transaction against a bill (advance received, credit note, etc.).
- New Ref – Select when you are recording a fresh transaction, to generate a new bill for the party.
- On Account – Select when you want to save the sales invoice without any bill reference.
In Name, the sales voucher number appears. You can change this to any value and use the name to track the bill. If you configure appropriate voucher numbering, you can use the voucher number itself.
If you want to adjust some amount against an advance, and split the remaining bill value by providing different credit days, you can do it in TallyPrime. You can break the amount of a single sales invoice into multiple bills by entering different bill references and due date/credit days.
- Press Enter to accept.
- Accept the invoice. As always, you can press Ctrl+A to save.
- In Type of Ref, select the method of adjustment.
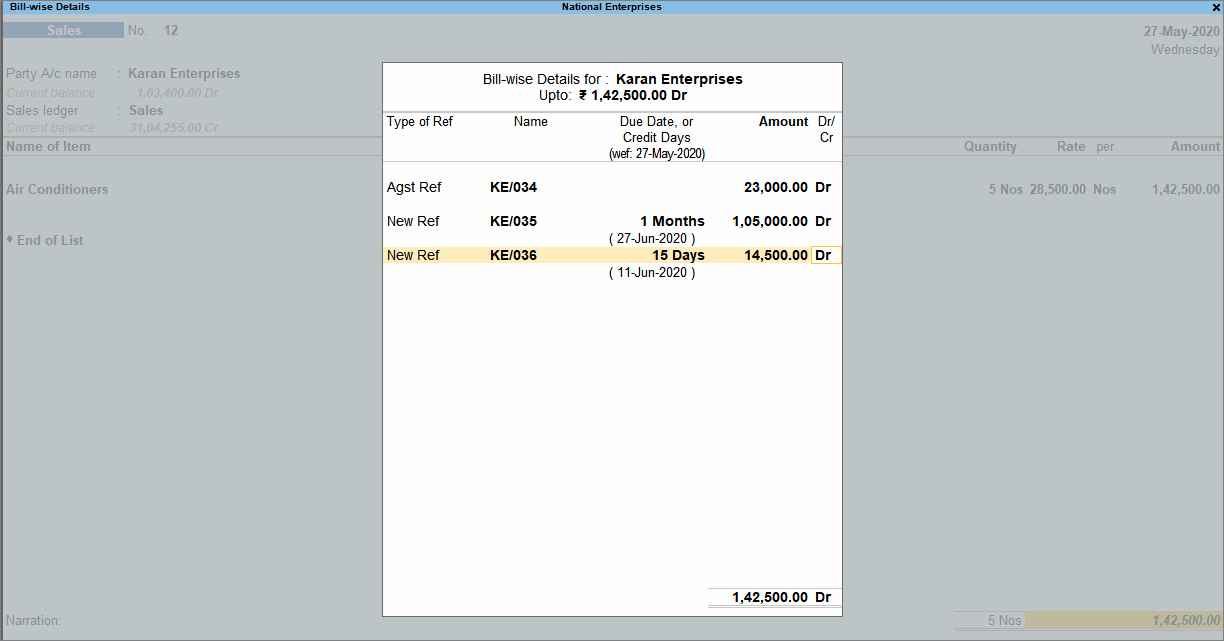
While recording transactions with party ledgers, the bill-wise details will appear for selection. You can select the required bills to set-off/clear the bill references.
Manage Credit Period
Based on your business requirements and customer relationship, you may need to provide different credit period to different parties. In TallyPrime you can enter the required credit period for each customer in the party ledger, and change it, if needed, while recording the transaction.
When the party master is enabled to Maintain balances bill-by-bill, the following options appear in the party master:
- Default credit period – Set the credit days. The credit period may be given for Sundry Debtors and Sundry Creditors. The number of credit days or period can be defined in various ways:
| Suffix | Example |
Days | None | 5 is considered as 5 days. |
Weeks | W | 5 W is considered as 5 weeks. |
Months | M | 5 M is considered as 5 months. |
Year | Y | 5 Y is considered as 5 years. |
While recording transactions, the credit period will appear in the Bill-wise Details screen as Due Date or Credit Days. You can change the details as needed.
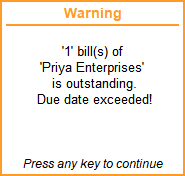
- Check for credit days during voucher entry – Set it to Yes to get warned about exceeding credit period or pending outstanding bills for a party during transactions. The warning message appears as shown below:
Once you set the terms of credit in party ledger, the same gets applied in transactions.
Settle dues for credit sales made without bill-wise
When your party makes a payment against a sale that you have recorded earlier, you can pass a receipt entry to settle the due amount. It is important to ensure that you receive the payments from your parties and settle your accounts time to time.
Scenario 1: Sale made for say Rs 50,000. Customer pays only Rs. 30,000 first and the remaining Rs. 20,000 later. This is the simplest case.
Scenario 2: Sale made for say Rs. 50,000. Customer pays Rs. 30,000 first, pays another Rs. 50,000. At a later date asks for goods worth Rs. 30,000. This is the complex case (without Bill-wise).
For example, Customer A owes you a total of Rs. 1,00,000 from the sales made on credit, and later has made a payment of Rs. 40,000. You can now make a receipt entry against that party on the day you receive the payment. As an when Customer A makes a payment of the remaining Rs. 60,000, you can pass another receipt entry to settle to entire outstanding receivables from that party. If you often transact with a customer, say Customer B, and you received an advance payment of Rs. 1,20,000. As and when you make a sale to the party, the corresponding amount gets knocked off from the total outstanding from the credit balance against Customer A.
Ledger Vouchers
In this report, you can see the details of sales you have made to your party along with the receipts recorded on receiving the payments.
- Alt+G (Go To) > type Ledger Vouchers > select the party.
Alternatively, Gateway of Tally > Display More Reports > Account Books > Ledger > select the party. A sample image is as shown.

Ledger Voucher Monthly Summary
- Press F6 (Monthly) to view the monthly receivables and payments received from the party.

Group Summary
If you have recorded sales for more than one party, you can view the Closing Balance for the parties under the selected group, using the Group Summary report. This report by default displays the Closing Balances of parties with uncleared dues.
- Alt+G (Go To) > type Group Summary > select the party group (For example, Sundry Debtor).
Alternatively, Gateway of Tally > Display More Reports > Account Books > Group Summary > select the party group.
A sample image is as shown.
- To view transaction details – along with the Closing Balances – for all parties that you have transacted with, under a group, press F12 (Configure) > set Nett transactions only to No.
A sample image is as shown below.
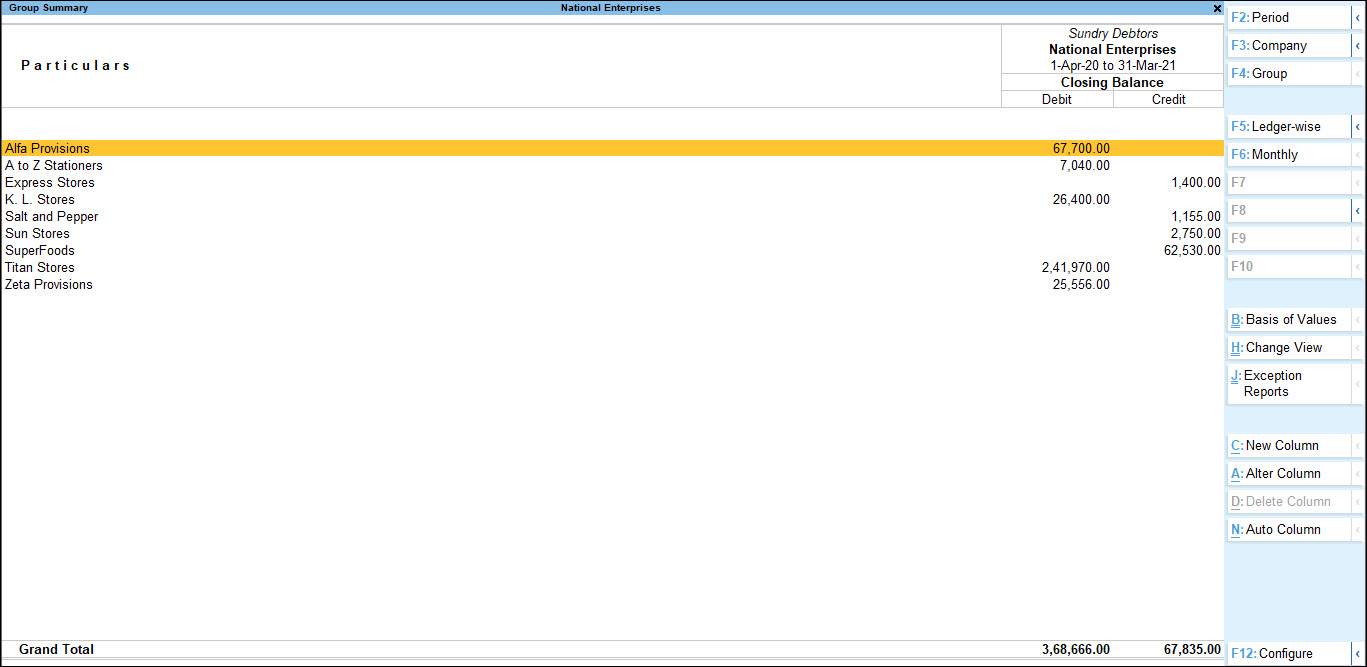
Track Outstandings for party
If you maintain your sales report separately for parties belonging to different branches, regions, etc., you can track the outstandings for all parties together or view the consolidated receivables for each set (branch, region, etc.) of parties.
For example, Customer A, Customer B, and Customer C belong to the NorthZone and Customer D and Customer E belong to SouthZone. If you recorded credit sales for all of these customers, you can view the receivables party-wise or view the total receivables from NorthZone and SouthZone separately.
Press F5 (Ledger-wise) to view receivables party-wise. When you are seeing the party-wise receivable details, press F5 (Group-wise) to view the consolidated receivables from each group.
As in all other reports, press Alt+F5 to expand the groups to view receivables party-wise under each group.
Credit Sale with Bill-wise
For systematic management of receivables and a cordial relationship with your buyers, it is always advisable to maintain accounts bill-by-bill. If you maintain bills with specific reference numbers for easy tracking in the future, you can use the bill-wise option in the party master. Next time you record a transaction for that party, TallyPrime will internally track the bill by using the voucher number as the reference number. All earlier transactions recorded for that party without the bill-wise option will be tracked as On Account. Whether there is a reference number or not, such dues can be settled by passing the corresponding receipt entries.
In this section
- Enable bill-wise in party master
- Record a credit sale
- Settle dues for credit sales made using bill-wise
Enable bill-wise in party master
In the Party Master screen:
- To maintain vouchers bill-wise for a particular party, enable the option Maintain balances bill-by-bill. When you make a credit sale to this party, by default the voucher date is considered as the due date for the payment.
Note: On maintaining balances bill-by-bill, all bills generated earlier are reflected as On Account. - To get the option in party master:
- In F11, ensure that Maintain Accounts is set to Yes and set Enable Bill-wise entry to Yes.
- Ensure that in F12 of party master, the option Provide bill-wise details is set to Yes.
- Credit Period: If you want to provide any lead time to your party to clear their dues, specify the Credit Period – for example, 30 or 60 Days. When you make a credit sale to this party, TallyPrime internally calculates the due date against the voucher entry date, based on the credit period you have specified. You may override this during transaction, if you wish to. Refer to the Sales of Goods and Services topic.
If you have specified a credit period for the party, next time you make a sale to the party, you can keep a check on the credit days given to that party. To do so, enable the option Check for credit days during voucher entry. When you record a sales invoice after the specified number of credit days for the party, TallyPrime will inform you of the same.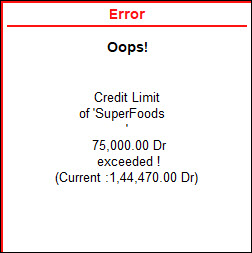
Refer to Record a credit sale for details.
Record a credit sale
A sale transaction without a corresponding receipt entry is a sale on credit – until the party has made the payment. Record a credit sale. If you have enabled the bill-wise option in the party master, TallyPrime tracks the bill by using the voucher number as the bill reference number.
Settle dues for credit sales made using Bill-wise
If you have made sales on credit, it is important that you receive the payments from your parties and settle your accounts time to time. When your party makes the payment, you can pass a receipt against the corresponding sales bill reference and settle your dues.
For example, Customer B owes you a total of Rs. 85,000 from the sales made on credit, and later has made a payment of Rs. 25,000. You can now make a receipt entry against that party on the day you receive the payment. When Customer B makes a payment of the remaining Rs. 60,000, you can pass another receipt entry to settle to entire outstanding receivables from that party.
When recording a receipt entry
- In the Bill-wise Details screen, you can choose the bill reference number, against which you want to record the receipt.

Alternatively, you can settle the sales bill from the Ledger Outstanding report.
Split a Credit Sale into Multiple Bills
When you have to make a credit sale of large amount that your party is unable to pay at a time, and has agreed to make partial payments in regular intervals, you can split the sales into multiple bills. This helps you to track the payment breakup against the bills created and manage your outstanding receivables systematically.
For example, you have made a credit sale of Rs. 10,00,000 to Super Foods. You can split this amount into Rs. 2,00,000 payable in 30 days, Rs. 5,00,000 in 60 days, and the remaining Rs. 3,00,000 in 90 days. Each part payment will be associated with a bill reference number. The corresponding reports will show the breakup of your receivables in the next 90 days. At the same time, when you receive the payment from the party, you can record the receipt entry against the bill references created and settle such bills.
In this section
- Enable Bill-wise in party master
- Record a credit sale – split bill
- Settle dues for credit sales made using bill-wise
Enable bill-wise in party master
For more information, click here.
Record a credit sale – split bill
You can record a sale and split the amount into multiple bills using the Bill Allocation feature.
Alt+G (Go To) > Create Voucher, press F8 (Sales).
Alternatively, Gateway of Tally > Vouchers > press F8 (Sales).
To split the sales bill into multiple bills, when recording a credit sale:
- Press F12 (Configure) > set Use default bill-wise details for bill allocation to No.
- In the voucher screen, press Enter on the total amount field to open the Bill-wise Details screen.
- In this screen, select New Ref and provide a Name for the bill. For example, if your voucher number is V1, your bill names can be V1a, V1b, and so on.
The bill name that you specify here can be used as the bill reference when you record a receipt transaction to settle your dues. - If you had specified any Credit Period in the Party Master, the Due Date is set to the same value by default. To override the Credit Period, press F12 (Configure) > set Modify all fields to Yes. Now, specify the due date.
- Fill in the Amount based on how you want the total amount to be split.

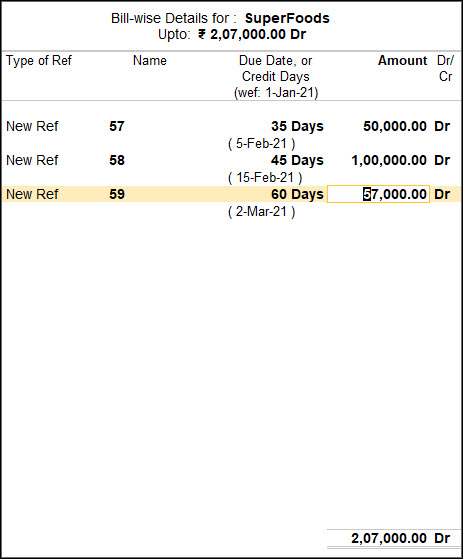
Settle dues for credit sales made using Bill-wise
For more information, click here.
Ledger Outstanding
The Ledger Outstandings report displays the details of the outstanding receivables – Opening Amount, Pending Amount, Due Date and Overdue days for the selected party. All the sales entries recorded bill-wise or without any bill references and the corresponding receipt entries recorded are displayed in this report. You can settle the outstanding
amount from your party using the report.
In this section
- View Ledger Outstanding report
- View age-wise outstanding receivables
- Settle bills from Ledger Outstanding reports
View Ledger Outstanding report
Gateway of Tally> Display More Reports > Statement of Accounts > Outstandings > Ledger > select the party.
Alternatively, Alt+G (Go To) > type Ledger Outstanding > select the party.
- On Account: When the sales and receipt entries are not recorded bill-wise then such entries are tracked as On Account and are displayed in the Ledger Outstandings report.
- Bill-wise entries: All the credit sales that are recorded bill-wise for a party are displayed in this report.
Press Alt+F5 to see all the bills with the corresponding receipt entries. - Pending Amount: The pending amount that you have to receive from the party and if any advance payments that have already been received from the party are displayed here.
- Due on: By default, the sales voucher date is considered as the due date. However, if you have specified a credit period or due days in the party master, the due date is updated accordingly once you record a sales
transaction. - Overdue by days: Based on the date of the report, TallyPrime displays the overdue days from the due date, if specified earlier, or the voucher entry date.
A sample image of the Ledger Outstandings report is shown below.

View age-wise outstanding receivables
If you want to know about your outstanding receivables from a party in a periodic manner, you can configure your report to analyse the age of the pending amount. This will help in tracking the amount you will receive in the coming days and therefore plan accordingly.
- Press F6(Age-wise) and select the Method of ageing.
- Ageing by Bill Date: Considers the voucher entry date for displaying the details.
- Ageing by Due Date: Considers the due date for displaying the details.
- Specify the From and To values.
For example, if you can set the values to 0 to 15, 15 to 30, 30 to 45 and so on, the report will display the pending amount to be received in every 15 days for the next 45 days.
View outstanding receivables based on Due Dates | Sort Bills
TallyPrime Release 5.0 provides the flexibility to sort bills and view your receivables based on the payment due dates set for the sales made to your parties. For parties that you maintain balances bill-wise while recording the transactions, you can settle their bills based on the order of their due dates. In case you have set any credit period for the party, while recording a transaction against a reference bill, the due dates is considered including the Credit Period. This flexibility was not available in TallyPrime Release 4.1 and earlier.
You can clear the pending bills in order of their due dates, including the credit days if any for the party, with the oldest bill being settled first.
- Open the Ledger Outstanding report: press Alt+G (Go To) > type or select Ledger Outstandings.
- Select the Party for which you want to view the outstanding receivables. For example, Hadeed Traders Ltd.
- In the default report, sort the transactions to view then as per the due date.
- Press F12 (Configure) > Sorting Method.
- Select Due Date (Decreasing) or Due Date (Increasing) based on the order of dates that you want to check.

You can also sort the report based on the Pending Amount, Ref No. and other columns available in the report, as per your convenience.
You can view that the bills for Hadeed Traders Ltd. are sorted based on the Due Dates.
- In case you want to use the same report for future reference, press Ctrl+L (Save View) to save the report with a report name of your choice.
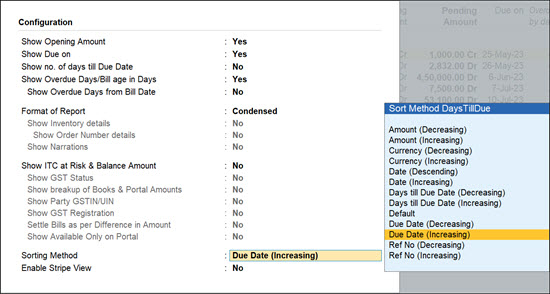
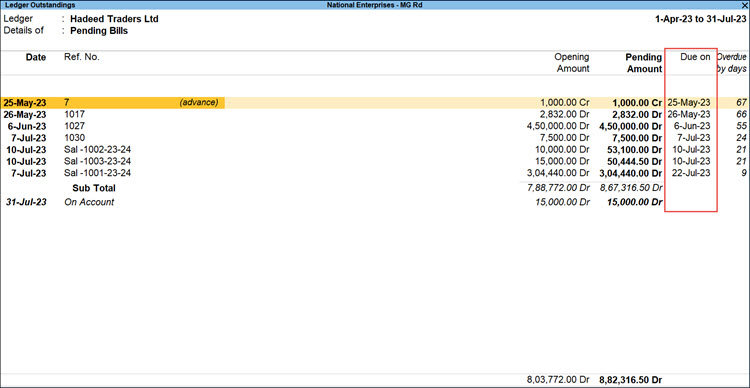
Settle bills from Ledger Outstanding reports
If you have maintained your sales using bill-wise and your party has made the complete due payment, settling the bill from the outstandings report becomes simpler.
- Press space bar to select the bill for which you have received the payment.
- Press Ctrl+B (Settle Bill) to open the Bill Settlement screen.
- Provide the receipt entry date.
- Specify the Account type. For example, Cash or Bank.
- Enter Narration, if any.

- Save the screen.
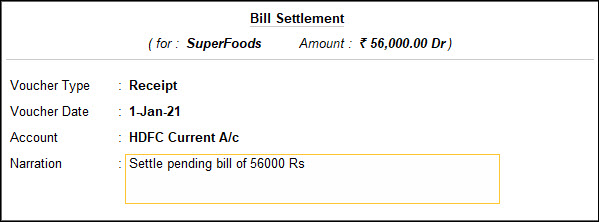
TallyPrime creates a receipt entry based on the details you provide and settles the due bill amount.
Bills Outstanding
The Bills Outstanding report displays the Pending Amount, Due Date and Overdue days for all accounts maintained using the bill-wise option for the parties. If you have made a receipt entry against any of the parties, the Pending Amount will be updated accordingly until the total due is settled. If you have specified a credit period for your parties or defined the due dates in the transactions, TallyPrime calculates the overdue details based on the date when you recorded the sales transaction.
Gateway of Tally > Display More Reports > Statement of Accounts > Outstandings > Receivables.
Alternatively, Alt+G (Go To) > type Bills Outstanding or Bills Receivable.
A sample image of the Bills Outstanding report is shown below.
- Pending Amount: This the amount pending from your party.
- Due on: By default, with bill-wise option enabled, the sales voucher date is considered as the due date. However, if you have specified a credit period or due days in the party master, the due date is updated accordingly once you record a sales transaction.
- Overdue by days: Based on the date of the report, TallyPrime displays the overdue days from due date, if specified earlier, or the voucher entry date.
Ledger-wise Bills:
Press F7 (Ledger-wise Bills) to view the receivables bill-by-bill for each party in the selected group.
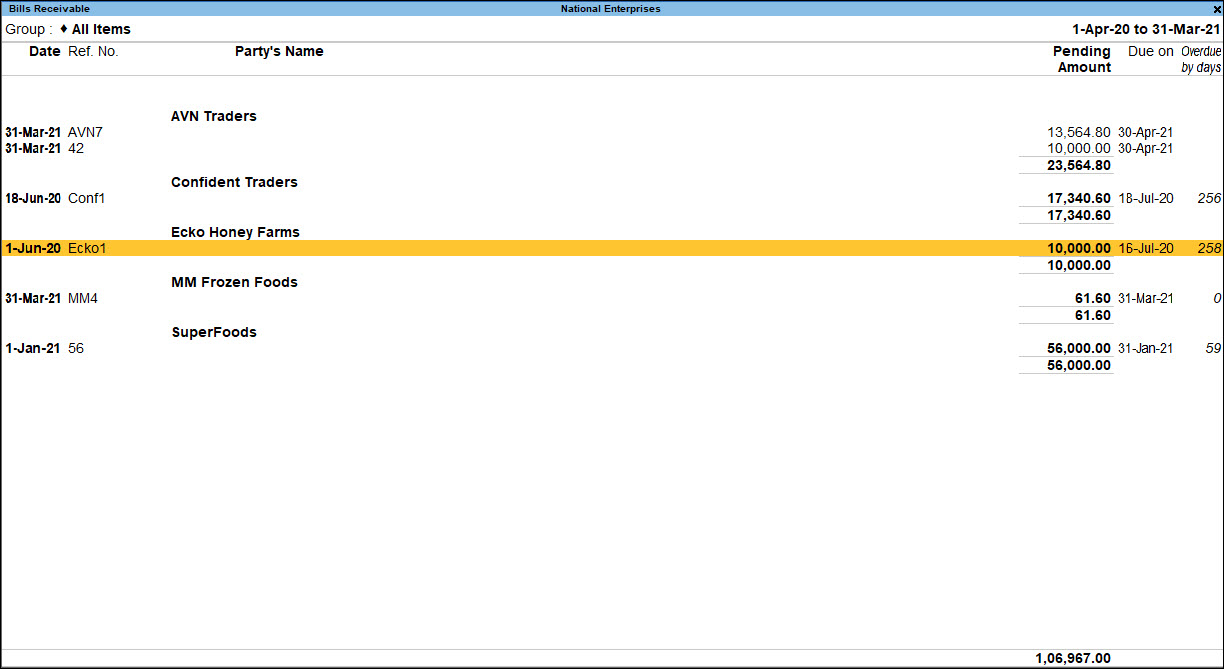
Check and Settle bills from Bills Outstanding report
Select the outstanding bills which you want to settle.
- Press Alt+G (Go To) > type or select Ledger Outstandings.
Alternatively, Gateway of Tally > Display More Reports > Statements of Accounts > Outstandings > Ledger. - Press Spacebar and select the bills to be settled.
- Press Alt+B (Settle Bills).

- Enter the details in the Bill Settlement screen.

- Press Enter to accept the Bill Settlement sub screen. The Receipt/Payment Voucher gets prefilled as shown below:

- Accept the voucher.
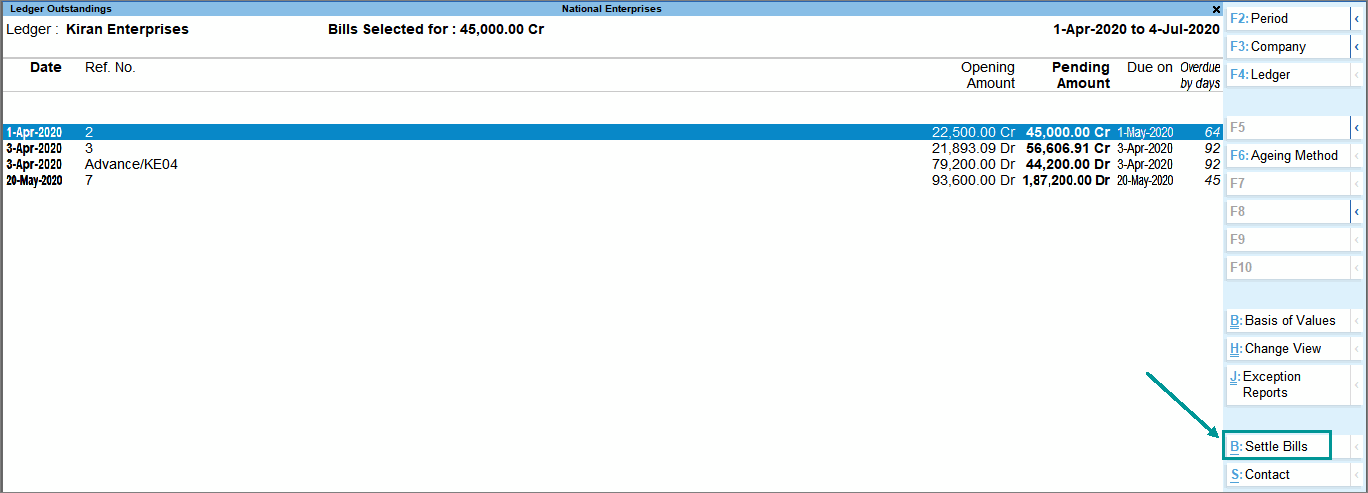
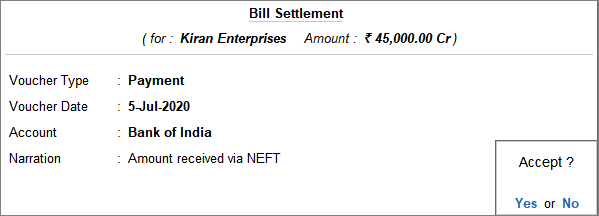
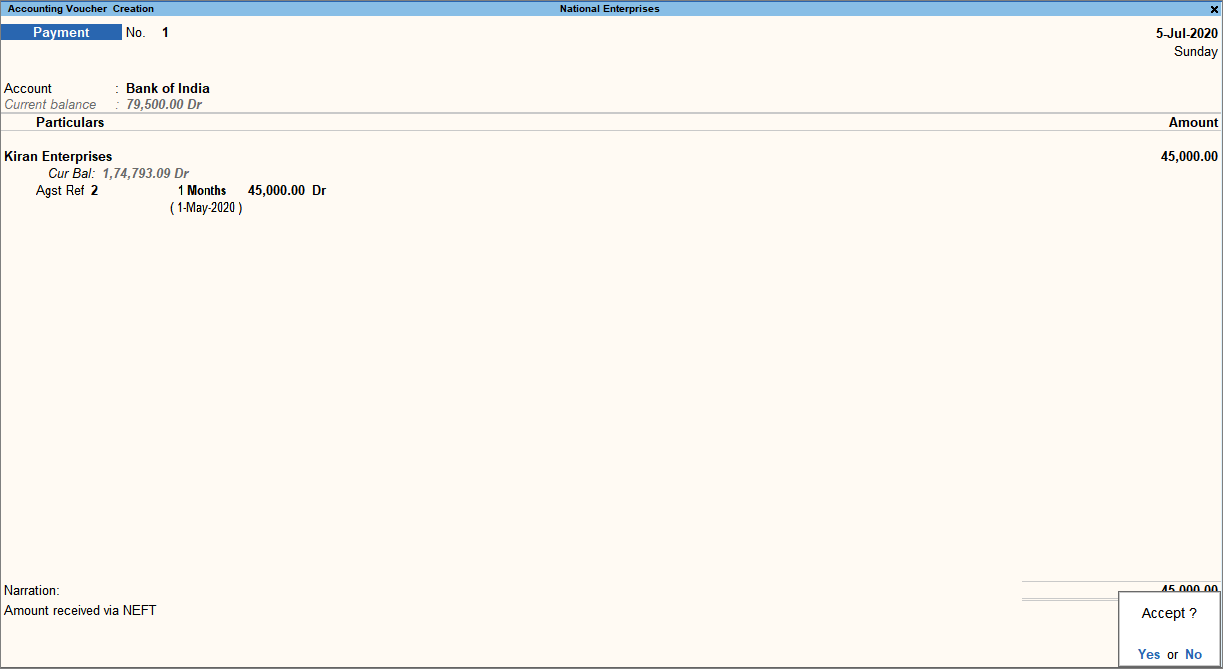
Group Outstandings
This report helps to view the group-wise outstanding details, including the debit and credit balances. You can configure the report to see only the overdue balances and take necessary steps to recover the due amount from your parties.
Gateway of Tally > Display More Reports > Statement of Accounts > Outstandings > Group Outstandings > select the group.
Alternatively, Alt+G (Go To) > type Group Outstandings > select the group.
Ledger-wise
Press F5 (Ledger-wise) to get a consolidated view of all the receivables party-wise in the selected group. A sample image is shown below.
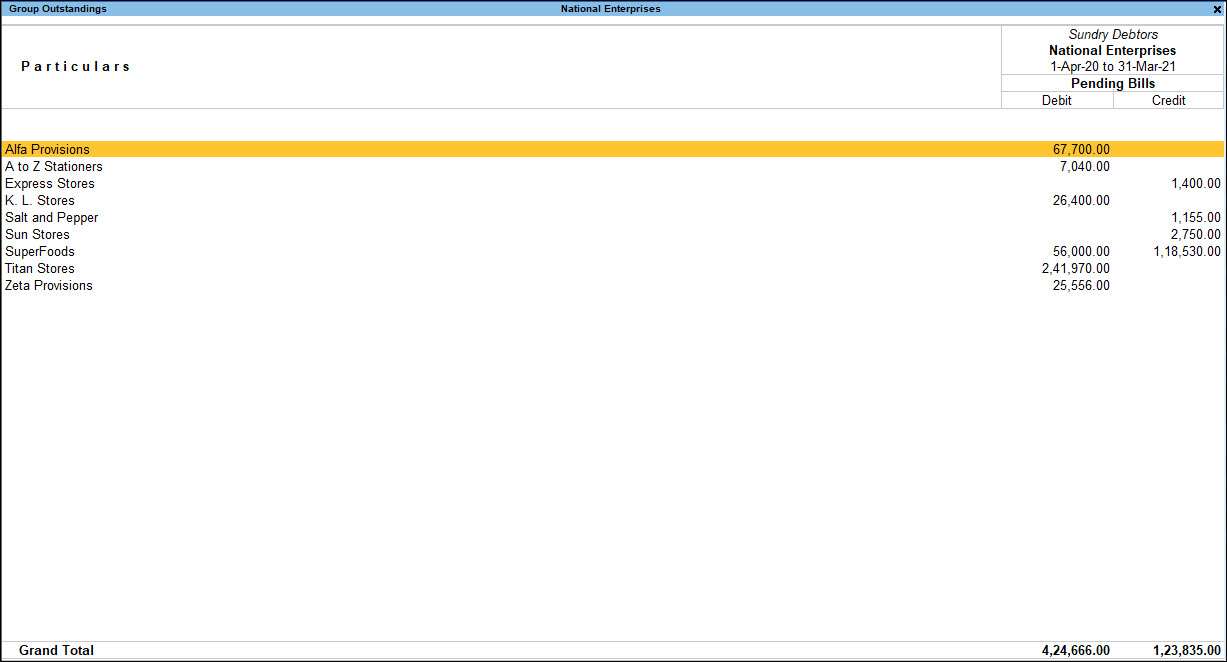
Age-wise
Press F6 (Age-wise) to view the outstanding receivables from a party in a periodic manner, you can configure your report to analyse the age (in days) of the pending amount. This will help in tracking the amount you will receive in the coming days and therefore plan accordingly.
- Press F6 (Age-wise) and select the Method of ageing.
- Ageing by Bill Date: Considers the voucher entry date for displaying the details.
- Ageing by Due Date: Considers the due date for displaying the details
- Specify the From and To values.
For example, if you can set the values to 0 to 15, 15 to 30, 30 to 45 and so on, the report will display the pending amount to be received in every 15 days for the next 45 days.
Ledger-wise Bills
Press F7 (Ledger-wise Bills) to view the receivables bill-by-bill for each party in the selected group.
Manage Credit Limit for Parties
You can specify the credit limit allowed as per your business for each debtor in the respective ledger. You can record transactions within the specified credit limit for the party. However, transactions like sales order, which do not affect your book of accounts can be passed. TallyPrime also gives you the option to consider posted-dated sales and receipts transactions to arrive at the credit limit utilization by setting the option Override credit limit using post-dated transactions to Yes.
In this section
- Enable and set credit limit
- Check on exceeding credit limit
- Override credit limit using post-dated transactions
Enable and set credit limit
You may want to set credit limit for party ledgers. In TallyPrime, you can set credit limits for ledgers grouped under Sundry Debtors and Sundry Creditors.
Set credit limit for each ledger one-by-one
- Gateway of Tally > Alter > Ledger > select the party ledger > and press Enter.
Alternatively, press Alt+G (Go To) > Alter Master > Ledger > select the party ledger > and press Enter. - Press F12 (Configure) > set Provide Credit Limits to Yes.
- Enter the amount in the Specify credit limit field.

- Enable the option Override credit limit using post-dated transactions, if required.
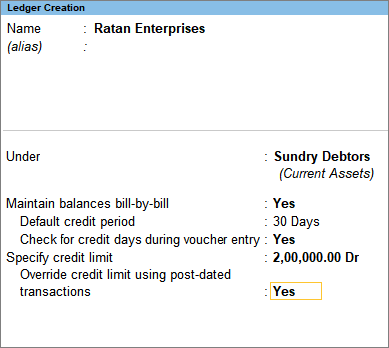
Set credit limits for multiple parties in one-go
- Gateway of Tally > Alter > Credit Limits > select the account group > and press Enter.
Alternatively, press Alt+G (Go To) > Alter Master > Credit Limits > select the account group > and press Enter. - Select the required group of ledgers to set the credit terms.

- In the Multi Ledger Limit Alterationscreen, set:
- Credit Limit – Specify the amount of credit limit against the ledger account in this field. You can set the amount in foreign currency, if required, for ledgers involving forex transactions.
- Credit Period – Specify credit period in number of days or the due date.
- Check for Credit Days during Voucher Entry – Enable this to get a warning message when the party ledger selected in a transaction has exceeded the credit period, and the outstanding bills are not cleared.

To view this report for a different group, press F4 > select the group > and press Enter.
The credit limits defined in the party ledgers will be applied in the transactions.
Check on exceeding credit limit
While recording transactions, you may want to know if the credit limit has been exceeded. In such cases, in TallyPrime, an error message appears with the credit limit defined for the party while saving the transaction. It also shows the amount that has been exceeded.
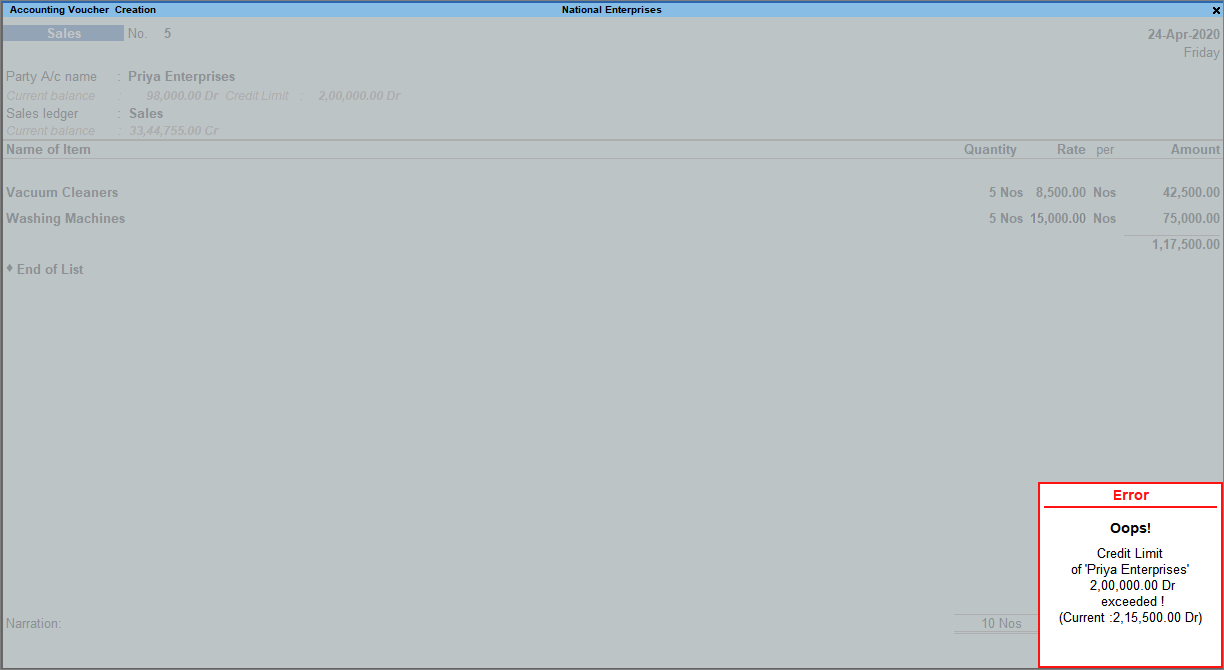
You can:
- Enter a lower value (within the prescribed credit limit) to complete the entry, or
- Enable the option Override credit limit using post-dated transactions in the party ledger.
You can use this information to have better control over the outstandings while recording sales transactions.
Override credit limit using post-dated transactions
Post-dated transactions are non-accounting transactions. They get converted to accounting transactions on the voucher date. The credit limit will not be considered until the transaction is converted from post-dated to regular voucher. However, you may want the post-dated receipt transaction to be considered when the customer has exceeded the credit limit. You can do this in TallyPrime by enabling the option Override credit limit using post-dated transactions in the party ledger.
- Enable party ledger to override credit limit in post-dated vouchers.
- Enter the required amount to Specify credit limit.
- Set the option Override credit limit using post-dated transactions to Yes.

- Record sales invoice before a post-dated receipt voucher.
- Record an invoice for an amount within the credit limit.

- Record another sales invoice, with amount that exceeds the credit limit. An error message appears.

- Record an invoice for an amount within the credit limit.
- Record a sales invoice after post-dated receipt voucher.
- Record a post-dated receipt voucher.

Note: Press Ctrl+T (Post Dated) to mark a voucher as Post-Dated in the voucher creation mode.
- Record a sales transaction for the excess amount. The message about exceeding credit limit will not appear.

- Accept the invoice. As always, you can press Ctrl+A to save.
- Record a post-dated receipt voucher.
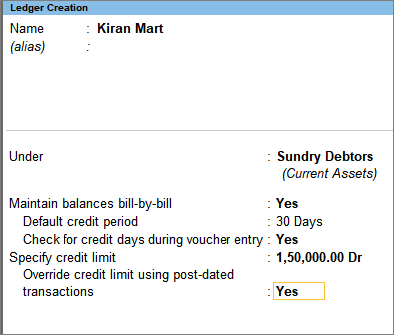
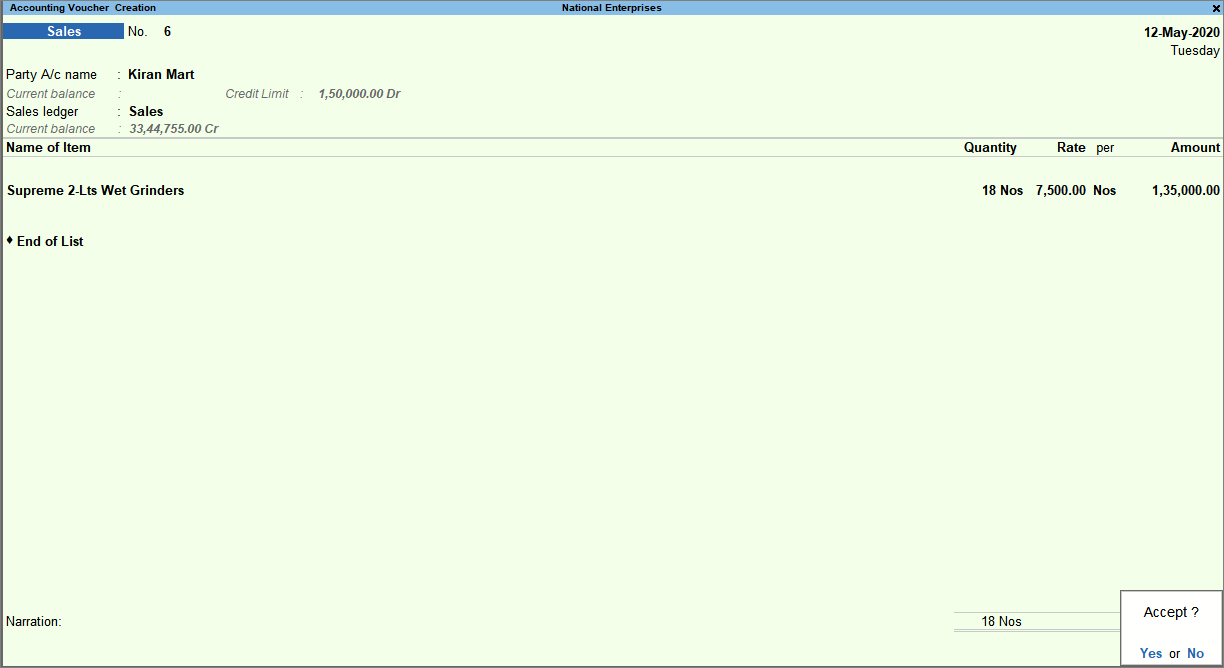
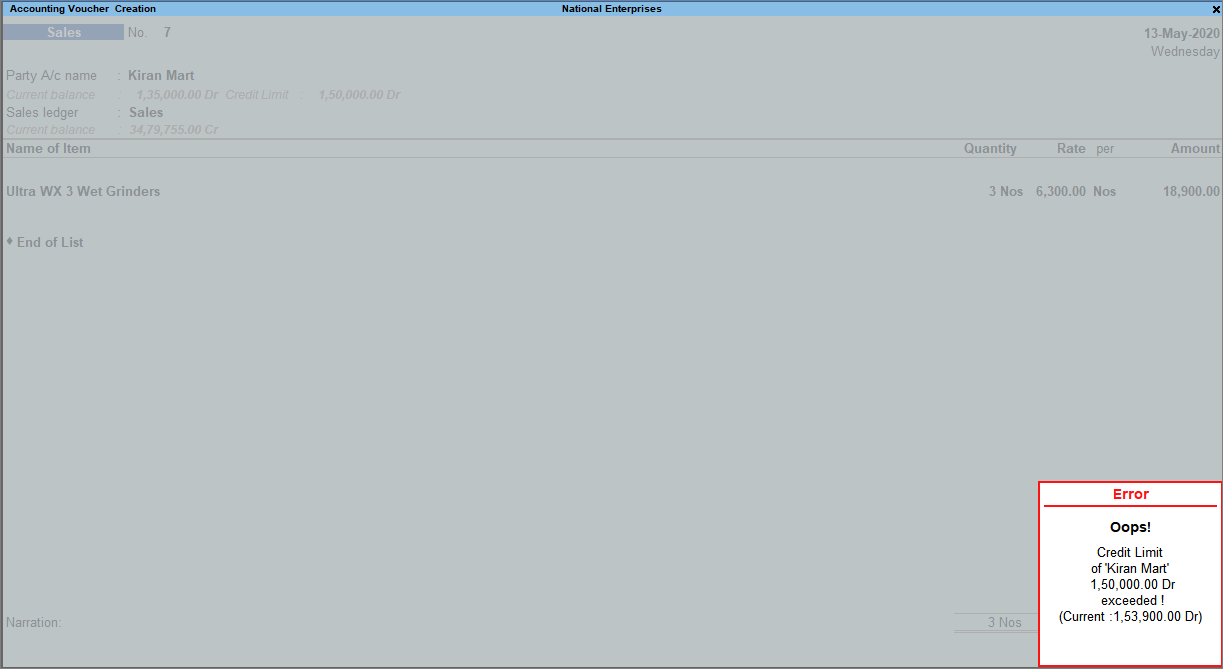
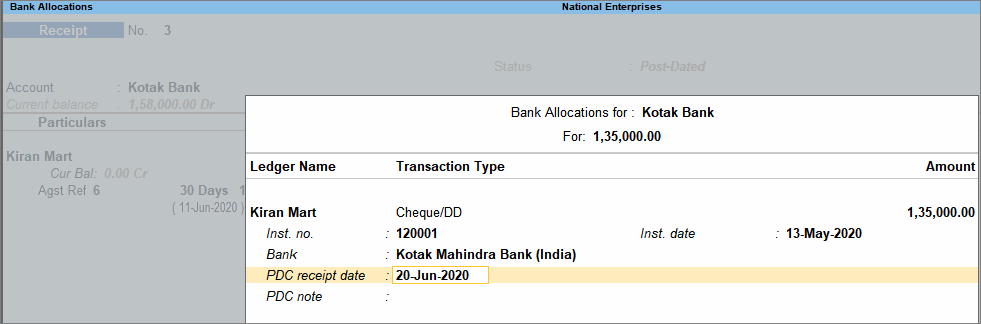
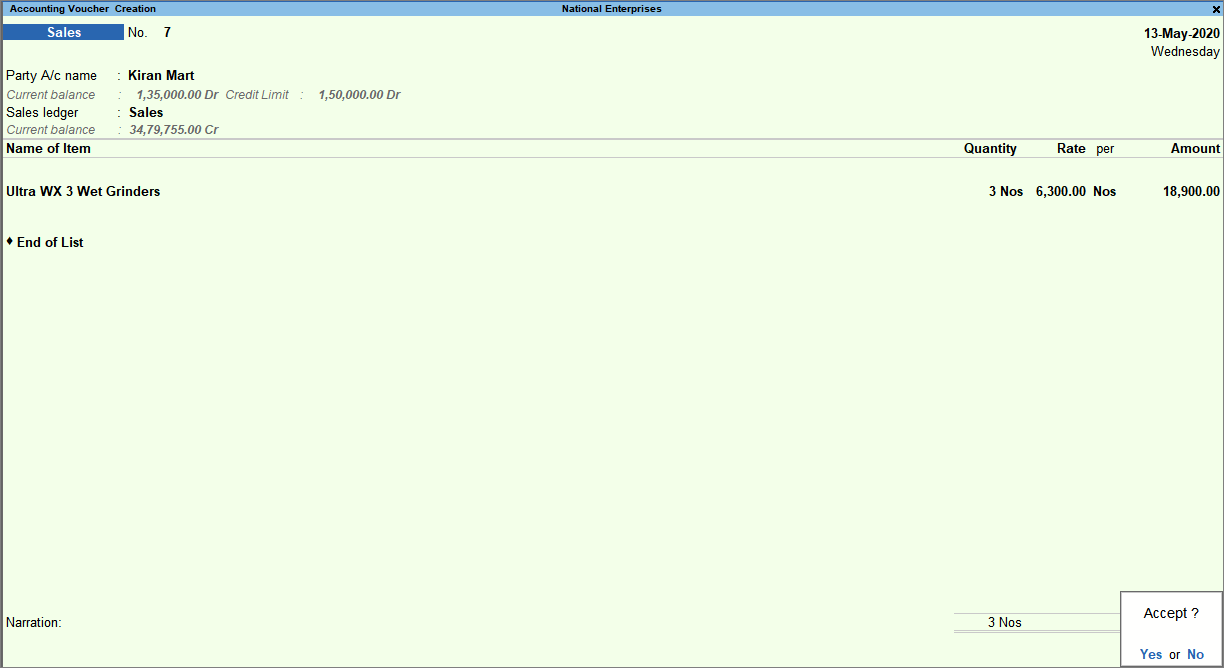
Using the procedure explained above, you can consider the value of post-dated receipt voucher when the party has exceeded the credit limit.
Send E-mails to Parties for Outstanding Bills | Reminder Letters
To manage the bills or ledgers outstanding with your parties, you can send reminder letters or the report details to the parties, as needed. Sending reminder letters helps in clearing due payments from parties so that you can update your books on time.
You can send reminder letters or the reports by using the E-mail feature in TallyPrime.
In this section
Reminder letters for current report
Let’s consider the Bills Receivable report for e-mailing reminder letters for overdue payments.
- From the Bills Receivable report, press Ctrl+M (E-mail).
Alternatively, press Alt+M (Share) > Current under E-MAIL. - Set up your E-maildetails.
- E-mail from: Select an e-mail profile.
To create an e-mail profile, select Create under List of Profiles. - E-mail to: Select New Address, Multiple Addresses, or All Ledgers, as needed.
- Select All Ledgers to send mass e-mail to all parties in the report.
- Enter the Subject of the e-mail and E-mail message (if any) and press Enter.
You can select a predefined message template by pressing Alt+S.
- E-mail from: Select an e-mail profile.
- Configure E-mail for Reminder Letters.
- Press C (Configure) > set Report Type as Reminder Letter.
Note: The Report Type is Bills Outstanding by default.
- In the Company Ageing Alteration screen, select the age of the outstanding amount for which you want to send the reminder letter.
- Configure other options as needed for the Reminder Letters.

- Press C (Configure) > set Report Type as Reminder Letter.
- Save the configurations and press M (E-mail).

Based on the configurations you have set, the reminder letter for the dues will be sent to the parties.
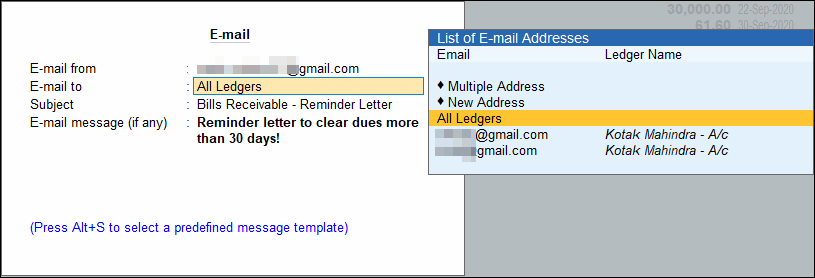
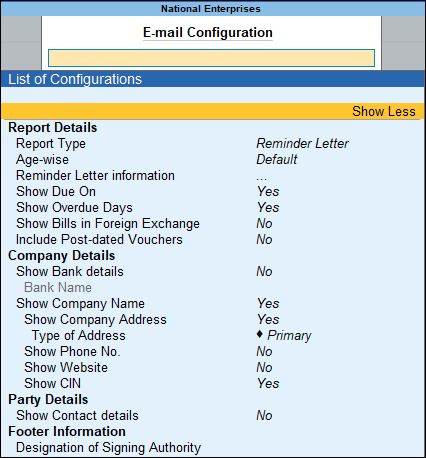
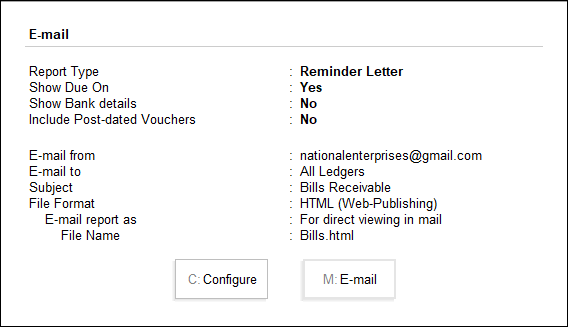
Scenario 1: If you have selected one or more bills in the report for multiple parties, the reminder letters will be sent for all the bills:
- E-mail to is set to All Ledgers – Reminder letters will be sent to all parties for all their corresponding bills details.
- E-mail to is set to New Address or Multiple Address – Reminder letters of all parties with their respective bills will be sent to e-mail IDs entered in E-mail to. In this case, for each party, the bills appears in a new page.
Scenario 2: If you have not selected any bills in the report, the reminder letter will be sent for all the bills:
- E-mail to is set to All Ledgers – Reminder letters will be sent for all the bills to the respective parties.
- E-mail to is set to New Address or Multiple Address – Reminder letters for the specified period in the report will be sent to the e-mails provided. In this case, for each party the bill details will be displayed on a new page.
Reminder Letters using multi-account printing
You can also send reminder letters to one or more parties by selecting from the Multi Account Reports. For Multi Account Reports, Reminder Letters can be sent for the following reports:
- All Ledger Accounts
- Group of Accounts
- Bills Receivable
- Group Outstanding
- Group of Account Outstandings
Steps to send reminder letters in case of Multi-account printing are the same as explained above for current report.
Send Outstanding report details
To ensure timely payments from your parties against the outstandings, you can send the outstanding report details to parties.
For example, from the Bills Receivables report:
- Press Ctrl+M (E-mail) > C (Configure).
- Specify other details as needed.
- Provide the E-mail from ID.
- Under E-mail to, select one or more e-mail IDs. Select All Ledgers if you need to send the report details to all parties displayed in the report.
- Press M (E-mail) from the E-mail screen to send the report details, as per the E-mail to details provided.
E-mail Confirmation of Accounts
Similar to sending reminder letters, you can also send the Confirmation of Accounts to one or multiple parties for multi-account reports.
- Press Alt+M (Share) > select Others under E-MAIL.
- Select the report name under Multi-Account Reports.

You can send the Confirmation of Accounts for the following:- All Ledger Accounts
- Group of Accounts
- Set up e-mail details.
- E-mail from: Select a e-mail profile from the List of Profiles.
If you have not created a profile yet, select Create under List of Profiles and create a profile. - In the E-mailto field
- Select New Address to enter a new e-mail ID.
- Select Multiple Address to select more than one address.
- Select All Ledgers to send mass e-mail to all parties in the report.
- Enter the Subject of the e-mail and E-mail message (if any).
You can select a predefined message template by pressing Alt+S.Note: You can also send the Ledger Accounts or default reports to parties using this mass e-mail feature in TallyPrime.
- E-mail from: Select a e-mail profile from the List of Profiles.
- Press C(Configure) to configure for Confirmation of Accounts.
- Under Report Type, select Confirmation of Accounts.
- Configure other options as needed.

- Save the configurations and press M (E-mail).

Based on the configurations you have set, the Confirmation of Accounts will be sent to the parties.
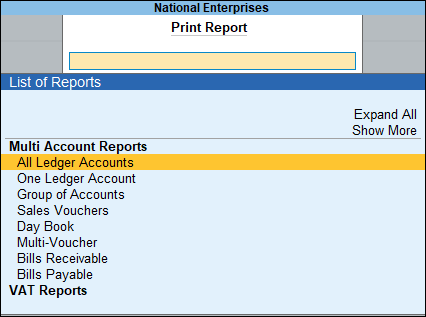
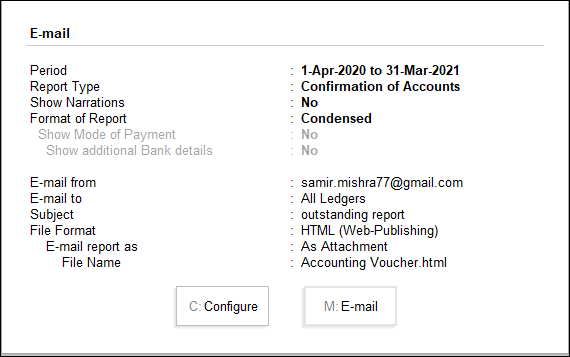
For Release 1.0: Click here.
Print Reminder Letters | Bills Outstanding
- From the Bills Receivable report, press Ctrl+P (Print). Alternatively, press Alt+P (Print) > Current.
- Press C (Configure) to view the List of Configurations.
- Under Report Type, select Reminder Letter.

Note: By default, Bills Outstanding is selected. You can also print the entire Outstanding Report.
- In the Company Ageing Alteration screen, select the age of the outstanding amount for which you want to send the reminder letter.
- Configure the reminder letter as per your needs.
- Reminder Letter information – You can enter the bill or amount details for reference.
- Enable Show Due on and Show Over Due Days, as needed.
- You can also include Post-dated Vouchers to be printed in the reminder letter.
- Set the Number of Copies that you want to print.
- Save the configurations and press P (Print).

Based on the configurations you have set, the reminder letter for the dues will be printed.
Similarly, you can print the Bills Outstanding report. Under Report Type, retain Bills Outstandings, configure other necessary details from printing and print the report.
Print Confirmation of Accounts – Similar to e-mailing, you can also print confirmation of accounts as follows:
- Press Alt+M (Share) > select Others under E-MAIL.
- Select the report name under Multi-Account Reports.
You can send the Confirmation of Accounts for the following:- All Ledger Accounts
- Group of Accounts
- Press C (Configure) to view the List of Configurations.
- Under Report Type, select Confirmation of Accounts.
- Set up other configurations as needed for printing.
- Save the configurations and press P (Print).
Based on the configurations you have set, the confirmation of accounts will be printed.
To know more about the Printing feature and flexibilities in TallyPrime, refer to the Printing Invoices and Reports topic.
Data Representation in Reports
Date behaviour in Reports | Bills Outstandings for selected period
The Bills Outstanding report displays the pending amount as on date. For example, if you are viewing the report for 1-Jul-2020 to 30-Sep-2020, any pending amount from the previous period is also displayed as the outstanding amount gets carried forward.
Therefore, to view the outstanding bills only for the selected period – 1-Jul-2020 to 30-Sep-2020, for example:
- Press Alt+F12 (Range).
- Select the Type of Information, Particulars, and Range of information as in the sample below:

- Select End of List to view the outstanding bills only for the range selected.

Explode/Collapse
- Press Shift+Enter to see the next level of data for the selected line on the same screen. You can move to any of the lines in the next level and further explode/collapse the selected line using Shift+Enter.
When you press Shift+Enter on any of the transaction recorded bill-wise or on account, the details related to the transaction are further expanded and displayed as shown below:
What you see on the screen can vary based on your choices. Press F12 (Configure) to change the options, and F11 (Company Features) to enable or disable features. - Press Alt+F5 to expand the data shown in the report in the detailed format. All the transactions recorded against a particular bill or On Account, and the partial settlement made against these transactions are displayed here.
You can toggle between the Detailed and Condensed formats of the reports using Alt + F5. A sample image is shown below.
What you see on the screen can vary based on your choices. Press F12 (Configure) to change the options, and F11 (Company Features) to enable or disable features. - Press Ctrl+Enter on any of the transactions displayed in the report to alter the transaction. If there are any opening balances recorded for a party you can also alter all such details from the same report.
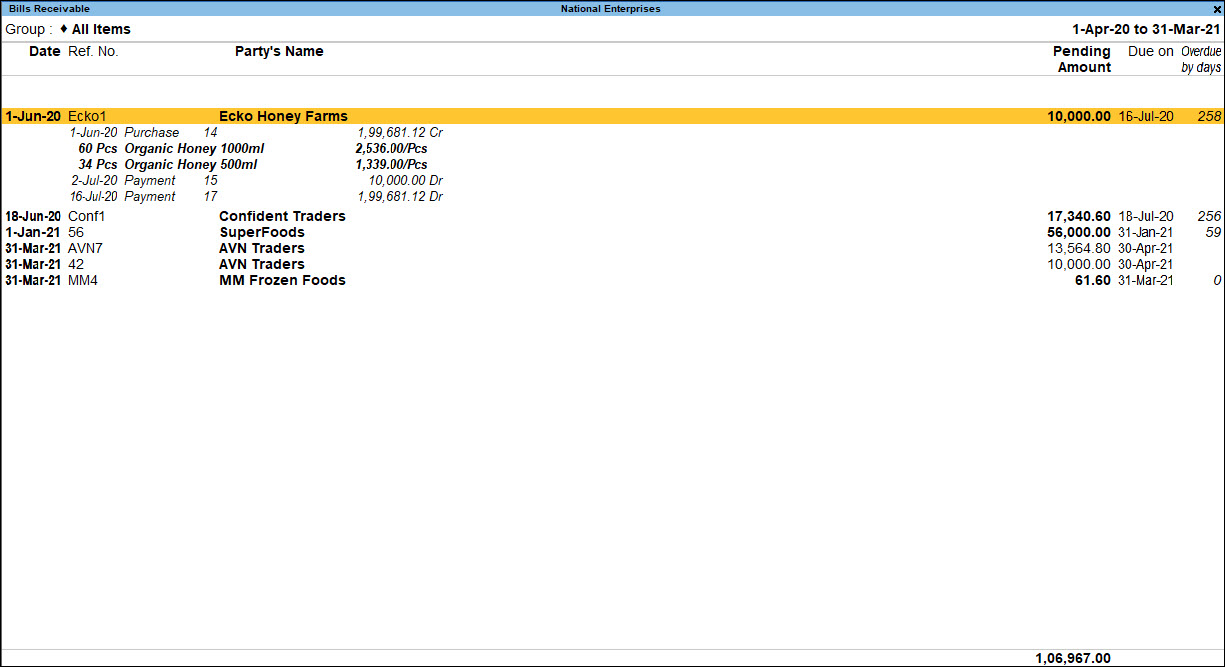
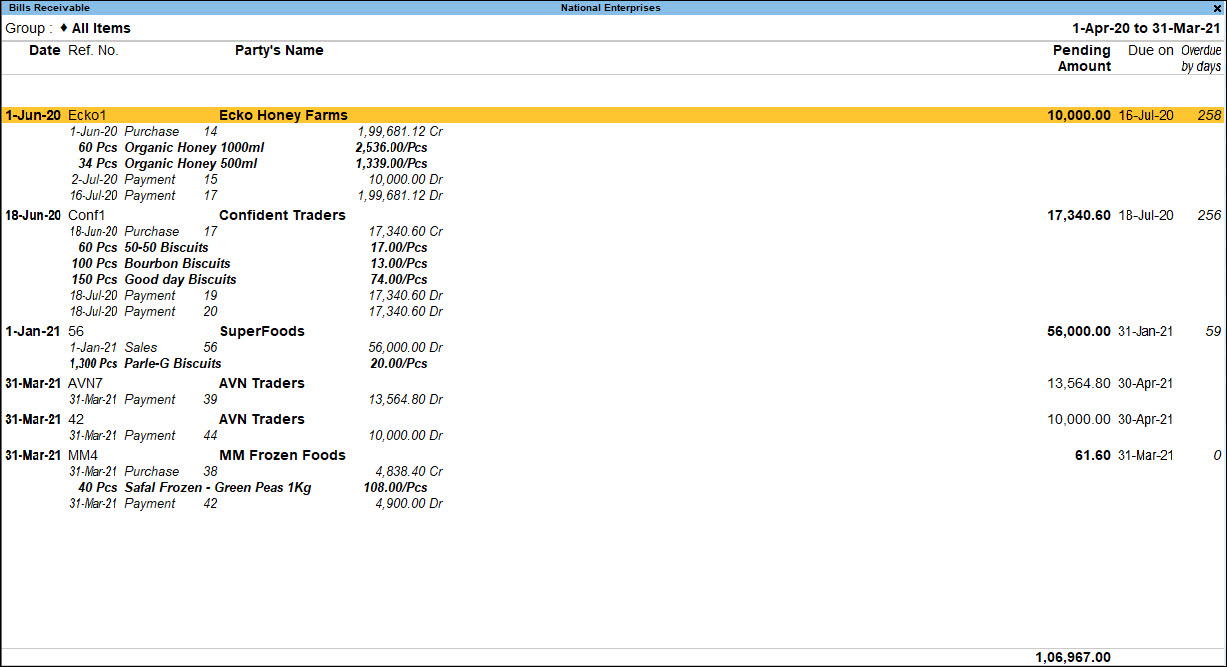
Change Report Context
- Press F4 and select a party to view the outstanding receivables details for that party.
Settle Bill
- Press Alt+B to settle an outstanding bill for a particular party. You can also select more than one bill and settle the total pending amount for the party. A sample image is shown below.
- Press F6 (Age-wise) to see what is the expected payment from the party in the coming days.
- Press F12 (Configure) to add or remove details from the report.
Ctrl+B (Basis of Values)
You can configure the values in your report for that instance, based on different business needs.
In Outstanding Receivables, you can display the values based on the pending or overdue bills.
- Press Ctrl+B (Basis of Values) > Type of Bills > select Pending Bills.
- Press Esc to view the default values.
Similarly, you can view the total values related to bills recorded with foreign exchange only. Press Ctrl+B (Basis of Values) > Show Bills in Foreign Exchange > and press Enter.

Ctrl+H (Change View)
You can display the details of a report in different views with additional details or for a specific period. You can also view other reports related to the current report.
- To view the Bills Receivables ledger-wise, press Ctrl+H (Change View) > type or select Ledger-wise Bills > and press Enter.
- Press Esc to view the default report.
Similarly, you can view the Bills Payable from through Change View. In addition, you can also view other related reports, such as Summary, Monthly Summary, and so on.
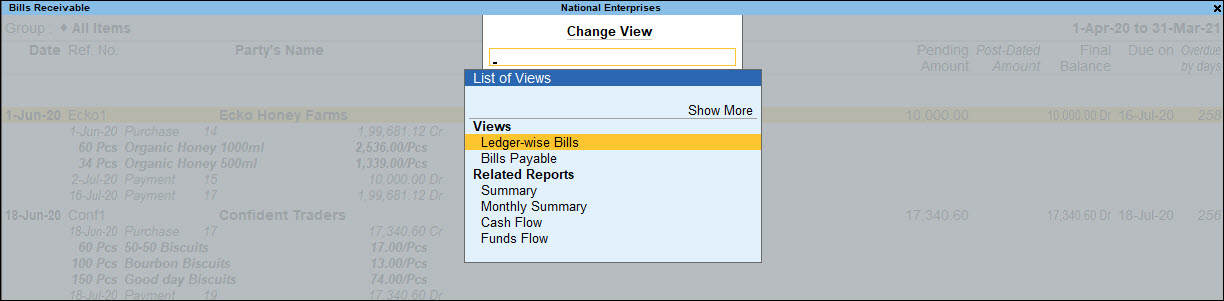
Ctrl+J (Exception Reports)
You can view the exceptions related to the data displayed in the current report by pressing Ctrl+J (Exception Reports), without closing the report.
- To view the Negative Ledgers for Outstanding Receivables, press Ctrl+E (Exception Reports) > type or select Negative Ledgers > and press Enter.

- Press Esc to view the default report.
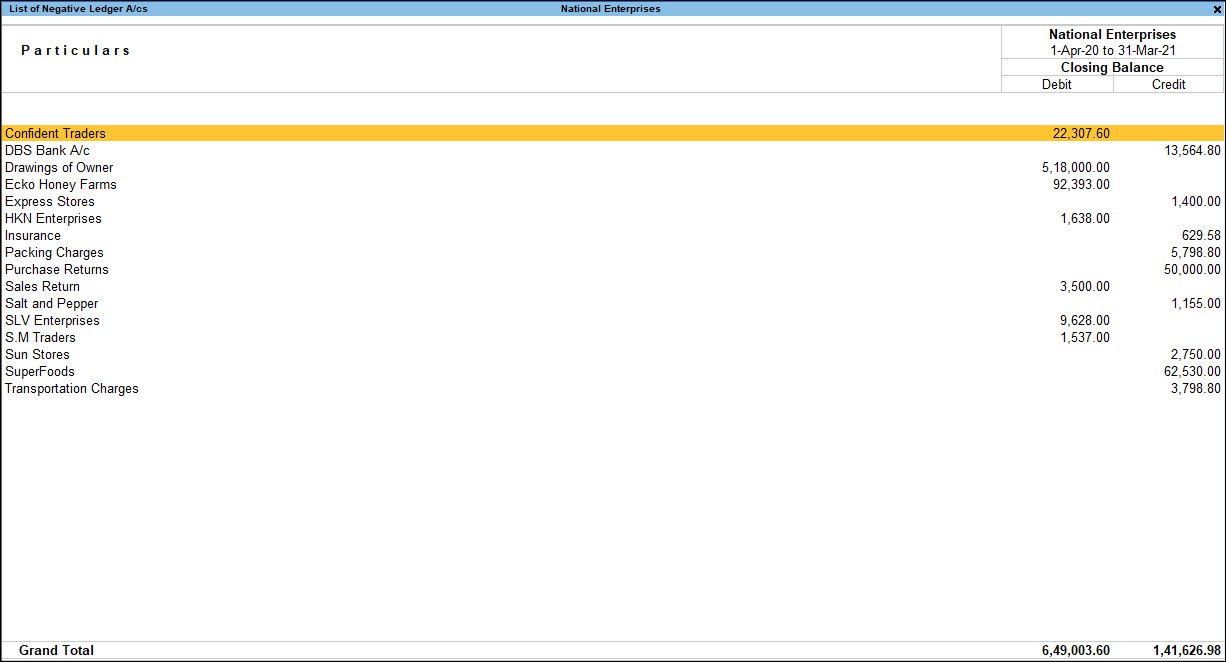
Manage Outstanding Payables in TallyPrime
When you purchase goods or obtain services from your vendors you need to keep track of all the payments that you have to make on the agreed timelines. All such pending or overdue payments to your parties are outstanding payables. You can manage such outstandings in TallyPrime using Outstanding Payables report that gives you an overview of what your business owes for supplies, inventory, and services. Moreover, you can get an overview of the amount and the creditors to whom you owe money. You can also see how much you owe each creditor and how long the money has been owed.
Record and Track Dues: You can get an overview of the amount and the creditors to whom you owe money and how much you owe each creditor and the duration of such pending or outstanding payments. Managing your outstanding payables will help you to know the time-to-time expenses, avoid overseeing the outstanding payments that you owe to the creditors, and help you manage the cash flow in your business.
Use Credit Period: To ensure that all the payments that you owe to your suppliers are tracked systematically, it is advised to maintain your accounts by specifying the credit period or due date for the party during purchases. You can specify a credit period of say 30 days in the party ledger for the party to make the payments. On recording a credit purchase for such parties, TallyPrime reflects the pending amount and the due date based on the credit period specified for the party. This helps to avoid conflicts with your parties, systematically track your outstanding payables, and make timely payments to your parties.
Bill-by-Bill: At times, when you have made a credit purchase from your party, you can mutually agree with your party to make part payments and make the total payment within a specified time. In such a case, you can use the bill allocation capability in TallyPrime to create one or more bill references as per the breakup decided. Each bill reference can also be specified with a credit period or a due date.
Manage Payables – Credit Purchase Without Bill-wise
When you purchase goods/services on credit, you may want to track and manage the amount that is due to your party. Once you record a purchase, TallyPrime reflects the purchase amount as Credit against the party in the corresponding report. Anytime you make the payment to your party, you can record a payment entry for that amount to clear the outstandings for that party.
In this section
- Record a credit purchase
- Record payments for credit purchases made without bill-wise
- Ledger Vouchers
- Group Summary
Record a Credit Purchase
When a company buys goods on credit or cash, Purchase voucher is used to record all the Purchase transactions of the company. Record a credit purchase.
Set credit limit for parties
To set the credit limit in the party ledger:
- In the party ledger screen, press F12 (Configure) > set Provide Credit Limit to Yes.
- On the party ledger screen, provide a value (in days or a date) for Specify credit limit.
Record payments for credit purchases made without bill-wise
When you are making a payment for the goods or services purchased, you can record a payment entry. Record a payment voucher.
Ledger Vouchers

You can view a ledger account with the corresponding voucher details.
- Press Alt+G (Go to) > type or select Ledger Vouchers.
Alternatively, Gateway of Tally > Display More Reports> Account Books > Ledger. - Select the required Ledger.
- Press F2 (Date) to change the period as required.
A sample image of Ledger Vouchers report appears, as shown below:
- Press F6 (Monthly) to view the monthly receivables and payments received from the party.

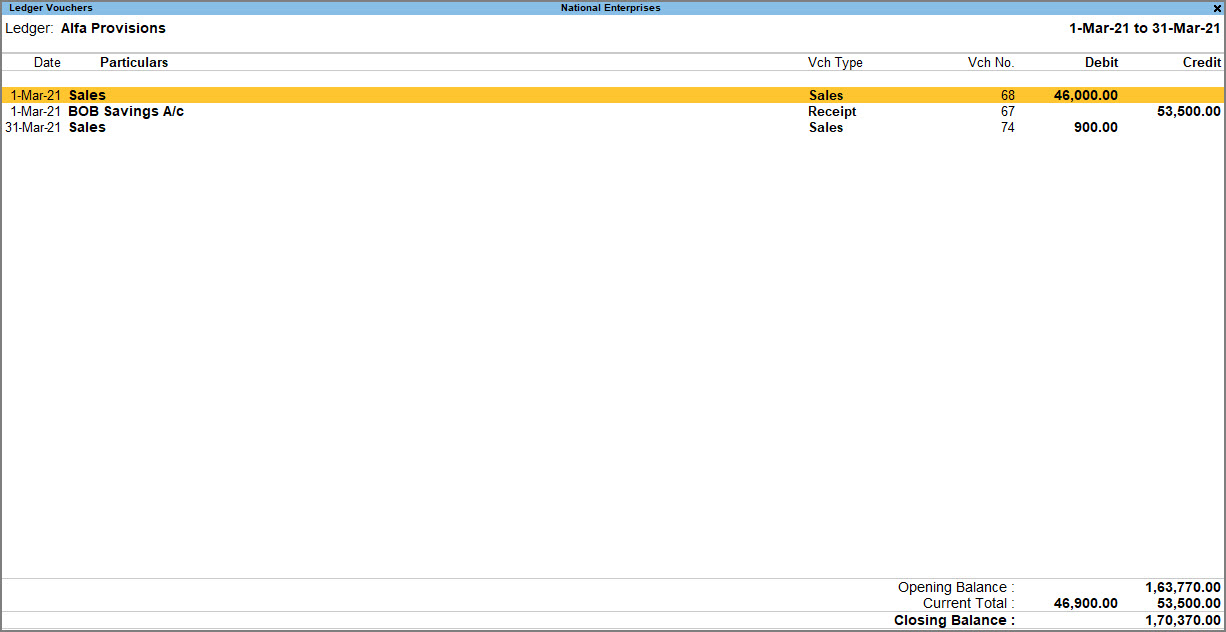

Cumulative balances or running balance for Ledger Voucher reports
- Press F12 (Configure) on Ledger Vouchers screen.
- Set the option Show Running Balance to Yes to see the running balances for Ledger Voucher report.
- Accept the screen. As always, press Ctrl+A to save the changes.
The Ledger Vouchers port with running balance column appears as shown below:
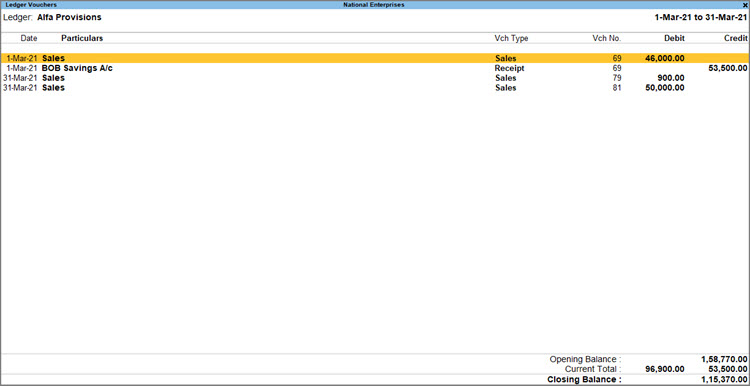
You can also access Ledger Vouchers by drilling down from different statements, such as Group Summary and Monthly Summary.
Group Summary
The group summary statement shows the closing balances of the accounts of a selected group for a specified period up to the current date. The default view is that of sub-groups within a group.![]()
To view group summary,
- Press Alt+G (Go To) > type or select Group Summary.
Alternatively, Gateway of Tally > Display More Reports > Account Books > Group Summary > Select a group.
A sample image of the Group Summary screen appears, as shown below:
- Press Enter on any group to view the Legder Monthly Summary report. You can further press Enter on any month to view the Leger Vouchers report.
- On Ledger Vouchers screen, Press F5 (Bill-wise) to view all the outstanding bills in the report. You can press Enter on any of the bills and drill down to the respective voucher.
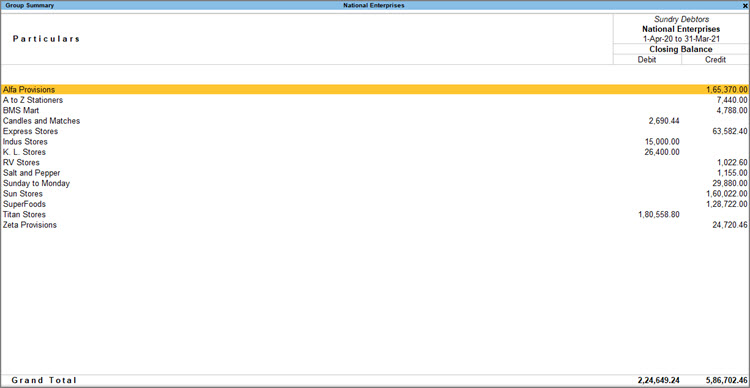
Manage Payables – Credit Purchase With Bill-wise
If you maintain bills with specific reference numbers for easy tracking in the future, you can use the bill-wise option in the party master. Next time you record a transaction for that party, TallyPrime will internally track the bill by using the voucher number as the reference number. All earlier transactions recorded for that party without the bill-wise option will be tracked as On Account. Whether there is a reference number or not, such dues can be settled by passing the corresponding payment entries.
In this section
- Enable Bill-wise in Party Master
- Record a Credit Purchase
- Record Payments for Credit Purchases Made Using Bill-wise
Enable Bill-wise in party master
In the Party Master screen:
- Set Maintain Balances bill-by-bill to Yes.
If you do not see this option:
- Press F11 (Features) > set Enable Bill-wise entry to Yes.
- Press F12 (Configure) > set Provide bill-wise details to Yes
After maintaining balances bill-by bill, all bills generated earlier are reflected as On Account.
If you want to provide any lead time to your party to clear their dues, specify the Default Credit Period – for example, 30 or 60 Days. When you make a credit purchase from this seller, TallyPrime internally calculates the due date against the voucher entry date, based on the credit period you have agreed with your seller. You may override this during transaction, if you wish to.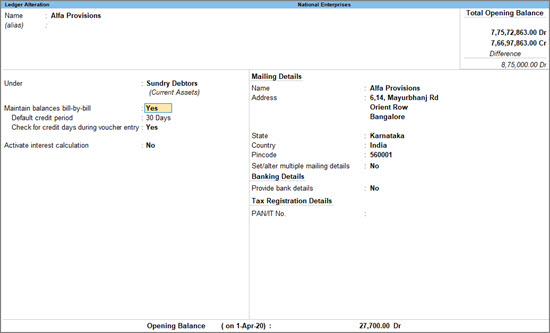
Record a credit purchase
A purchase transaction without a corresponding payment entry is a sale on credit – until the you have made the payment. If you have enabled the bill-wise option in the party master, TallyPrime tracks the bill by using the voucher number as the bill reference number.![]()
- Press Alt+G (Go To) > Create Voucher > press F9 (Purchase).
Alternatively, Gateway of Tally > Vouchers > press F9 (Purchase). - Press Ctrl+H (Change Mode) to select the required voucher mode (Item Invoice, in this case).
- Specify the supplier details.
- Supplier Invoice No. and Date: The invoice number and date should be the same as given in the corresponding sales bill.
- Party A/c name: Select Cash or Bank for cash purchases. For credit purchases, select the supplier ledger.
- Party Details: Enter the supplier’s name and address, if needed.
If you do not see the Party Details screen, press F12 (Configure), and set Provide Receipt, Order, and Import details to Yes.You may want to maintain specific details about your suppliers, such as address with landmark, alternative contact number, and so on, in the invoices. In such cases, you can create party ledgers with the required details. In the Suppliers field of Party Details screen, select the required ledger.
- Purchase ledger: Select the accounting ledger to allocate the stock items.
If you do not see this field on the screen, press F12 (Configure) and set Select common Ledger Account for Item Allocation to Yes.
In Accounting Invoice, you can select the purchase ledger under Particulars. - Provide the stock item or service details.
As in other transactions, you can create the item or ledger on the fly by pressing Alt+C.- In Item Invoice, select the stock item, enter the Quantity. The Rate will be auto-filled, if available for the stock item. However, you may choose to enter the Rate or Amount.
- In Accounting Invoice, select the service ledger and enter the Amount.
- Select additional ledgers, like transportation charges, insurance, or discount, if any.
- Press Enter on the Amount field and fill in the bill-wise details screen with the Type of Ref and Name as required.

- Provide Narration, if needed, and accept the screen. As always, you can press Ctrl+A to save.
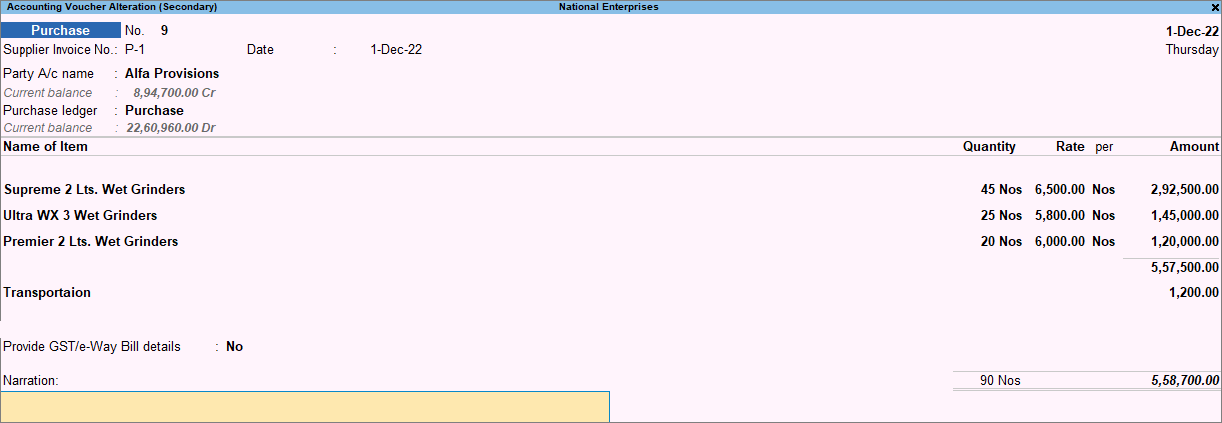
Record payments for credit purchases made using bill-wise
You can make payments to settle any specific purchase bill to ensure proper accounting for the credit transactions.![]()
While recording a payment voucher for a purchase you have made:
- Under Particulars, select the party ledger to which you are making the payment against a purchase.
- In the Bill-wise Detailsscreen, enter the bills for each purchase made from the party.
- Under Type of Ref, select Agst Ref.
You can break the total amount for payment into multiple bills against the same or different purchase bills, as per your convenience. - Under Name, select the purchase bill number against which you are making the payment.
Based on your needs, you can sort billsas per:- The Due Date in order to settle the oldest bill first. In case you had set any credit days for the party, the due dates are displayed including the credit days.
 This is applicable TallyPrime Release 5.0 onwards. If you are using TallyPrime Release 4.1 or earlier, you will not find the Due Dates column for the bills.
 - The Balance or Final Balance in the order of highest or lowest amount for settlement.
You can settle any remaining unsettled purchase bills from the Ledger Outstandings report for the party Hadeed Traders Ltd.
- The Due Date in order to settle the oldest bill first. In case you had set any credit days for the party, the due dates are displayed including the credit days.
- Under Type of Ref, select Agst Ref.
- As always, press Ctrl+A to save the payment voucher.
Split a Credit Purchase into Multiple Bills
When you make a purchase of large amount and unable to pay at a time, and have agreed to make partial payments in regular intervals, you can split such purchases into multiple bills. This helps you to track the payment breakup against the bills created and manage your outstanding payables systematically.
In this section
Enable Bill-wise in party master
To learn how to enable Bill-wise in party master, click here.
Record a credit purchase – split bill
You can record a sale and split the amount into multiple bills using the Bill Allocation feature.![]()
- Press Alt+G (Go To) > Create Voucher > press F9 (Purchase).
Alternatively, Gateway of Tally > Vouchers > press F9 (Purchase). - To split the sales bill into multiple bills, when recording a credit purchase:
- Press F12 (Configure) > set Use default Bill-wise details for Bill Allocation to No.
- In the voucher screen, press Enter on the total amount field to open the Bill-wise Details screen.
- In this screen, select New Ref and provide a Name for the bill. For example, if your voucher number is V1, your bill names can be V1a, V1b, and so on.
The bill name that you specify here can be used as the bill reference when you record a payment transaction to settle your dues. - If you had specified any Default credit period in the Party Master, the Due Date is set to the same value by default. To override the Credit Period, press F12 (Configure) > set Modify all fields to Yes. Now, specify the due date.

- Fill in the Amount based on how you want the total amount to be split and press Enter.
- As always, press Ctrl+A to save the voucher.
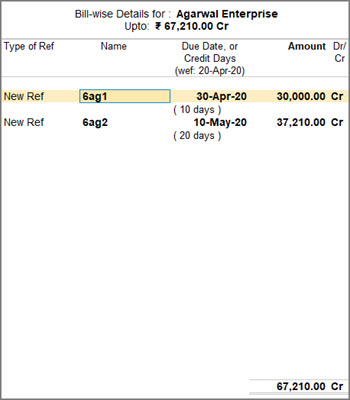
Ledger Outstandings
The Ledger Outstandings report displays the details of the outstanding payables – Opening Amount, Pending Amount, Due Date and Overdue days for the selected party. All the purchases recorded bill-wise or without any bill references and the corresponding payment entries recorded are displayed in this report. You can make the payments that are pending with your parties using the report.
View Ledger Outstandings report
- Press Alt+G (Go To) > type and select Ledger Outstandings.
Gateway of Tally > Display More Reports > Statements of Accounts > Outstandings > Ledger. - Select a ledger from the list. The Ledger Outstandings report appears as shown below:

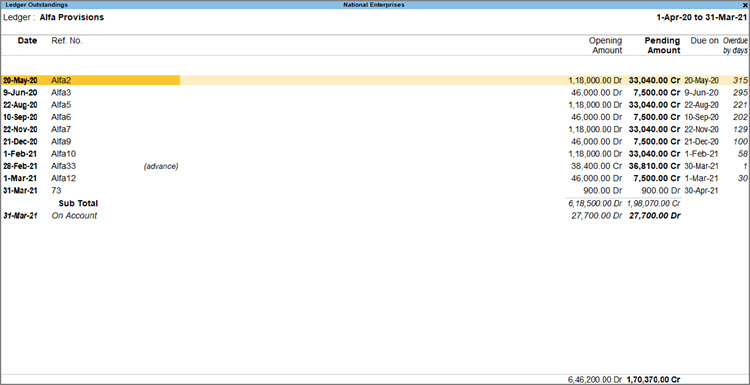
You can print or export Reminder Letters from the Ledger Outstanding report by enabling the option Print Reminder Letter in the Print Report or Export Report accordingly.
In the Ledger Outstandings report, you can:
- Press Alt+F4 (Ledger): to display the list of ledgers. Select the required ledger to view outstandings for the selected ledger.
- Press Alt+F5 (Detailed): Detailed or press Alt+F5to display the Ledger Outstandings report in the detailed view. In the detailed view, the following will be displayed:
- Voucher details : Voucher Date, Voucher Type(s), Voucher Number(s), and Amount
- Inventory details : Quantity, Stock Item, and Rate
- Press F6 (Ageing Method): To display the Age wise analysis of the Ledger Outstandings report. To know more, refer to Ageing Analysis topic.
- Press Alt+B (Settle Bills): the Bill Settlement option helps to settle the selected or all bills from the Ledger Outstandings report.
- Press Alt+S (Contact): To view the ledger contact details.

- Press F12 (Configure): To change the report configurations, as required.
- Press Alt+F12 (Range): to use the Range Filter option to search for specific bills from the list of bills outstanding. Users may filter the transactions based on the Date, Original Amount, Pending Amount, Ledger, Reference number, and so on. This is a useful tool, as it makes the process of finding specific bills fast, easy, and simple.

Group Outstandings
This report helps to view the group-wise outstanding details, including the debit and credit balances. You can configure the report to see only the overdue payments and make payments to your parties accordingly.
In this section
View the group-wise outstandings report

- Press Alt+G (Go To) > type and select Group Outstandings.
Alternatively, Gateway of Tally > Display More Reports > Statements of Accounts > Outstandings > Group. - Select the Group from the list.
A sample image of the Group Outstandings report appears, as shown below:
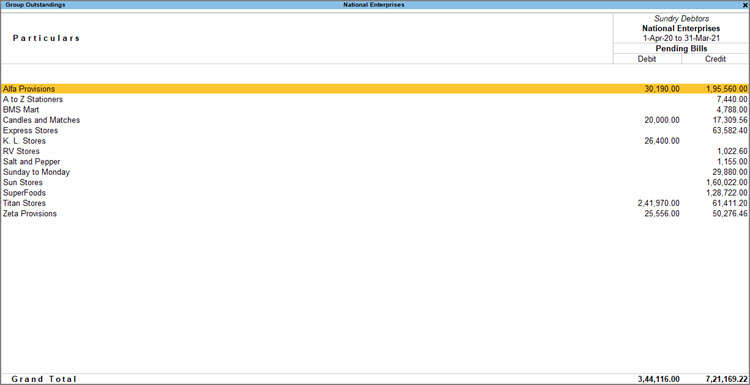
You can print or export Reminder Letters from the Ledger Outstanding report by enabling the option Print Reminder Letter in the Print Report or Export Report accordingly.
In the Group Outstandings report, you can:
- Press Alt+F4 (Group): To display the list of groups. Select the required group to view outstandings for the selected group.
- Press F5 (Ledger-wise): To display only the ledgers and their debit & credit balances.
- Press Alt+F6 (Ageing Method): To display the Age wise analysis of the Group Outstandings report. For more information, refer Ageing Analysis report.
- Press F8 (Ledger-wise Bills): To display the ledger-wise breakup of the Group Outstanding report.
- Press Ctrl+F8 (Bill-wise): To display all the bills outstanding from the ledgers falling under the selected group.
Configure and filter for specific report information
- Press F12 (Configure) to enable or disable the Group Outstanding report, as per your business needs.
- Press Alt+F12 (Range) to filter masters at the top level in the hierarchy of the current report. For example, you can filter to view the godowns with zero closing quantity.
For example, you can configure the date range and view outstanding payables for the selected period. To know more, Refer to Date behaviour in Reports | Bills Outstandings for selected period topic. - Press Ctrl+F12 (Value) to filter the vouchers based on the conditions you specify. For example, if you want to view the godowns from which sales had happened, use the Value filter and set the voucher condition to Sales.
Trial Balance
The Trial Balance is a summary of all the ledger balances. It helps in checking whether the transactions are correct and balanced. Manually preparing a Trial Balance report is a tedious task. In case of any mismatch in the Trial Balance, you will have to check the ledgers and maintain the correctness of the accounts manually. Now, with TallyPrime, the Trial Balance will be at your fingertips. You can verify the accuracy of financial transactions by comparing the total debit balances with total credit balances in the Trial Balance report.
View Trial Balance: By default, the Trial Balance displays the debit and credit of the ledger accounts. The Trial Balance is prepared periodically for your company, for example, at the end of a quarter or financial year. The difference in Opening Balances is also displayed in the report.
Identify mismatches in ledger balances and update as needed: When there is a difference in Opening Balances, you can use the Trial Balance to check which ledger’s Opening Balance was updated incorrectly or if a ledger creation was not considered at all. Such differences occur when you move the ledger balances from a manual system to TallyPrime for the first time.
Configure Trial Balance, as per business practices: Varied configurations within the report allows you to view different aspects of the accounts as per your business requirements. You can choose to include the Opening Balance while viewing the report or not. You can also view the Trial Balance according to groups or ledgers in your books. The impact of Receipt/Delivery notes with tracking number is also visible in the Trial Balance report.
To know more, view working with reports.
View Trial Balance
By default, the report Trial Balance in TallyPrime will be generated as on the date of the last voucher entry. You can change the date to view the report for the required period. Let’s suppose you want to view the Trial Balance for April 2020 to March 2021,
![]()
- Press Alt+G (Go To)> type or select Trial Balance> press Enter.
Alternatively, Gateway of Tally > Display More Reports > Trial Balance.
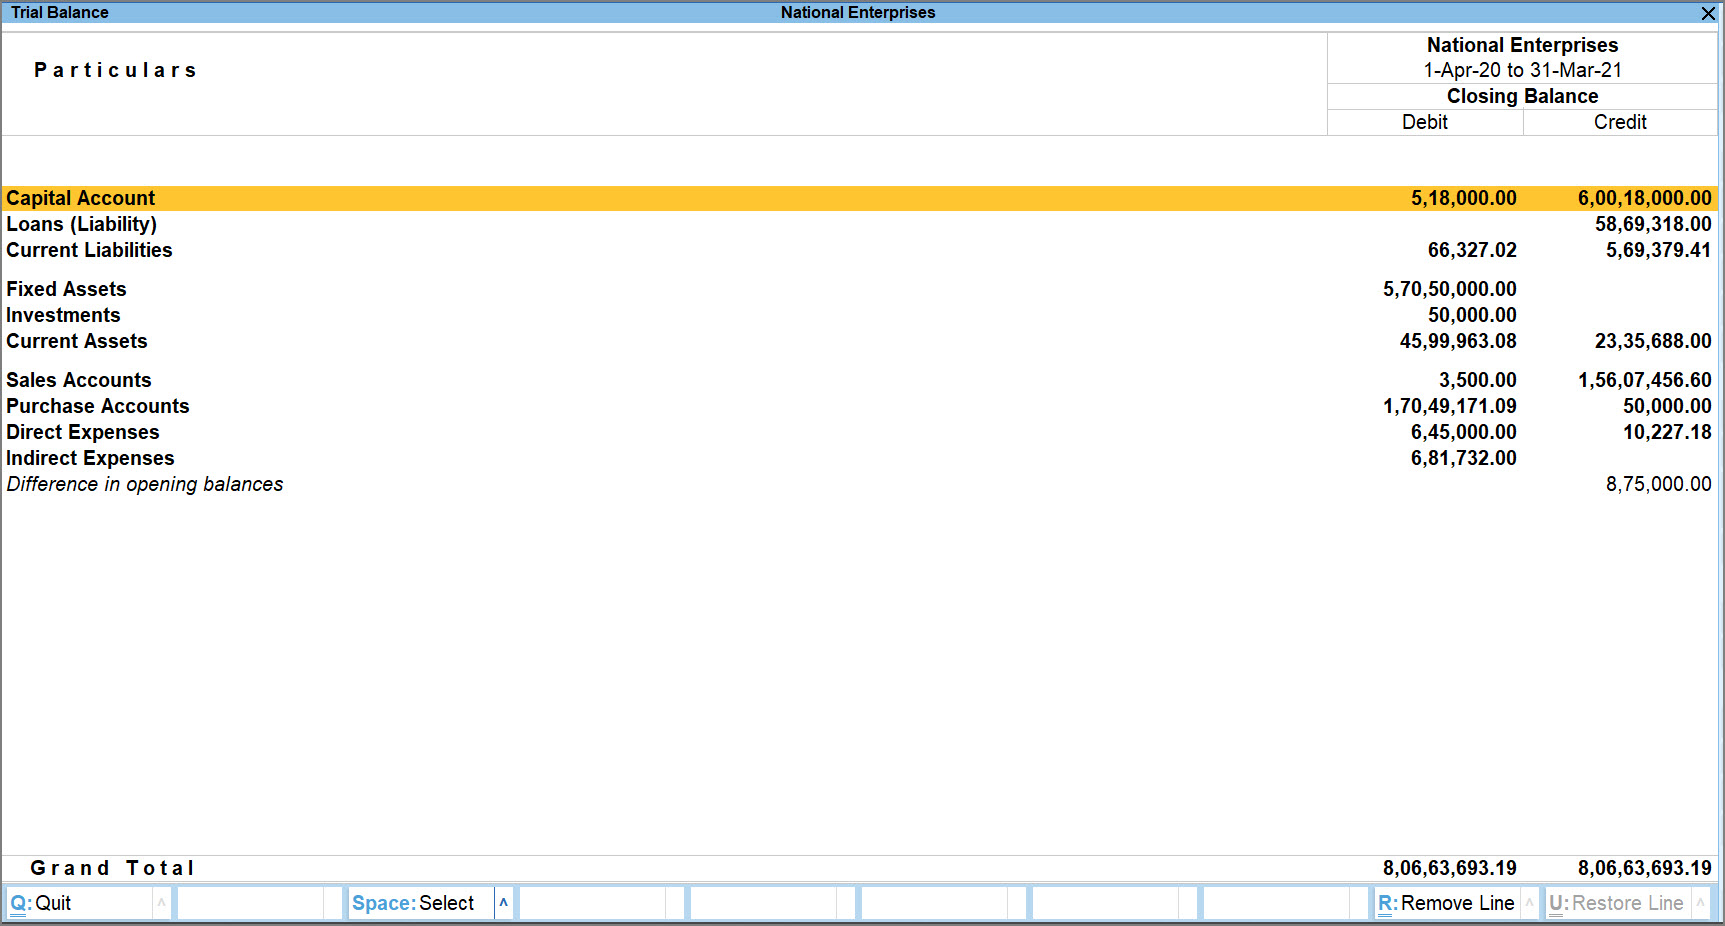
There are varied configurations in the F12 (Configure) section of the Trial Balance that allow you to view the report as per your requirements. For instance, you might want the Opening Balance of this financial year to appear in the Trial Balance report, so that you can tally it with the Closing Balance of the previous financial year. To view Opening Balance in the Trial Balance,
- In the Trial Balance, press F12 (Configure)> Show Opening Balance> Yes.

You can view the details of the Opening Balance and Closing Balance side-by-side. - Similarly, you can also view transaction details in the Trial Balance report. Let us assume that you have traded with a particular party, wherein you made purchases as well as sales with that party.
Press F12 (Configure) > set Show Transactions to Yes.
You will see the Debit as well as Credit details of the particular party.
- Set the Nett Transactions to Yes to merge the debit and credit sides.
If the debit is more than the credit or vice-versa, you will be able to see a Nett amount in the Trial Balance after adjustment.
With this information, you will be able to determine if you need to pay the party or receive payment from them. - Closing stock: As per accounting principles, the Trial Balance does not display the closing stock. The closing stock is the balance of unsold goods that are left from the purchases made during an accounting period. The value of the total purchases is already included in the Trial Balance. If closing stock is included in the Trial Balance, then the effect will be doubled.
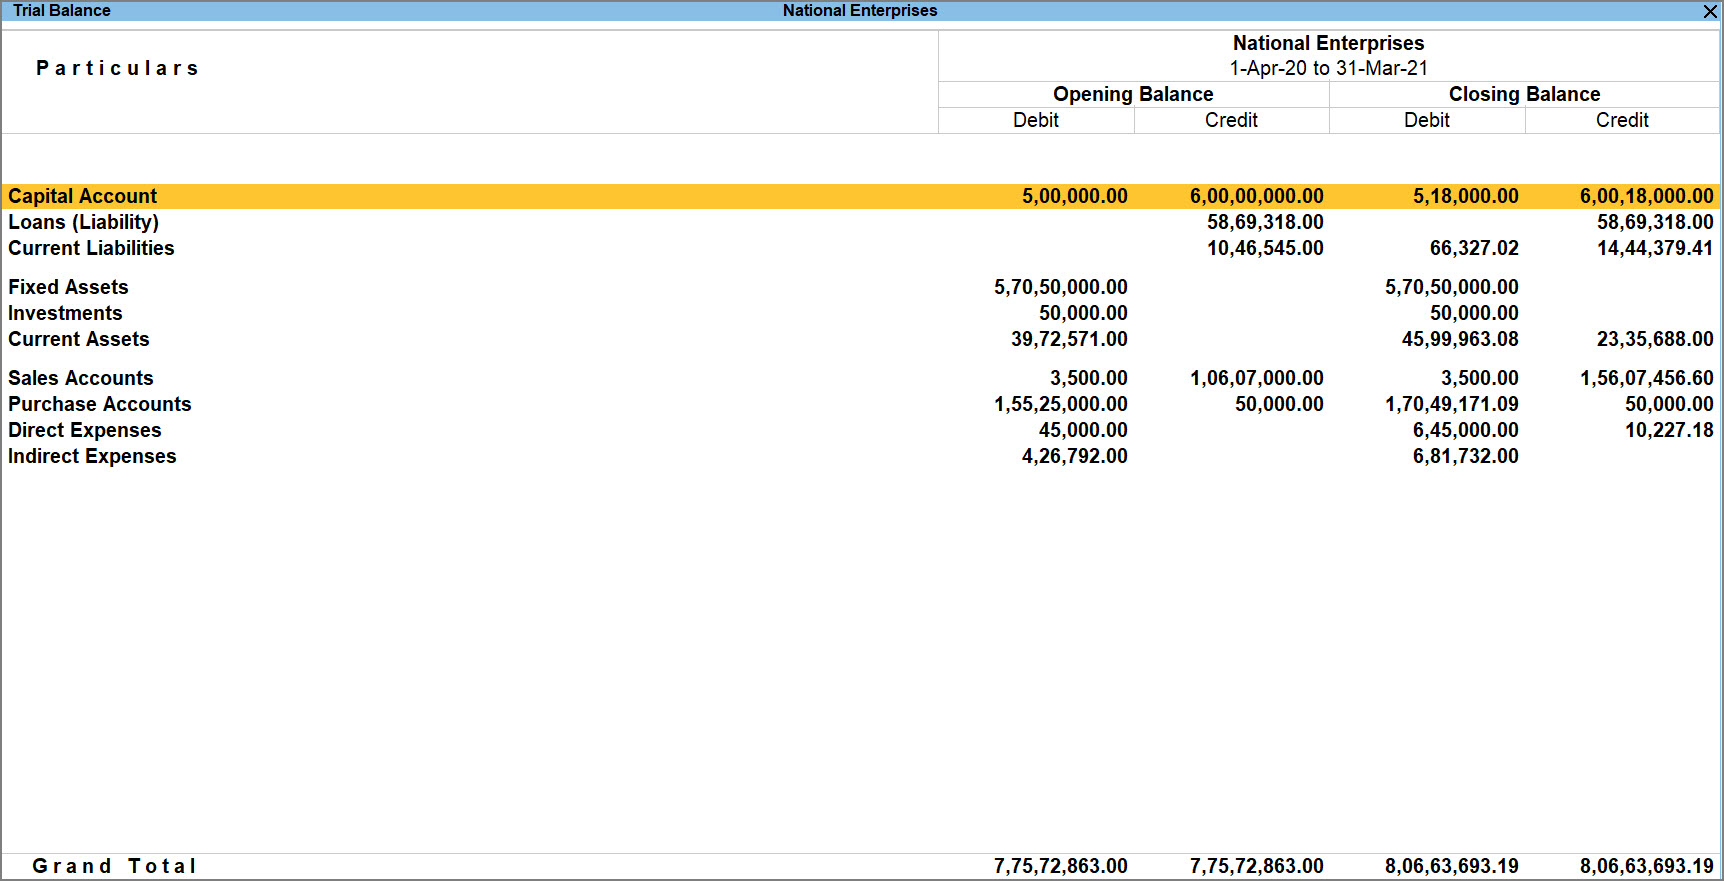
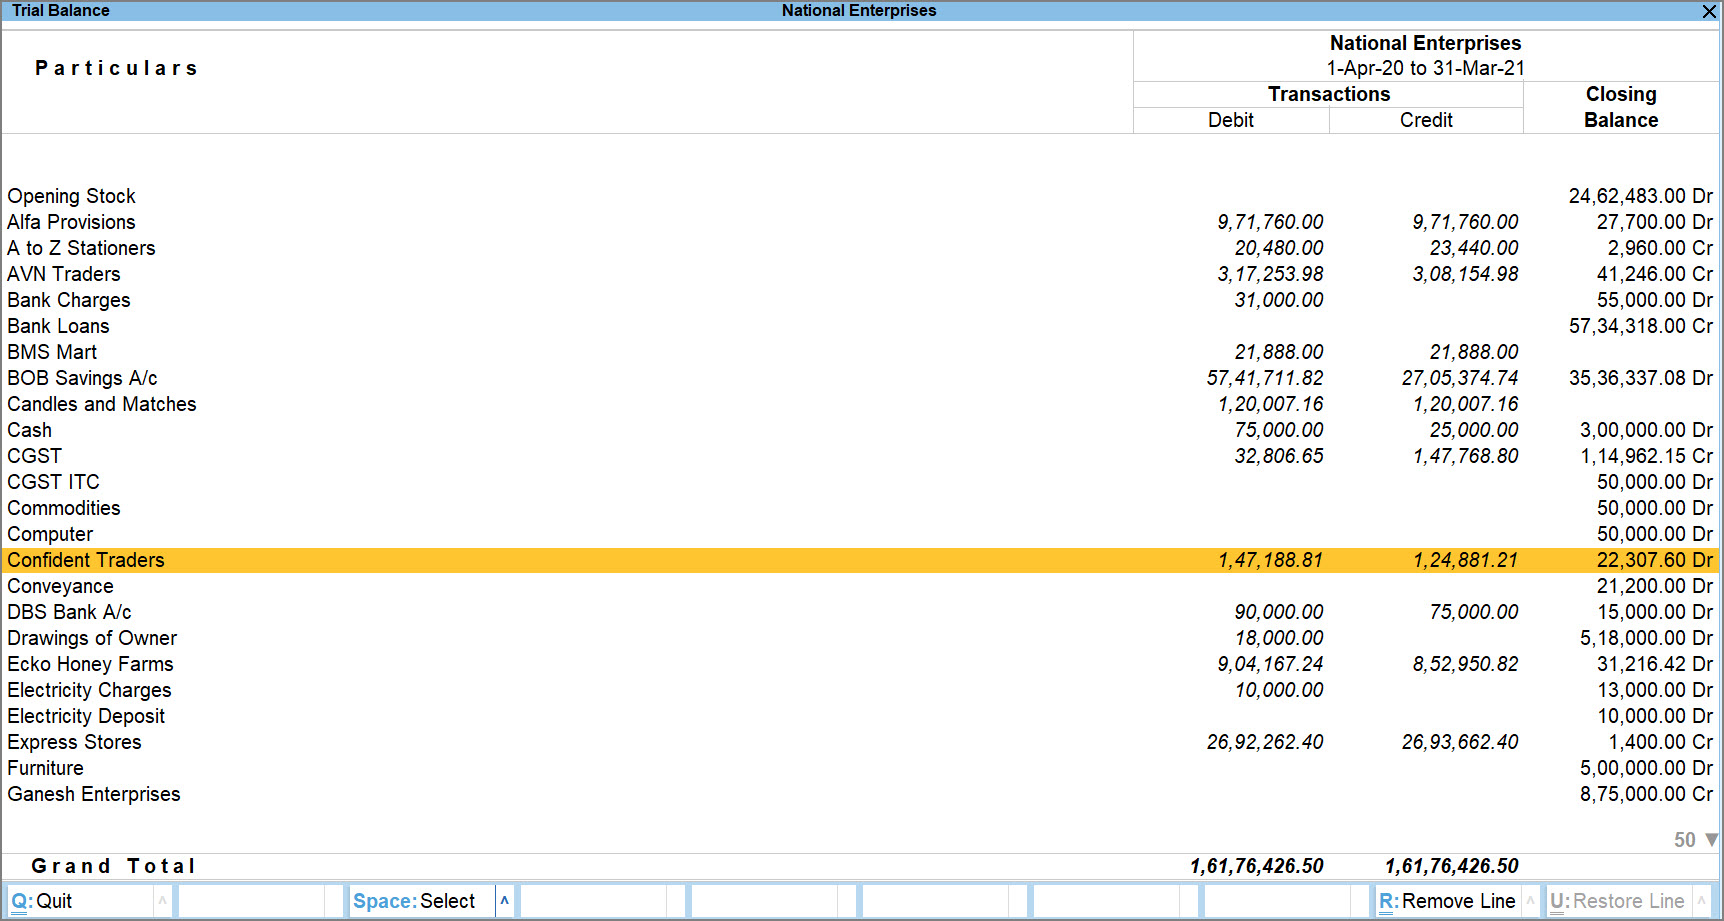
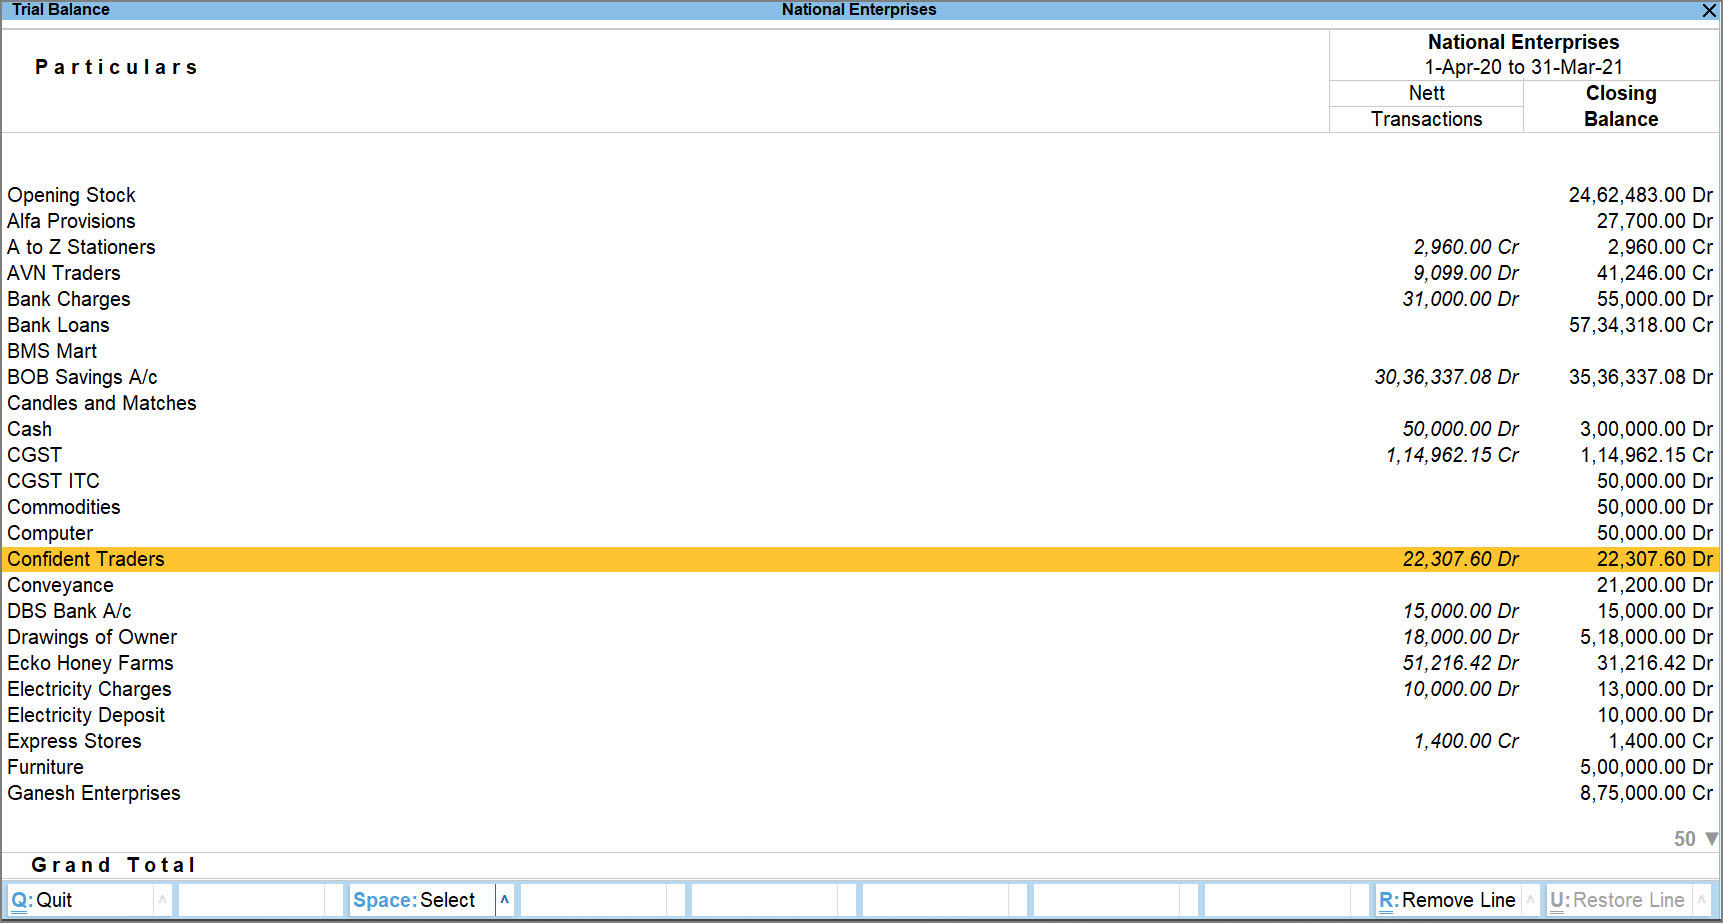
Balancing Difference in Opening Balances
There may be some differences in opening balances in the Trial Balance report due to the following reasons:
- When you create a new company in a new financial year, there may be a mismatch in the total of debit and credit opening balances. This can be due to one of the following reasons:
- Error while manually entering the opening balance.
- Impact of data from the previous company.
- Removal of opening balance from one or more ledgers.
- When the data is split, and you have tried to change the carried forward opening balances.
- Importing or sync of ledger opening balances which will overwrite the existing balances.
In order to nullify the difference, you must verify the Opening Balance of each ledger from the previous year’s balance sheet and fix any data entry error.
To verify the opening balances of the ledgers in the company data,
- Press Alt+G (Go To)> type or select Trial Balance> press Enter.
Alternatively, Gateway of Tally > Display More Reports > Trial Balance. - Press F12 (Configure) > set Show Opening Balance as Yes.
The Difference in opening balances field appears in the report, if any.
- Specify the opening balances in ledgers, if missing, or correct the incorrect opening balances in ledgers, if any.
- Alter the required ledger: press Alt+G (Go To) > Alter Master > select the ledger that you want to alter.
- In the Opening Balance field, update the opening balance value and save the ledger.
- Once you correct the ledger balance, check and tally the Trial Balance report.

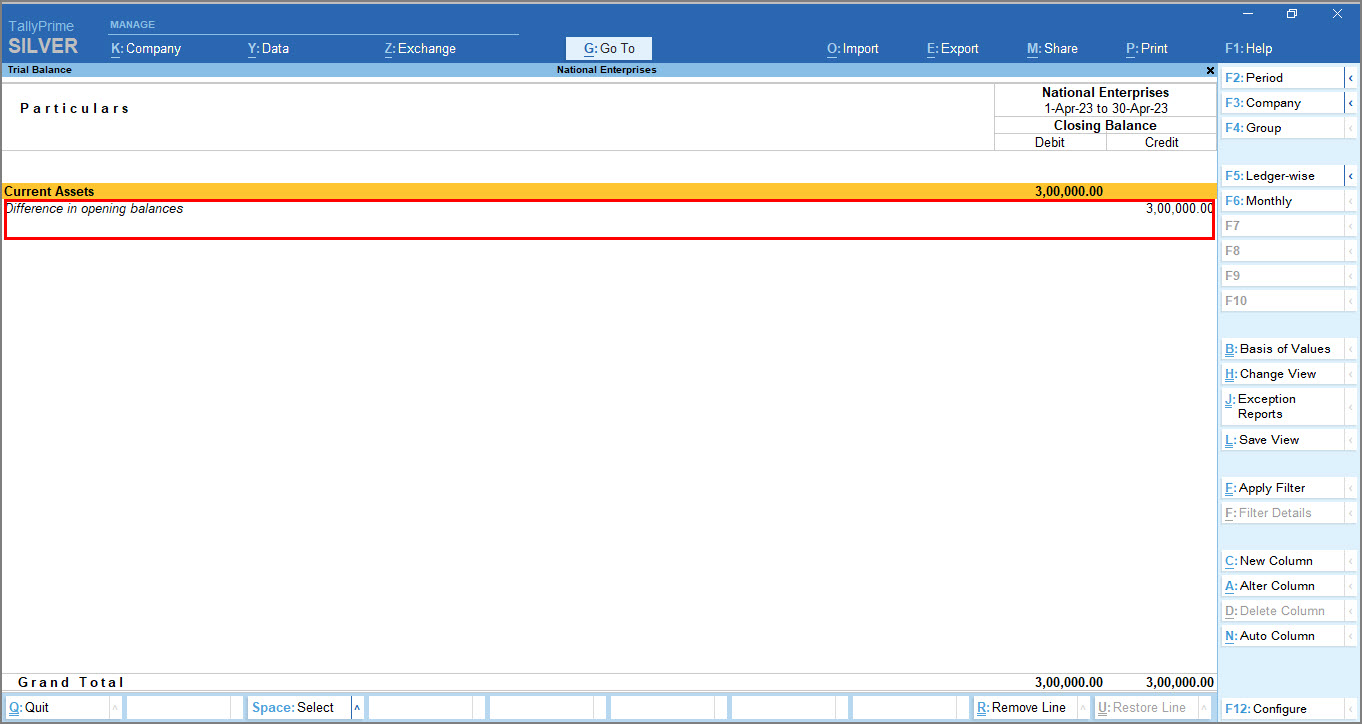
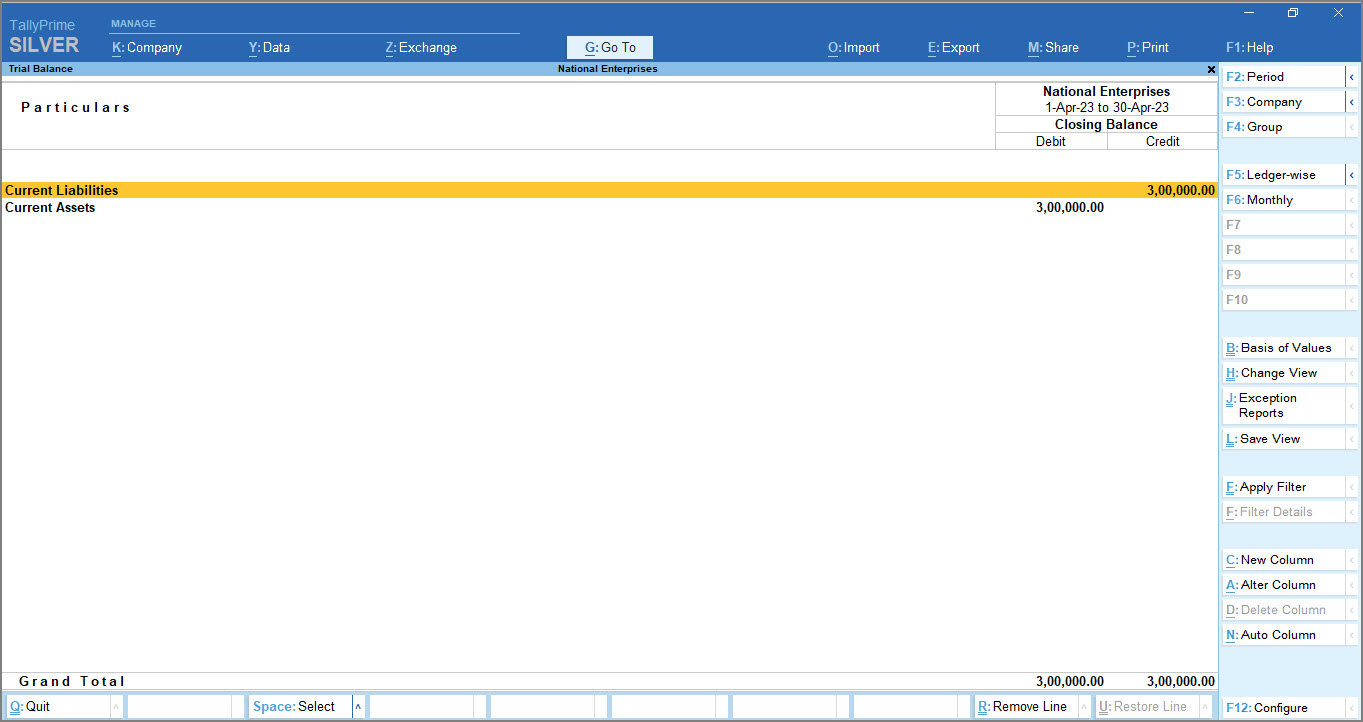
By adjusting these imbalances, you can ensure the accuracy of financial reports like Balance Sheet, and balance the debit and credit values in these reports as well.
Receipt Notes in Trial Balance
Let’s suppose you purchased goods from a party, and they seemed fine when you received them. As an acceptance of the goods, you issue a Receipt Note. But when the Receipt Note is entered with a tracking number, it affects the Trial Balance. To see how this affects the Trial Balance,
![]()
- Press Alt+G (Go To)> type or select Trial Balance> press Enter.
Alternatively, Gateway of Tally > Display More Reports > Trial Balance. - Press F5 (Ledger-wise) to view the ledger-wise report.

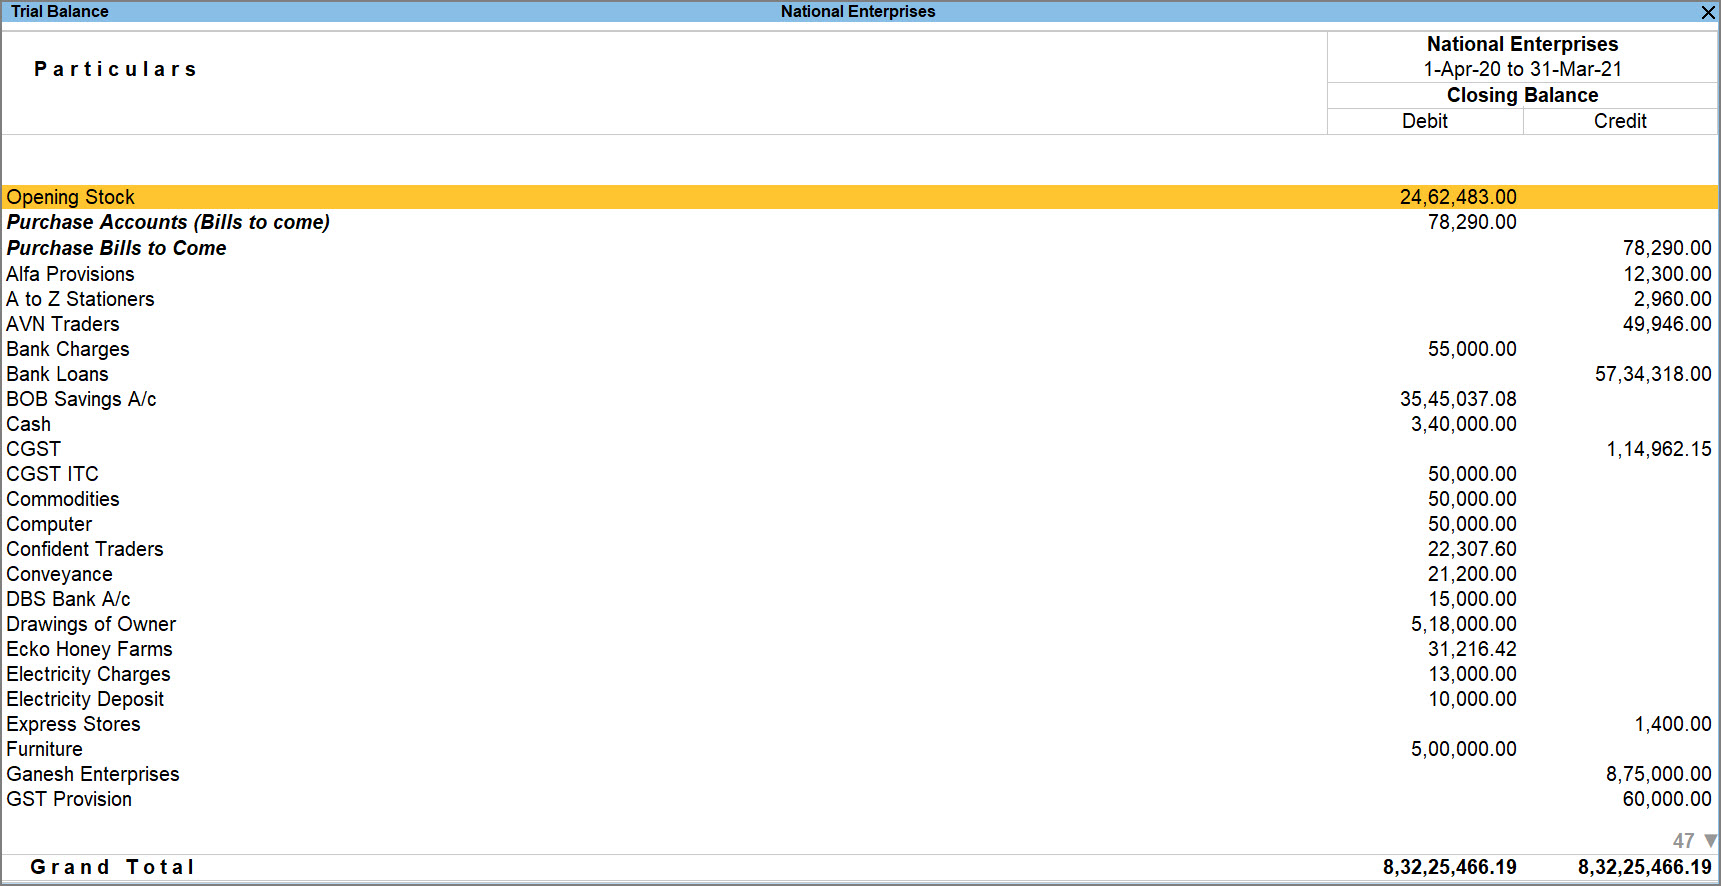
The value of the Purchase Accounts (Bills to Come) is displayed in the Debit field. The receipt note transaction does not affect the books of accounts when it is entered with a tracking number since it is an inventory transaction and not an accounting entry. There will be an increase only in the stock quantity and stock value. The Purchase Bills to Come (under Credit) represents the stock for which a receipt note is entered, but the purchase voucher is not yet accounted.
Similarly, you might have sold some goods to a party and sent it along with the Delivery Note. In this case, the value of the goods will appear under Sales Bill to Make as the sales bill was not issued at that time.
Group/Ledger-Wise Trial Balance
You might want to cross-verify the opening balance ledgers to adjust the difference in Opening Balance. By default, a group-wise view of the Trial Balance appears. You can view Trial Balance in TallyPrime according to the groups or the ledgers in your books by converting it into a ledger-wise report or back into a group-wise report. To do so,
- Press Alt+G (Go To)> type or select Trial Balance> press Enter.
Alternatively, Gateway of Tally > Display More Reports > Trial Balance. - Press F5 (Ledger-wise) to view the ledger-wise report. To return back to the Group-wise report, press F5 again.
- For a detailed format of the Trial Balance, press Alt+F5 (Detailed).

- Press F12 (Configure) > set Expand all levels in Detailed format to Yes. The group-wise Trial Balance appears in the expanded format. This configuration will expand even those groups, for which Group behaves like a Sub-ledger is set to Yes.
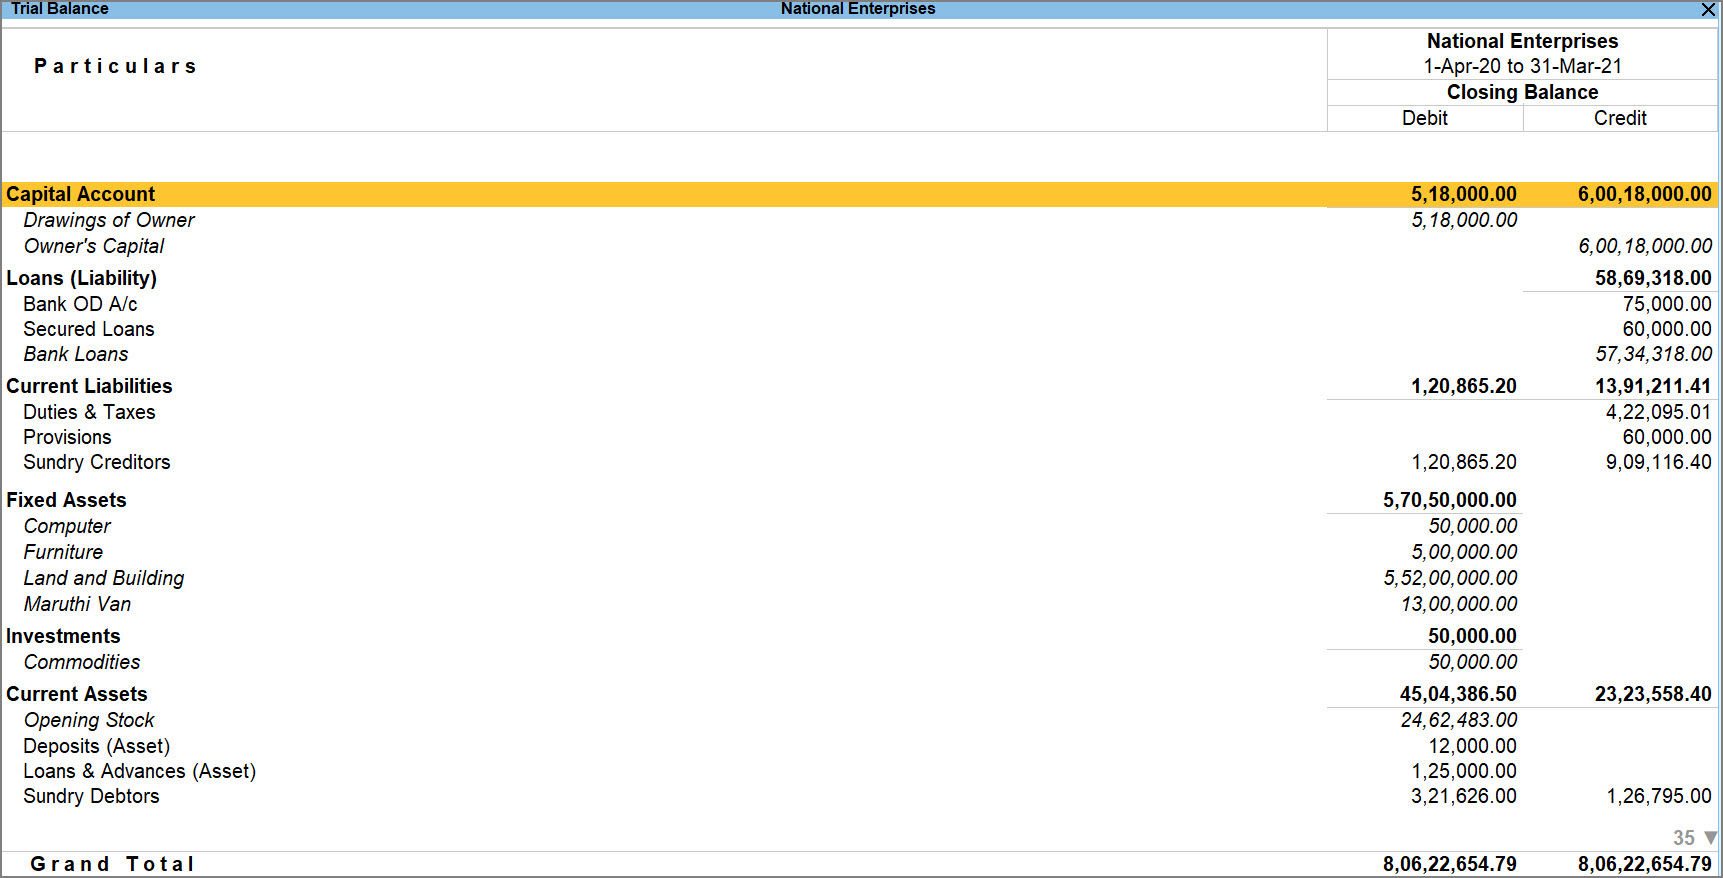
By default, the option Group behaves like a sub-ledger is set to Yes for Sundry Debtors/Sundry Creditors. However, if you want the Sundry Creditors/Sundry Debtors groups to be expanded, go to Group Alteration and set Group behaves like a sub-ledger to No.
To know more about Group behaves like a sub-ledger, go to Groups in TallyPrime
The Trial Balance is a summary of all the ledger balances. It helps in checking whether the transactions are correct and balanced. Manually preparing a Trial Balance report is a tedious task. In case of any mismatch in the Trial Balance, you will have to check the ledgers and maintain the correctness of the accounts manually. Now, with TallyPrime, the Trial Balance will be at your fingertips. You can verify the accuracy of financial transactions by comparing the total debit balances with total credit balances in the Trial Balance report.
View Trial Balance: By default, the Trial Balance displays the debit and credit of the ledger accounts. The Trial Balance is prepared periodically for your company, for example, at the end of a quarter or financial year. The difference in Opening Balances is also displayed in the report.
Identify mismatches in ledger balances and update as needed: When there is a difference in Opening Balances, you can use the Trial Balance to check which ledger’s Opening Balance was updated incorrectly or if a ledger creation was not considered at all. Such differences occur when you move the ledger balances from a manual system to TallyPrime for the first time.
Configure Trial Balance, as per business practices: Varied configurations within the report allows you to view different aspects of the accounts as per your business requirements. You can choose to include the Opening Balance while viewing the report or not. You can also view the Trial Balance according to groups or ledgers in your books. The impact of Receipt/Delivery notes with tracking number is also visible in the Trial Balance report.
To know more, view working with reports.
View Trial Balance
By default, the report Trial Balance in TallyPrime will be generated as on the date of the last voucher entry. You can change the date to view the report for the required period. Let’s suppose you want to view the Trial Balance for April 2020 to March 2021,
![]()
- Press Alt+G (Go To)> type or select Trial Balance> press Enter.
Alternatively, Gateway of Tally > Display More Reports > Trial Balance.
There are varied configurations in the F12 (Configure) section of the Trial Balance that allow you to view the report as per your requirements. For instance, you might want the Opening Balance of this financial year to appear in the Trial Balance report, so that you can tally it with the Closing Balance of the previous financial year. To view Opening Balance in the Trial Balance,
- In the Trial Balance, press F12 (Configure)> Show Opening Balance> Yes.

You can view the details of the Opening Balance and Closing Balance side-by-side. - Similarly, you can also view transaction details in the Trial Balance report. Let us assume that you have traded with a particular party, wherein you made purchases as well as sales with that party.
Press F12 (Configure) > set Show Transactions to Yes.
You will see the Debit as well as Credit details of the particular party.
- Set the Nett Transactions to Yes to merge the debit and credit sides.
If the debit is more than the credit or vice-versa, you will be able to see a Nett amount in the Trial Balance after adjustment.
With this information, you will be able to determine if you need to pay the party or receive payment from them. - Closing stock: As per accounting principles, the Trial Balance does not display the closing stock. The closing stock is the balance of unsold goods that are left from the purchases made during an accounting period. The value of the total purchases is already included in the Trial Balance. If closing stock is included in the Trial Balance, then the effect will be doubled.
Balancing Difference in Opening Balances
There may be some differences in opening balances in the Trial Balance report due to the following reasons:
- When you create a new company in a new financial year, there may be a mismatch in the total of debit and credit opening balances. This can be due to one of the following reasons:
- Error while manually entering the opening balance.
- Impact of data from the previous company.
- Removal of opening balance from one or more ledgers.
- When the data is split, and you have tried to change the carried forward opening balances.
- Importing or sync of ledger opening balances which will overwrite the existing balances.
In order to nullify the difference, you must verify the Opening Balance of each ledger from the previous year’s balance sheet and fix any data entry error.
To verify the opening balances of the ledgers in the company data,
- Press Alt+G (Go To)> type or select Trial Balance> press Enter.
Alternatively, Gateway of Tally > Display More Reports > Trial Balance. - Press F12 (Configure) > set Show Opening Balance as Yes.
The Difference in opening balances field appears in the report, if any.
- Specify the opening balances in ledgers, if missing, or correct the incorrect opening balances in ledgers, if any.
- Alter the required ledger: press Alt+G (Go To) > Alter Master > select the ledger that you want to alter.
- In the Opening Balance field, update the opening balance value and save the ledger.
- Once you correct the ledger balance, check and tally the Trial Balance report.

By adjusting these imbalances, you can ensure the accuracy of financial reports like Balance Sheet, and balance the debit and credit values in these reports as well.
Receipt Notes in Trial Balance
Let’s suppose you purchased goods from a party, and they seemed fine when you received them. As an acceptance of the goods, you issue a Receipt Note. But when the Receipt Note is entered with a tracking number, it affects the Trial Balance. To see how this affects the Trial Balance,
![]()
- Press Alt+G (Go To)> type or select Trial Balance> press Enter.
Alternatively, Gateway of Tally > Display More Reports > Trial Balance. - Press F5 (Ledger-wise) to view the ledger-wise report.

The value of the Purchase Accounts (Bills to Come) is displayed in the Debit field. The receipt note transaction does not affect the books of accounts when it is entered with a tracking number since it is an inventory transaction and not an accounting entry. There will be an increase only in the stock quantity and stock value. The Purchase Bills to Come (under Credit) represents the stock for which a receipt note is entered, but the purchase voucher is not yet accounted.
Similarly, you might have sold some goods to a party and sent it along with the Delivery Note. In this case, the value of the goods will appear under Sales Bill to Make as the sales bill was not issued at that time.
Group/Ledger-Wise Trial Balance
You might want to cross-verify the opening balance ledgers to adjust the difference in Opening Balance. By default, a group-wise view of the Trial Balance appears. You can view Trial Balance in TallyPrime according to the groups or the ledgers in your books by converting it into a ledger-wise report or back into a group-wise report. To do so,
- Press Alt+G (Go To)> type or select Trial Balance> press Enter.
Alternatively, Gateway of Tally > Display More Reports > Trial Balance. - Press F5 (Ledger-wise) to view the ledger-wise report. To return back to the Group-wise report, press F5 again.
- For a detailed format of the Trial Balance, press Alt+F5 (Detailed).

- Press F12 (Configure) > set Expand all levels in Detailed format to Yes. The group-wise Trial Balance appears in the expanded format. This configuration will expand even those groups, for which Group behaves like a Sub-ledger is set to Yes.
By default, the option Group behaves like a sub-ledger is set to Yes for Sundry Debtors/Sundry Creditors. However, if you want the Sundry Creditors/Sundry Debtors groups to be expanded, go to Group Alteration and set Group behaves like a sub-ledger to No.
To know more about Group behaves like a sub-ledger, go to Groups in TallyPrime
Day Book in TallyPrime
Day Book in TallyPrime is an account book in which a day’s entries or transactions are captured. TallyPrime stays true to the traditional Day Book used by businesses for manual bookkeeping while bringing in a host of powerful features like viewing the profitability of sales, inserting a voucher right from the report into the books, viewing only a particular type of transactions, and so on.
In any business, it is important to have a daily report of your business to gauge the performance in terms of sales, purchases, profitability, and much more. You may also want to view a particular type of voucher recorded in a day or even a type of accounting entry to analyse the course of your business.
All such requirements are covered in the Day Book report of TallyPrime. But most importantly this report not only lets the user view but also perform some important actions to update the books directly.
What if while going through your Day Book report you come across a voucher that was added by mistake or you find a voucher with errors? Well, do not worry as you can select multiple transactions at once and cancel, delete, or remove the entries from the Day Book. Similarly, you can verify your transactions, and account for any missing entries by adding, inserting, or duplicating entries.
View Day Book in TallyPrime
Day Book in TallyPrime hosts a powerful pack of features that will make your life easy while working around transactions recorded in a day or any period. The best part about this report in TallyPrime is that it maintains the originality of the traditional Day Book used by businesses for manual bookkeeping and at the same time provides so many features to tailor the experience as required. Right from altering vouchers to duplicating them, and changing the view of the report to checking profit, Day Book in TallyPrime delivers all. And to know more about the experience of using reports in TallyPrime, refer to Working with Reports in TallyPrime.
In this section
- View Day Book
- View Day Book by type of transaction
- Hide transactions
- Restore hidden transactions
- View profitability
- View Optional/Cancelled/Post-dated vouchers
View Day Book
Visit the Day Book in TallyPrime to see all your transactions that were recorded on a particular day or a period. By default, this day is set to the Current Date displayed in Gateway of Tally.![]()
- Press Alt+G (Go To) > type or select Day Book > press Enter.
Alternatively, Gateway of Tally > Day Book.
- Press Alt+F5 (Detailed) for a detailed format of the report. You can see the break-up of the invoices with details such as additional charges, tax components, and so on.

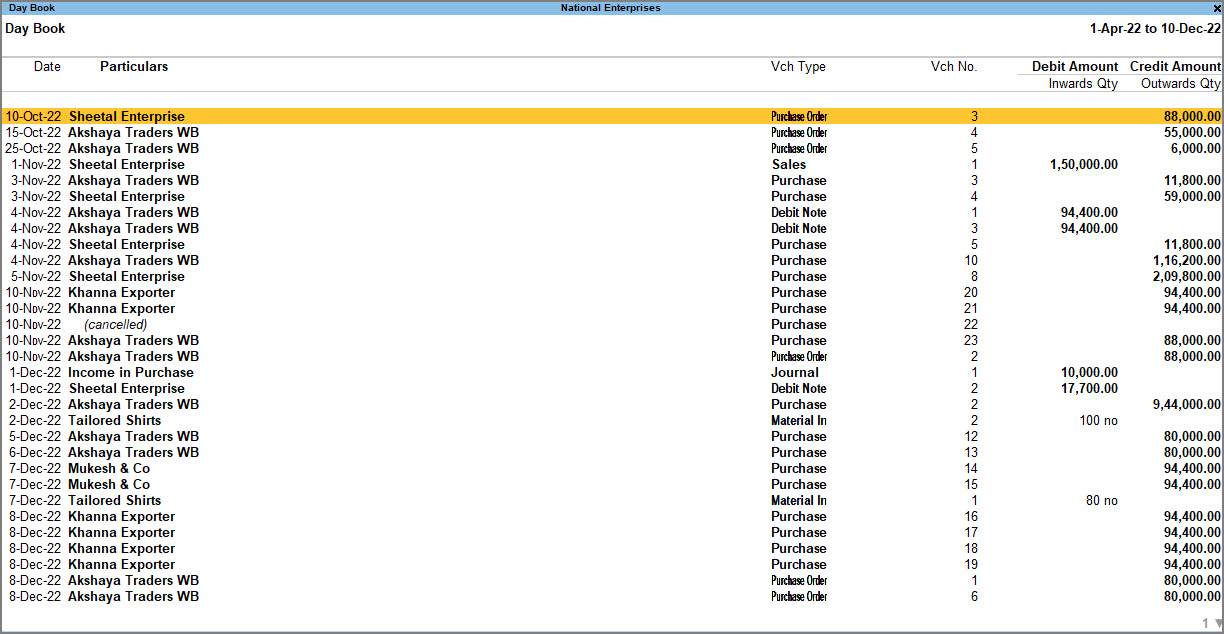
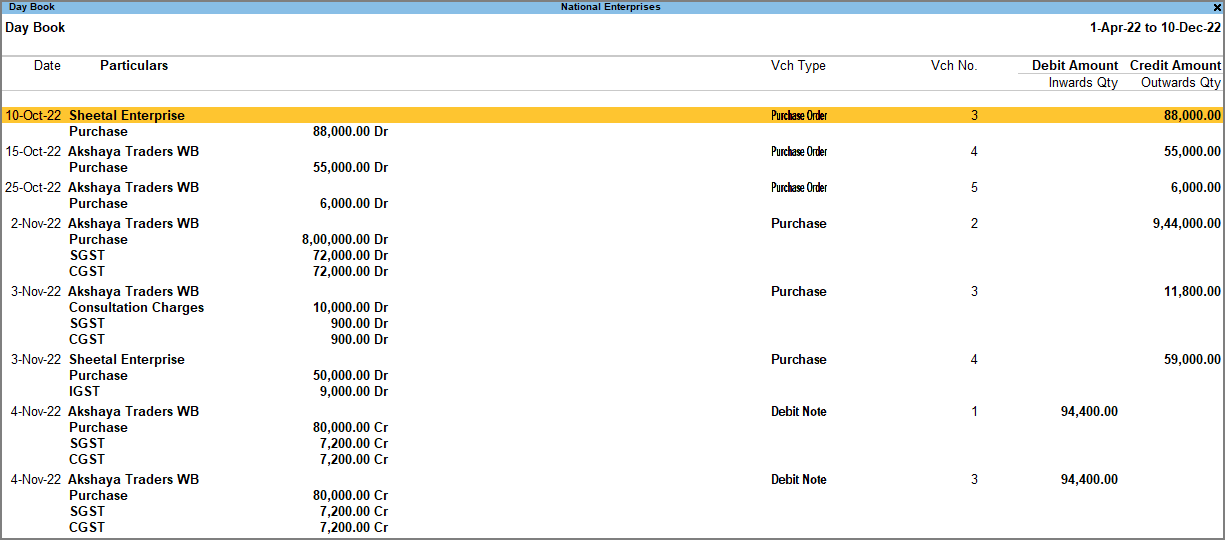
If you want to view more details of the transactions such as narration and cost centre, press F12 (Configure) and enable the configurations as required.
View Day Book by Type of Transaction
In the Day Book in TallyPrime, you can see not only the transactions of the day or a period but also a single kind of transaction. For example, you may want to see all the Receipts. You can easily change the view of the Day Book to see all the Receipts recorded for the day or a particular period.![]()
- Day Book > F4 (Voucher Type), and select the Debit Note voucher type.


You can also see the Total amount from your debit notes.
Similarly, you can see all the Purchase or Sales or any voucher recorded in a day or a period.
Hide a transaction
Did you know that you can temporarily hide entries from the Day Book, without deleting it from your books?
Let us assume that you want to view the transactions for November 2022 without the purchase entries with voucher number 4 against Sheetal Enterprise because you want to prioritize and plan payments to other parties right now.
On the Day Book report,
- Press F4 (Voucher Type) > Purchase.
You can view all the purchase transactions of the day. - Select the entry against Sheetal Enterprise, and press Ctrl+R (Remove Line) to remove.

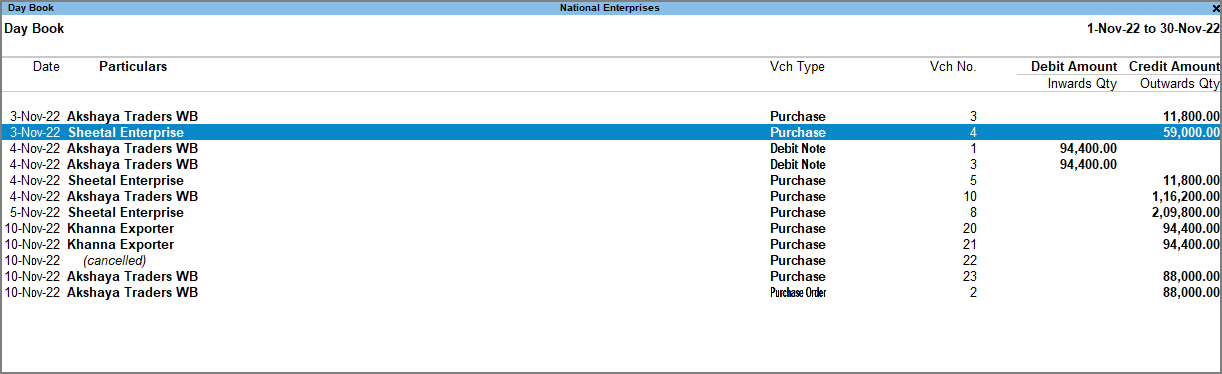
The entry against Sheetal Enterprise with voucher number 4 is now hidden from view.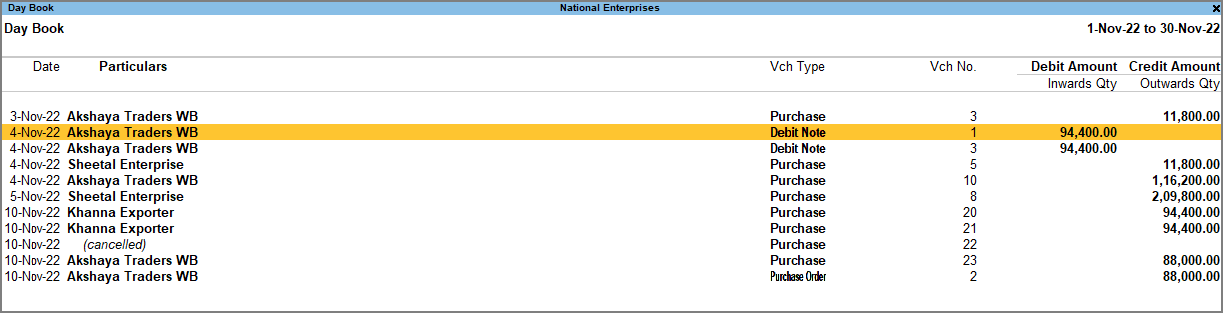
Restore a removed/hidden transaction
- To restore the last entry that was hidden, press Ctrl+U. Similarly, you can keep pressing Ctrl+U to undo and the entries will be restored in the order in which they were hidden.
- To restore all the hidden entries at once, press Alt+U.
View profitability
If you are viewing the Day Book for Sales voucher type, press F7 (Show Profit) to see the Gross Profit against the Transaction Value and Cost. You can use F7 (Hide Profit) to hide the profit-related details.
View Optional/Cancelled/Post-dated Vouchers | Exception Reports
You can view the exceptions related to the data displayed in the current report by pressing Ctrl+J (Exception Reports), without closing the report. The Exception Reports available in the Day Book in TallyPrime are of Optional Vouchers, Cancelled Vouchers, and Post-Dated Vouchers.
- To view the List of Optional Vouchers for Day Book, press Ctrl+E (Exception Reports) > type or select Optional Vouchers > and press Enter.
- Press Esc to view the default report.
Stripe View in Day Book
You can enable Stripe View for Day Book through F12 configuration. After doing so, you can view the report with stripes, ensuring a neat representation of data with maximum readability. In case, you wish to enable Stripes for all the reports, including Day Book, you can enable it at the application level.
To enable Stripe View only for Day Book:
- Open Day Book > press F12 (Configure) > set Enable Stripe View to Yes.
Once you have enabled Stripe View for Day Book, you can view the report, as shown below:
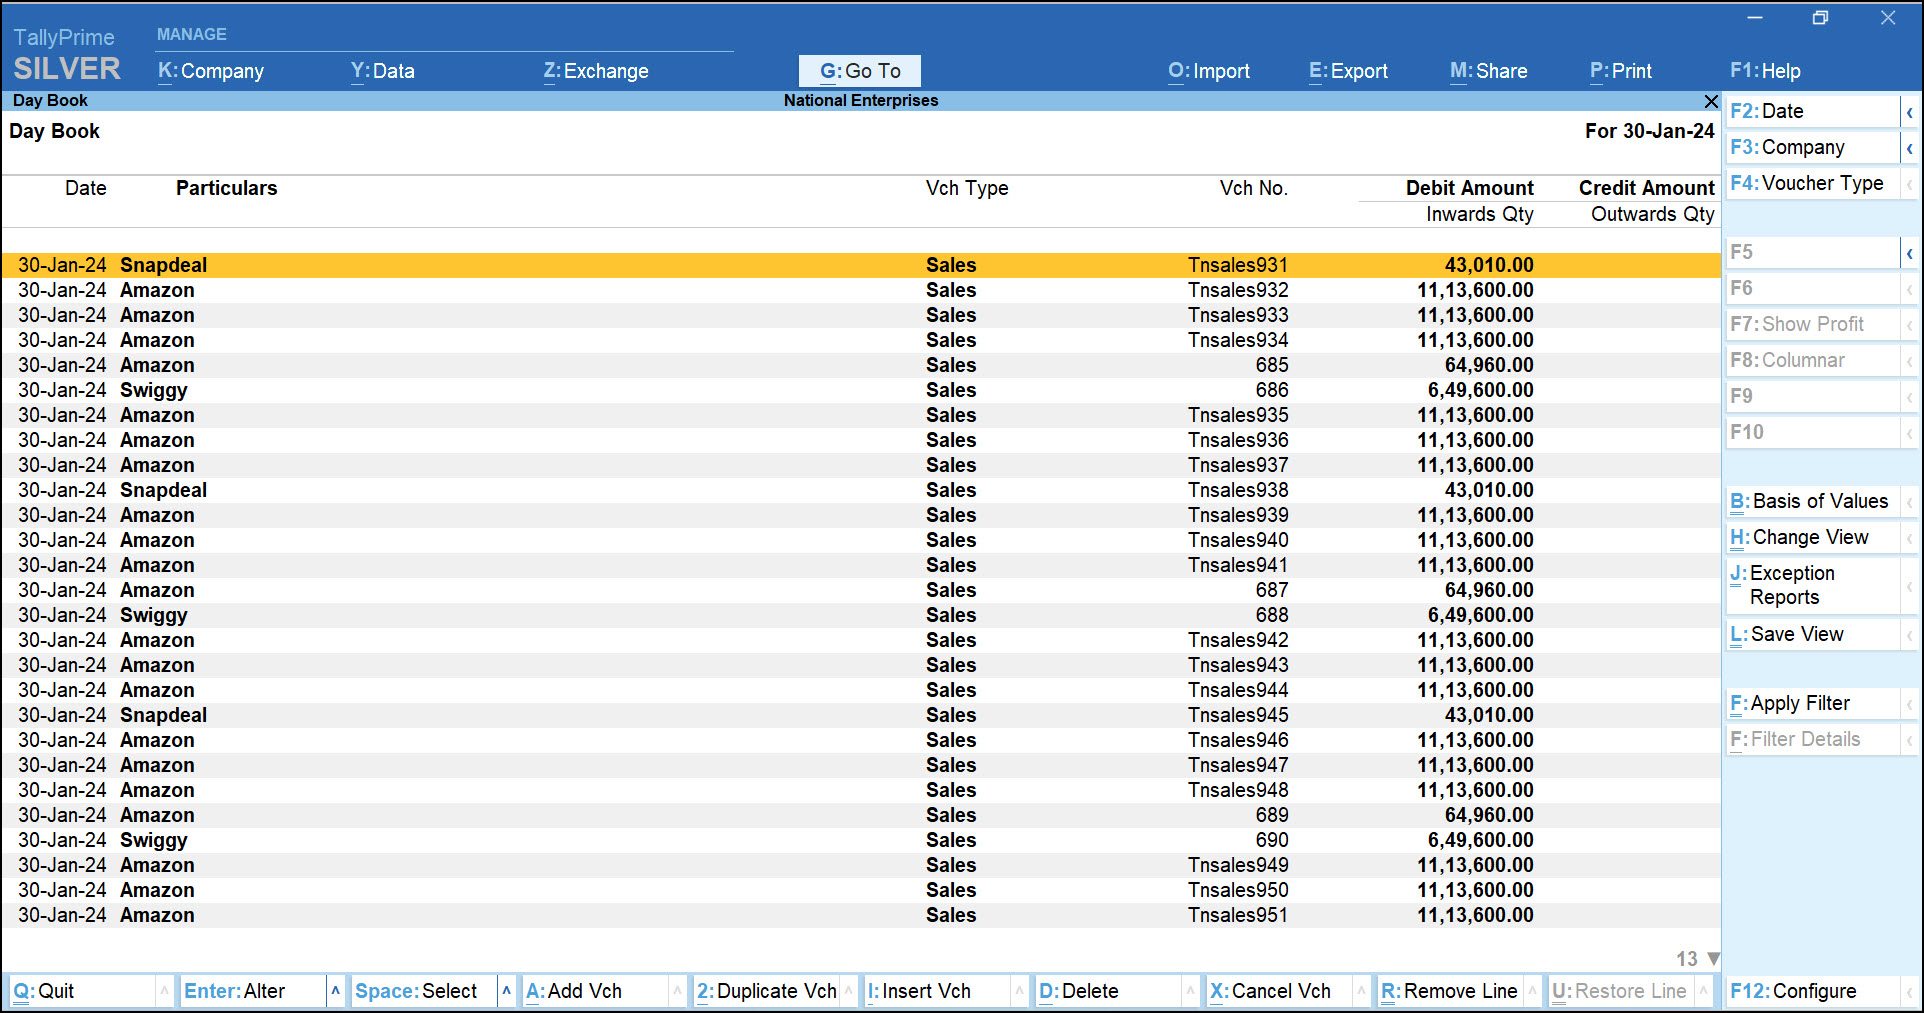
Similarly, you can enable Stripe View and Print, Export, as well as Share the reports and vouchers with your parties for better readability.
To know more, refer to the Stripe View section in the Working with Reports in TallyPrime topic.
Find a Transaction Within Your Day Book
If your business has hundreds or thousands of transactions, it can get difficult if you are trying to find a particular transaction. Here is how the Day Book in TallyPrime will help you find it easily.
Let us assume that you have made an import of goods from the USA but you are unable to find more details about this. You feel that you might have added a note in the narration of the transaction.
No problem! You can use the Apply Filter feature to locate this transaction.![]()
Before using the Apply Filter feature, press Alt+F2 and clear the From and To dates. Now you can see all your transactions till date.
- Open Day Book and press Ctrl+F (Apply Filter).
- On the Basic Filter screen, enter the specific information you are looking for in the Look For field. For example, let us say you are looking for a voucher with the word USA in its narration.

You can see the following transaction in the Day Book.
Now, you can Press Enter to open the transaction, and check the required details.
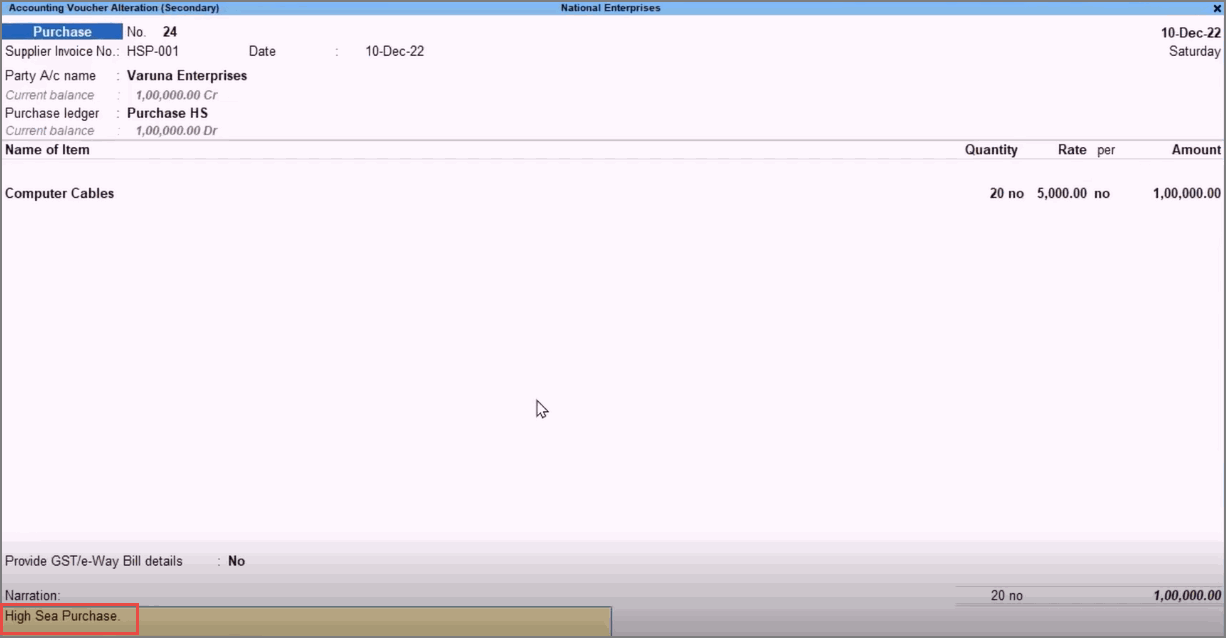
On the Basic Filter screen, you can also press F6 (Multi-Filter) and F7 (Advanced Filter) to explore more filter options. To learn more about report filters, you can refer to the Apply Filter in Reports | Basic Filter, Multi-Filter, Advanced Filter topic.
View Day Book by Type of Voucher Entries
You can also configure the Day Book in TallyPrime for the type of voucher entries you want to view. This will come in handy when you want to check your accounting transactions or inventory transactions separately.![]()
- In Day Book, press Ctrl+B (Basis of Values).
The Basis of Values sub-screen appears.
- Select Type of Voucher entries and press Enter.
The Report Details screen appears. - Select from the Type of Voucher entries.
- Accounting Entries Only: It displays Day Book for only accounting vouchers such as Sales, Purchase, Payment, Debit Note, Credit Note, and others.
- All Vouchers: It displays Day Book for all the vouchers, irrespective of the type of voucher.
- Inventory Entries Only: It displays Day Book for only inventory vouchers such as Journal Vouchers for stock items, Delivery Note, Physical Stock Voucher, and others.
- Press Ctrl+A to save the setting.
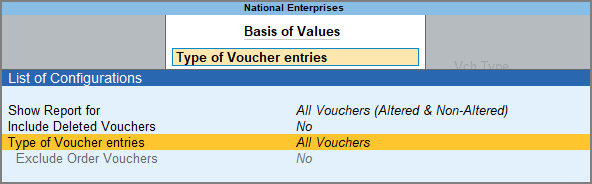
You will be able to view Day Book by the type of voucher entries selected. For example, if you have selected Accounting Entries Only then the Day Book will appear as shown in the image below.
Add, Insert, or Duplicate a Transaction
While dealing with transactions in your business, there are possibilities of missing an entry or of a situation where you will need to make an entry while going through your Day Book report. In some business cases, a particular transaction like a monthly EMI might get repeated frequently or some regular transactions like the counter sale of an item have to be duplicated for faster and accurate data entry. Also, in certain scenarios, a voucher has to be inserted in the exact sequence of voucher number of the voucher type for proper sequencing. Day Book in TallyPrime takes care of all these situations. You can add a transaction in the Day Book as and when required, you can also insert a transaction at an exact position, and duplicate any transaction. Moreover, all this can be done while maintaining the proper sequence in the chronology of the voucher number.
Also, when you add, insert, delete, or duplicate transactions then it becomes vital to adjust the numbers of vouchers that comes after the new voucher is created for the proper sequencing of transactions in the books. To do so, all you have to do is set the voucher numbering method to automatic in TallyPrime. In the case of Edit Log being enabled, all such automatic alterations in the voucher number are recorded and an edit log is created in all such vouchers that are impacted.
In this section
Add a transaction
Day Book in TallyPrime provides you the flexibility to directly add a voucher from the report screen to account for an entry. For example, let us assume that you make a purchase from one of your parties (Akshaya Traders WB) of Rs 80,000 on Dec 5, 2022.
Now you can add a purchase entry directly and hand over the payment.
- Open Day Book and press Alt+A (Add Vch) to add a new transaction.
- Enter the necessary details and save the transaction.
Now you can see the entry for Rs 80,000 against Akshaya Traders WB in the Day Book.
Insert a transaction
If you want to add a transaction in the exact chronological order of the voucher type for the proper sequencing of the voucher number, then you can insert it directly in the Day Book.
Let us take a scenario where you discover that three entries of the same amount had been passed on the same day. You think that one of them might be a duplicate, so you delete it.
However, your data entry operator points out that it was a unique entry.
Now, how can you retrieve the original entry with the same voucher number and position? Easy. You can insert this entry. The voucher number and position will be restored.
Select the entry above which you want to insert the transaction,
- Press Alt+I (Insert Vch).
- Enter the relevant details and save the transaction.

Now you will be able to see both the entries on the specified date in the Day Book, with the original voucher numbers and amounts.
If you insert a voucher between two vouchers with the method of voucher numbering set to automatic, then all the existing vouchers of that particular type recorded on all subsequent days are renumbered. For example, if you insert a sales voucher between sales voucher numbers 2 and 3, then the inserted voucher will attain voucher number 3 and the existing voucher number 3 will be listed as voucher number 4 for the proper sequencing of the voucher numbers. Consequently, all the existing sales vouchers recorded on all subsequent days will be renumbered.
Duplicate a transaction
You can duplicate a voucher in the Day Book in TallyPrime to easily account for a recurring transaction. Let us take a scenario where your business has a deal with Akshaya Traders WB to purchase a consignment for two consecutive months.
You have passed a purchase entry for November. Now you can easily repeat this transaction for the next month.
Select the existing entry and,
- Press Alt+2 (Duplicate Vch).
- On the Accounting Voucher Creation (Duplication) screen, press F12 (Configure) and set Use default Bill-wise details for Bill Allocation to No.
- Update all the relevant voucher details like invoice number, party details, ledger, item details and so on, as required.
- On the Bill-Wise Details for form, select the Type of Ref as New Ref and change the reference number to the new voucher number or as required.

- Enter the Narration, if any. As always, press Ctrl+A to save the voucher.
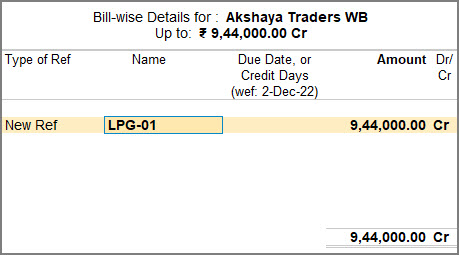
You can see the Purchase voucher recorded against Akshaya Enterprise WB for December.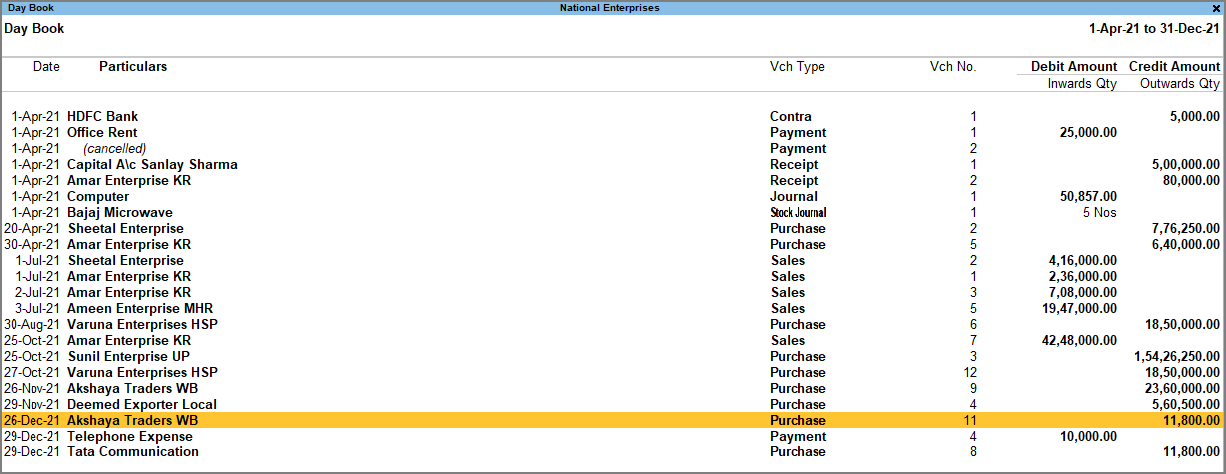
Delete or Cancel a Transaction
In some cases, a transaction gets recorded unintentionally and has to be deleted to avoid any error in the values in the books of accounts. Also, in case of order cancellation, the voucher recorded against it has to be cancelled. Day Book in TallyPrime provides all the flexibility to handle these uncertainties regarding unwanted transactions and maintain your books as you want. You can easily delete, and cancel entries at your fingertips using TallyPrime.
In this section
Delete a transaction
Let us take a scenario where you discover that two vouchers have been recorded for the same transaction and you want to delete one of the entries.
In the Day Book, you can easily delete vouchers if required. Let us take a scenario where you discover that the same transaction was recorded twice against Khanna Exporters, probably by two different data entry operators.
- Select the entry which you want to delete, and press Alt+D to delete it from your books.
Cancel a transaction
What do you do when an order is canceled but a sales voucher has already been passed? Simple! You can just cancel the corresponding voucher, instead of deleting it. The benefit is that voucher numbering will not be affected, as the same voucher number will be available for reuse. It will be assigned in your books to the canceled voucher list.
Let us take a scenario where you place an order with Akshaya Traders WB and you record a corresponding purchase entry. However, a representative from the sales department of Akshaya Traders WB calls your office and cancels the order at the last minute due to a shortage of supply.
Now, how do you cancel the transaction?
- Select the relevant entry in the Day Book and press Alt+X to cancel.
You can see that the entry has been cancelled, with the original voucher number intact.
When you cancel a voucher with the voucher numbering method set to automatic, the voucher number gets retained. It can be used later to create a voucher with the same number for proper sequencing in the chronological order of the voucher numbers.
View Altered and Deleted Vouchers in Day Book When Using Edit Log
There can be a situation when your auditor or you want to view altered vouchers. In TallyPrime Edit Log and TallyPrime Release 2.1 or later with Edit Log enabled, you can view altered and deleted vouchers in Day Book and other Ledger Vouchers reports.![]()
- In Day Book, press Ctrl+B (Basis of Values).
The Basis of Values sub-screen appears. - Select Show Report for which will be set to All Vouchers (Altered & Non-Altered) by default and press Enter.
The Report Details screen appears. - Press Enter on Altered Vouchers.
Consequently, the option Include Deleted Vouchers will also be set to Yes. This will include the vouchers that you have deleted in TallyPrime with Edit Log enabled. Press Enter to set it as No, if you do not want to view the deleted vouchers.
- Press Ctrl+A to save the setting. The list of altered vouchers will appear, as shown below.

Similarly, you can view Day Book with only non-altered vouchers.


You can view the Edit Log of any of these vouchers by opening it and pressing Ctrl+O (Related Reports) > Edit Log.
If you select Non-Altered Vouchers, then the report will open for vouchers that are never altered in TallyPrime. Consequently, the option Include Deleted Vouchers will be set to No. You cannot set it to Yes, if you are viewing the report for Non-Altered Vouchers, as deletion is also a form of alteration.
Ratio Analysis
Ratio Analysis in TallyPrime is a powerful tool for financial analysis, where the analysis of a financial statement is made possible by the use of financial ratios. It helps you compare different sets of financial data. Along with the ratio of your assets with respect to your liabilities, cash in hand, stock in hand, and so on, you can also understand the payment performance of your debtors which indicates the average time the customers take to actually pay their bills irrespective of the outstanding balance on the statement date. All these comparisons and observations give an understanding of the financial position of a business unit.
Ratio Analysis report is mostly sought after by business owners, auditors, and stakeholders who want to have clarity about the course of their business for a particular financial year. By referring to the Ratio Analysis report, they can understand their accounts better and take much informed decisions according to the current fiscal scenario.
In TallyPrime, the Ratio Analysis report consists of Principal Groups and Principal Ratios. The Principal Groups are the key figures that give meaning to the ratios. Principal Ratios compare two pieces of financial data for a meaningful comparison.
You can view Ratio Analysis report in the browser.
View Ratio Analysis Report
![]()
Ratio Analysis in TallyPrime helps you compare different sets of financial data. It consists of Principal Groups and Principal Ratios, that help you know about the overall standing of your business. While Principal Groups showcase your Working Capital, Cash-in-hand, Bank Accounts, along with the data related to Sundry Debtors, Sundry Creditors, Stock-in-hand, Nett Profit, and Inventory Turnover, Principal Ratios display the data related to Current Ratio, Quick Ratio, Gross Profit %, Nett Profit %, Return on Investment %, and more. Apart from the data regarding your current business scenario, TallyPrime allows you to drill down further from the Principal Groups and Ratios to access other primary reports such as Balance Sheet, Profit and Loss A/c, Funds Flow report, and many more. For example, Current Ratio takes you to Balance Sheet and Gross Profit % takes you to Profit & Loss A/c.
- Press Alt+G (Go To) > type or select Ratio Analysis and press Enter.
Alternatively, Gateway of Tally > Ratio Analysis.
A sample image of the Ratio Analysis screen appears, as shown below:
- In case you need to configure the report, press F12 (Configure).

- Show Explanation: No
This option is to disable the description or explanation of the parameters mentioned in the Principal Groups and Principal Ratios. By default, this option is set to Yes. The descriptions are meant to give you a better understanding about the parameters and how they are calculated.
For example, Working Capital is the difference between your Current Assets and Current Liabilities. Similarly, the term Current Ratio depicts the ratio between the Current Assets and Current liabilities and Quick Ratio. However, you can set this option to either Yes or No, according to your convenience. Once you have set the Show Explanation to No, a sample image of the Ratio Analysis report appears, as shown below:
- Show Vertical Analysis: Yes
This option is to view the Ratio Analysis report vertically. In the Ratio Analysis report, Principal Groups and Principal Ratios appear horizontally by default.
However, if you want to change the view to vertical and represent the data vertically, you can do so by changing this option to Yes.
Once you have set the Show Vertical Analysis to Yes, you can view the Ratio Analysis report, as shown below:
- Show Explanation: No
Principal Groups
The following are the key features that summarize the Principal Groups in the Ratio Analysis report.
- Working Capital: The Working Capital is calculated by subtracting Current Liabilities from Current Assets. Financial analysts often consider the total Current Assets as the Working Capital. This serves as a measure of how far the firm is protected from liquidity problems.
- Cash-in-Hand and Bank Accounts: This data provides another view of the liquidity position where you can get the details of the finances.
- Bank OD A/c: It allows the account holder to continue withdrawing money even when the account has no funds in it or has insufficient funds to cover the amount of the withdrawal. Basically, if you have a bank OD account, you can borrow a set amount of money from the bank.
- Sundry Debtors (due till today): This is the list of all the debtors and total debts due as of the date of the statement.
- Sundry Creditors (due till today): This is the list of all the creditors and total credits due as of the date of the statement.
- Sales and Purchase Accounts: The Sales and Purchase Accounts, which represent the trading activity for the period, are displayed.
- Stock-in-Hand: The Stock-in-Hand is displayed as on the date of the report. Together with Cash and Bank Balances and Debtors, this completes the Current Assets aspect of the Working Capital.
- Nett Profit: This is derived from the Profit & Loss Account, and is the profit that remains after direct and indirect expenses.
- Wkg. Capital Turnover (Sales Accounts/Working Capital): This is an activity or efficiency ratio that shows the number of times the working capital has been rolled over during a particular period. It depicts how effectively the firm is using its working capital.
- Inventory Turnover (Sales Accounts/Closing Stock): This is an activity or efficiency ratio that shows the number of times the stock has been rolled over during the report period. It depicts how effectively the firm is using its inventories.
Principal Ratios
The following are the key features that summarize the Principal Ratios in the Ratio Analysis report.
- Current Ratio: It is the ratio between the Current Assets and Current liabilities. The current ratio helps you to understand whether your business is able to pay the liabilities with its current assets.
- Quick Ratio: This ratio displays the difference between your Current Assets and Stock-in-Hand with respect to your Current Liabilities. Quick Ratio indicates the company’s ability to instantly use its near-cash assets, which can be converted quickly to cash, to pay down its current liabilities without considering stock in hand.
- Debt/Equity Ratio: This ratio tells you how much debt you have taken as compared to the company’s equity. A high Debt equity ratio means that your company relies on debt financing.
- Gross Profit %: It is the profit made from the sale of goods and services, expressed in percentage. It is the difference between revenue and cost of goods sold, divided by revenue. Gross Profit % reflects your business efficiency.
- Nett Profit %: The percentage of earnings remains with you after all the operating and non-operating expenses are deducted from the gross profit. Nett Profit % demonstrates how well you handle your indirect expenses.
- Operating Cost %: It is the percentage of operating cost with respect to the total turnover. Operating Cost % helps you check certain areas of your business, such as cost control and cost reduction.
- Recv. Turnover in days: Through this data, you can analyze your debtor-wise payment performance. Identifying the customers who are yet to pay their bills, you can plan the receivables collection process through Recv. Turnover in days.
- Return on Investment %: It is used to evaluate the efficiency of an investment or different investments. Return on Investment percentage is the benefit drawn from an investment or Nett Profit with respect to your Capital Account and Nett Profit combined together. Expressed in percentage, Return on Investment directly measures the amount of return on a particular investment, with respect to the cost incurred on the investment.
- Return on Wkg. Capital %: It is the ratio of Nett Profit with respect to Working Capital. Return on Working Capital percentage highlights the relation between the investments done towards the operation of a business and the revenues it generates to continue its operation and make profit.
Payment Performance of Debtors
![]()
Payment Performance of Debtors (Receivable Turnover in days) is the average time the customers take to pay their bills, irrespective of the outstanding balance on the statement date. It is possible that the receivable turnover is low and the payment performance is high, indicating that the customers cleared their outstanding, but took a long time to do it.
To get group-level and customer-level performance reports and a detailed position of debt collection, you have to drill down from the ratios. Use a customer statement that shows both the receivable turnover in days and the customer’s actual payment performance.
- In the Ratio Analysis report, select Recv. Turnover in days, and press Enter.
If your company has groups, you can see the Group Payment Performance screen, as shown below:
- Drill down from the required group to view the performance of the party in the Ledger Payment Performance screen.

- Press Enter for more details of the selected party.

The Ledger Payment Performance statement displays the receivable turnover in days. This is the balance outstanding in relation to the total sales made, multiplied by the total number of days in the period. This ratio should be used in combination with the Average Performance of actual payments and the payment history of the customer to assess how long they might take to pay the outstanding balance.
The actual payment history is given in the table for each invoice that was paid by the customer. It shows when the invoice was paid, how long it was due, and what was the delay in payment. The customer’s average performance is shown at the bottom of the screen.
The Ratio Analysis report gives you insights into the profitability, liquidity, operational efficiency, and financial stability of your business. It tells you how your business has been performing for a particular period and guides you to take convenient decisions.
Cash Book and Bank Book
Businesses must keep a proper track of the cash as well as the bank transactions. The Cash Book is a record of the receipts and payments of cash within a financial year. It is a book of original entries as well as a ledger account. Similarly, the Bank Book is a record of all the receipts and payments made through the bank. This enables you to maintain daily record of your business transactions in a chronological order. You can view the Cash/Bank Book, daily breakup of ledgers, negative cash report and compare information using the Cash/Bank Book in TallyPrime.
The Cash/Bank Book in TallyPrime is a two-in-one report that provides you with information involving the debit balance, credit balance, closing balance and so on. The cash/bank receipts are recorded on the debit side whereas payments on the credit side. The report summarizes all the cash and bank transactions and provides you with the status of your Cash and Bank accounts.
You can configure varied features as per your business requirements. The Cash/Bank Book can be exported, printed and viewed in your Browser.
View Cash Book and Bank Book
It is important for every business to manage the cash flow efficiently and determine the cash balance on a regular basis. With the Cash Book in TallyPrime, you can view all the receipts and payments of cash in one place. It helps you in keeping a track of all your business transactions that involve cash.
The credit balance indicates the amount you owe the creditors, whereas the debit balance indicates the money the debtors owe you. You must keep a track of the credit and debit balances to maintain proper fund flow in your company. To view the credit or debit amount,![]()
- Press Alt+G (Go To) > type or search Cash/Bank Book > press Enter.
Alternatively, Gateway of Tally > Display More Reports > Account Books > Cash/Bank Book(s).
The Cash/Bank Summary screen appears, displaying the Cash and Bank transactions of your company. - Select the Cash ledger. Press Alt+F2 to select the required period, and drill down to view the ledger vouchers.
 The Ledger Monthly Summary screen displays the Debit and Credit amounts of all the vouchers for the period. The cash balance might be negative on varied days. In this case, TallyPrime displays the credit cash balance in Red as the Closing Balance.
Similarly, with the Bank Book in TallyPrime, you can view all the bank-related receipts and payments in one place. For instance, if you want to view the banking transactions made during January,
- In the Cash/Bank Summary Screen, select the required Bank from the list of Bank Accounts.

- If you have more than one bank account, select the required account and drill down to view the Ledger Monthly Summary.
If you want to know what amount is left in your account at the end of a given period, you can set the Show Closing Balance options to Yes in F12 (Configuration). This will display the Closing Balance of your company and help you track the company’s finances.
Daily Breakup of Ledgers
The Cash/Bank Book in TallyPrime gives you the flexibility of viewing the daily break up of your cash and bank transactions for the ledger. This enables you to keep a track of your daily business transactions and determine the fund flow in the company. TallyPrime provides you the flexibility of viewing the Highest and Lowest Balance recorded in a particular month. This information can be used to record the trend of highest or lowest balance. For instance, you can make decisions like scheduling the payments or purchasing items, based on the trend of days that recorded the Highest Balance. Similarly, you can check with your debtors to receive payments on days that record the Lowest Balance.
Suppose you want to view the daily break up of cash transactions during the month of December to know which day recorded the Highest Balance, ![]()
- In the Cash/Bank Summary screen, select the Cash ledger and drill down to the required month.
- Press Ctrl+F6 (Daily) to view the Daily Breakup of the Ledger.
 If the cash balance is negative for a particular date, then the closing credit cash balance will appear in Red.
 - Press F12 (Configure) in the Daily Breakup of Ledger screen and set Show Highest Balance & Lowest Balance to Yes, to see the highest or lowest cash balance recorded in the month.

This will enable you to take better financial decisions to maintain proper fund flow in your company.
View Negative Cash Report
When your cash expenses are more than your income, the differential amount goes into the negative cash report. Let’s say you have a cash balance of Rs. 30000, and you have made a payment of Rs. 32000. Thus, you will have Rs. 2000 as a negative cash balance with you.
This report allows you to identify in which month the negative cash was generated. Additionally, you can view the day-wise report to determine precisely when or on which date the cash fell short. The report will show you the running balance of your business.
Negative cash balance indicates that your company is spending more amount than it is generating. TallyPrime provides all these features, which allow you to identify negative cash balances that need to be corrected and take measures to fix the data.
Scenario 1: In case you have a negative cash balance on 25th November, but the balance is brought back to positive by the end of the month, then follow these steps to view the negative cash report,
To view negative cash balance,![]()
- Open Cash/Bank Book.
- Select the Cash ledger. The Ledger Monthly Summary screen displays the cash balance for all the months of the particular financial year.

- Drill down to the required month and press Ctrl+F6 (Daily) to view the Daily Breakup of Ledger.
The Daily Breakup of Ledger screen displays the cash balances for the selected month. Even though the Closing Balance is positive on the last day of November, you can still view the days that have recorded negative cash balance.
- Press F2 (Period) to change the period of Cash/Bank Book by entering the dates in From and To fields, if needed.
When the overall transaction is positive, the Closing Balance for that month appears in Black. In this case you can view the daily transactions and be able to identify the day that reflects Negative Balance in the Cash/Bank Book.
Now you can further drill down to view the transaction details and correct the data.
Scenario 2: Suppose you have passed cash transactions and the cash balance is negative on a certain day or for an overall month, and you are closing the month with a negative balance, it starts showing in the Exception Reports. The Exception Reports display all the negative ledgers that have recorded negative balance.
To view the Negative Ledger,
- Press Alt+G (Go To) > type List of Negative Ledgers > select Cash from the List of Negative Ledger A/cs > press Enter.
Alternatively, Gateway of Tally > Display More Reports > Exception Reports > Negative Ledgers > select Cash from the List of Negative Ledger A/cs > press Enter.
- Press F2 (Period) to change the period of Negative Ledgers by entering the dates in From and To fields, if needed.
- Drill down from the Cash ledger to view the negative cash report for the months with a negative cash balance.
Now you can further drill down to view the transaction details and correct the data.
Using these methods, you can access the negative cash report to identify the negative cash balances that need to be corrected and take necessary actions to fix your data.
Compare Data Using Cash/Bank Book
You can use the Cash/Bank Book as a powerful medium for comparison. You can compare Bank Book with Cash Book, or two or more banks in multiple columns. You can view the information for multiple periods (such as yearly, quarterly, monthly, and so on) on the same screen, instead of toggling between different periods or ledgers.
For example, let us say that you want to know whether your company is spending too much or not making enough in varying quarters. You compare the Closing Balance in these quarters let’s say, the quarter of July to September with the quarter of October to December, ![]()
- In the Cash/Bank Book, drill down from the Cash ledger. The Ledger Monthly Summary appears.

- Press Alt+N (Auto Column) and select Quarterly from the list of options in the Auto Column field.
- Set the Show Total Column to Yes if you want the total of Closing Balances to appear in the report.

The Ledger Monthly Summary screen displays the Closing Balance of both the quarters side-by-side. You can know in which quarter the company performed better by comparing the data displayed on the screen.
Statistics Report
Statistics is crucial in business as you can make decisions based on the historical data and ongoing trends. Accurate statistical data always serves as the basis for critical decisions and with TallyPrime you can view the Statistics of your business as per your requirements. The Statistics report in TallyPrime provides you with a snapshot of all the masters created and the number of voucher types entered. With the Statistics report, viewing and comparing statistical data has become simpler.
View Statistics Report: You can see all the transactions and masters from the last date of voucher entry in a single view. By default, the Types of Vouchers and Types of Accounts are displayed in the report side-by-side. However, varied configurations in TallyPrime will allow you to view the report as per your business requirements. For instance, if you want to see the details in a single vertical column, you can enable the option for Vertical Statistics in the F12 configuration.
Compare Statistical Data: If you are maintaining data for more than one business in your TallyPrime, you can use the Statistics report to compare business data within a single company or across multiple companies. For instance, you can view the monthly comparison of the number of sales vouchers and other vouchers recorded by your company in the report. Or you may have upgraded to a newer version of TallyPrime and the data is being recreated in this process. While migrating from one release of TallyPrime to the other, you can retain the information of the Statistics report in the previous release and compare it with the latest release.
You can use the Statistics Report to drill down to specific transactions to get more details. To know more about using the common features in Statistics report, refer to How to Use Reports in TallyPrime | TallyHelp (tallysolutions.com)
View Statistics Report
The Statistics Report provides you with detailed information about the types of vouchers and accounts involved in your business transactions for a particular period. By default, you can view the statistics side by side in a columnar format.
In this section
View Default Report
The Statistics report displays the types of vouchers and types of accounts side-by-side by default. You can see the total number of vouchers passed and accounts involved in your business transactions in a particular period. Suppose you want to view the Journal entries passed during March, you can:![]()
- Press Alt+G (Go To) > type or select Statistics > and press Enter.
Alternatively, Gateway of Tally > Display More Reports > Statement of Accounts > Statistics.
- Drill down a specific type of voucher to view the details. For example, you can select Journal as Type of Vouchers and press Enter. The Voucher Monthly Register screen appears as shown below:

- Drill down from the required month for more details, such as Voucher Numbers, Invoice Amounts, and the Total Amount.

Vertical Statistics
By default, Statistics displays the Types of Vouchers and Types of Accounts side by side. However, if you want to see the details in a single vertical column, then you can configure Statistics accordingly.
- Press Alt+G (Go To) > type or select Statistics > and press Enter.
Alternatively, Gateway of Tally > Display More Reports > Statement of Accounts > Statistics. - Press F12 (Configure).
- Set Show Vertical Statistics to Yes.

The Statistics report displays the Types of Vouchers on the top, and the Types of Accounts on the bottom instead of displaying them side-by-side.
Alternatively, press Ctrl+H (Change view) to modify the view of the Statistics report.
Sort by Default Vouchers
There are 22 default voucher types available in TallyPrime that are sorted alphabetically by default in the Statistics report. Suppose you create additional vouchers apart from the pre-defined ones,
- The default report sorts all the voucher types – both predefined and the ones you have created – alphabetically.
- On setting Sort by Default Vouchers to Yes, TallyPrime sorts the pre-defined voucher types alphabetically and groups the additionally created voucher types under their respective groups.
This helps you to get a consolidated view of the voucher types, depending on your business requirements.
Vouchers with Zero Entries
It could be possible that there were certain vouchers that did not have any entries made in a particular period. By default, the Statistics report includes voucher types that have zero entries.
However, you can configure the Statistics report in TallyPrime to exclude such entries to see only the relevant voucher types.
- Press Alt+G (Go To) > type or select Statistics > and press Enter.
Alternatively, Gateway of Tally > Display More Reports > Statement of Accounts > Statistics. - Press F12 (Configure).
- Set Show Voucher Types having entries only to Yes.
 You can see that Statistics now displays only the voucher types that have at least one entry.
Compare Statistical Data
Comparing your business data helps you know more about your business performance. TallyPrime allows you the flexibility of selecting varied columnar views as per your requirement and viewing them in the Statistics report.
In this section
- Compare data within a company
- Compare data between different companies
- Compare data between different versions of TallyPrime
Compare Data within your Company
Let us assume that you want to know in which quarter the company recorded more orders from the customers. With TallyPrime you can view the Sales Order that in your Statistics report and gain a clearer perspective of the sales vouchers recorded in your company. To compare the data:
![]()
- Press Alt+G (Go To) > type or select Statistics > and press Enter.
Alternatively, Gateway of Tally > Display More Reports > Statement of Accounts > Statistics. - Press Alt+N (Auto Column).
- In the Auto Repeat Columns screen, select Quarterly from the list of Auto Column.

You can view the trend of Sales Order in a particular business quarter and compare it.
- Select the Voucher Type and further drill down to get more details by pressing Enter.
This will help you in making business decisions like analysing the reason for the company’s downfall in a particular quarter and take corrective measures to fix it.
Compare Data with another Company
Similarly, you can also compare your company’s statistical data with another company. Let us assume that you have a sister concern for your company and want to compare the number of sales vouchers recorded in both the companies. One company might record a greater number of sales vouchers than the other. This comparison will help you in analysing why the business performance is low for the other company. TallyPrime allows you to view both the company’s data side by side in the Statistics report. To compare the companies’ performance:
![]()
- Press Alt+G (Go To) > type or select Statistics > and press Enter.
Alternatively, Gateway of Tally > Display More Reports > Statement of Accounts > Statistics. - Press Alt+N (Auto Column).
- In the Auto Repeat Columns screen, select Company from the list of Auto Column.

The varied Types of Vouchers of both the companies are listed in the Statistics report. - You can further drill down for more details by pressing Enter.
This will further help you in taking corrective actions to improve the Sales for the company with a lower performance.
- Press Alt+G (Go To) > type or select Statistics > and press Enter.
Compare Post-migration Data in TallyPrime
Statistics report also helps in keeping a historical track of your business data and use it for future reference. Let us suppose that you have upgraded to a newer version of TallyPrime and the data is being recreated in this process. While migrating from one release of TallyPrime to the other, you can retain the information of the Statistics report in the previous release and compare it with the latest release. Statistics report will be helpful in comparing the pre-migration and post-migration data in TallyPrime.
Print, Export, WhatsApp or E-mail Multi Account Reports
You can print multiple vouchers and the primary Books of Accounts, like the Cash and Bank Books, Account Ledgers, Sales and Purchase Registers and so on, without having to select the accounts one at a time and printing them.
Note: For illustration purpose, print-related procedure and images have been used in this topic.
Access Multi Account Reports
- Press Alt+P (Print) > Others.
- Select Show More > and press Enter to view all the reports supported for multi account printing.

Note: The Multi Account Reports will not appear if you are working on Educational Mode. Ensure that your TallyPrime license is active to access these reports.
- Select the required report and press Enter, and then print the required reports.
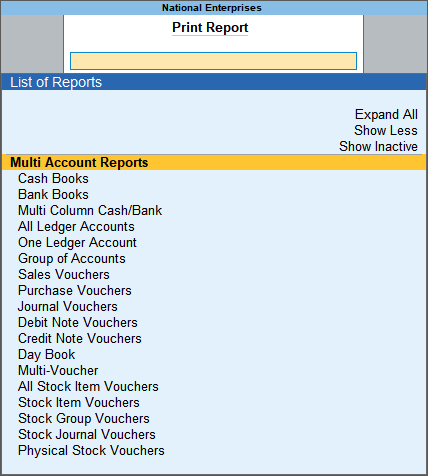
Print, Export, E-mail All Accounts
Note: For illustration purpose, print related procedure and images have been used in this section.
- Press Alt+P (Print) > Others.
- In the list of Multi Account Reports, select All Ledger Accounts > and press Enter.
- In the Print sub-screen, press C (Configure), and provide the period. Based on the report selected, the options appear.
- You can select Show More and press Enter, to view all the options provided for the selected report. Set the options as needed.

- Press Esc > press I (Preview) to preview it or press P (Print) to print.
Print, Export, E-mail Multi-Voucher/Multi-Invoice
In your business, you may need to share information that include all your sales, payment, or receipt. transactions. Such information may be needed for all parties or a selected party, depending on your requirements. In such cases, printing Multi-Vouchers in TallyPrime comes in handy. This allows you to print the transactions details for a specific voucher type in one go.
Note: For illustration purpose, print related procedure and images have been used in this section.
Multi-Voucher/Invoice for all parties
- Press Alt+P (Print) > Others.
- In the list of Multi Account Reports, select Multi-Voucher > and press Enter.
- In the Print sub-screen, press C (Configure), and provide the period. Based on the report selected, the options appear.
- You can select Show More and press Enter, to view all the options provided for the report.
- Voucher Type: Select the required voucher type.
- (If you are on Release 2.1) Ledger Name: By default All Items is selected. This configuration allows you to select if you want to print multi invoices for all ledgers or selected ledgers. Refer to the Multi-Voucher for Selected Ledger section.
- Vouchers to Print: Select Regular or Optional or All the vouchers.
- Period: Specify the date, as needed.
- Number of copies: If you select sales Voucher Type, and set this option to 2 or more copies, you can enable the option Print Transporter’s Copy.
Set the other options as needed.
- Press Esc > press I (Preview) to preview it or press P (Print) to print.
The invoices recorded for the selected date will be printed on separate pages.
Multi-Voucher/Invoice for a selected party
If you are on TallyPrime Release 2.1, you can seamlessly print, export or e-mail multi-voucher for a selected ledger. This flexibility is available for the following voucher types:
- Sales
- POS
- Purchase
- Debit Note
- Credit Note
- Receipt
- Payment
- Contra
- Journal
- Press Alt+P (Print) > Others > select Multi-Voucher > press Enter.
- Under Configure, select the required ledger/party under report details.
- Voucher Type: Select the voucher type that you want to print.
- Ledger Name: Select the ledger for which you want to print each invoice in a separate page in one go.
- Vouchers to Print: Once you have selected a specific ledger, this option is updated to Regular automatically. Selecting a specific ledger in Ledger Name is applicable only to Regular vouchers.


- Make changes to other configurations, as needed, and print.
- Press Esc > press I (Preview) to preview it, or press P (Print) to print.
TallyPrime prints the multi-voucher of the selected voucher type and selected ledger.
Print, Export, E-mail All Ledger Outstandings
Note: For illustration purpose, print related procedure and images have been used in this section.
- Press Alt+P (Print) > Others.
- In the list of Multi Account Reports, select All Ledger Outstandings > and press Enter.
- In the Print sub-screen, press C (Configure), and provide the period. Based on the report selected, the options appear.
- You can select Show More and press Enter, to view all the options provided for the selected report. Set the options as needed.

- Press Esc > press I (Preview) to preview it or press P (Print) to print.
When printing the Ledger Outstanding report, if Show Contact details is set to Yes, and Start each A/c on a fresh page is set to No, the contact person’s name, telephone number and/or mobile number will be printed below each Ledger Account on the same page.
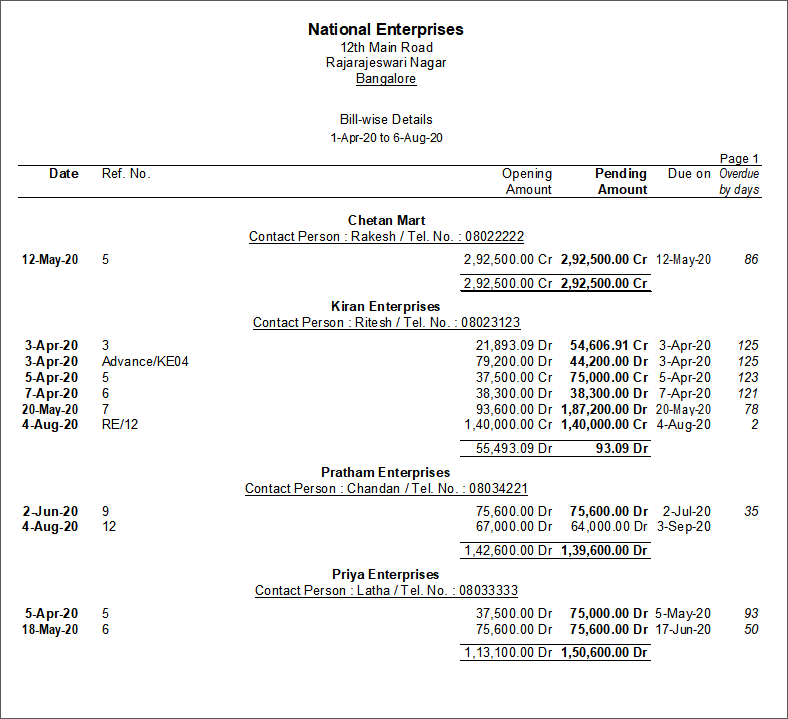
If Show Contact Details is set to Yes, and Start Fresh Page for each Account is also set to Yes, each Ledger Account is displayed in a fresh page, with the address appearing below the Ledger Name.
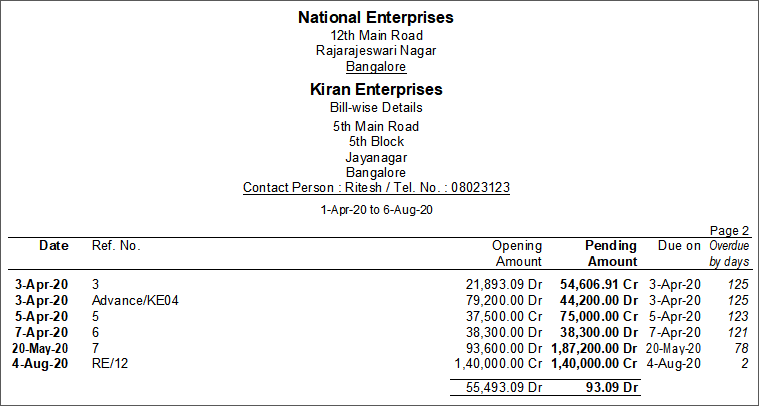
For the Contact Person, Tel. No. and the address to be displayed, the same should be entered in the Ledger Masters.
When the option Show Group Name is set to Yes, the Group name of the ledger appears under the ledger name.
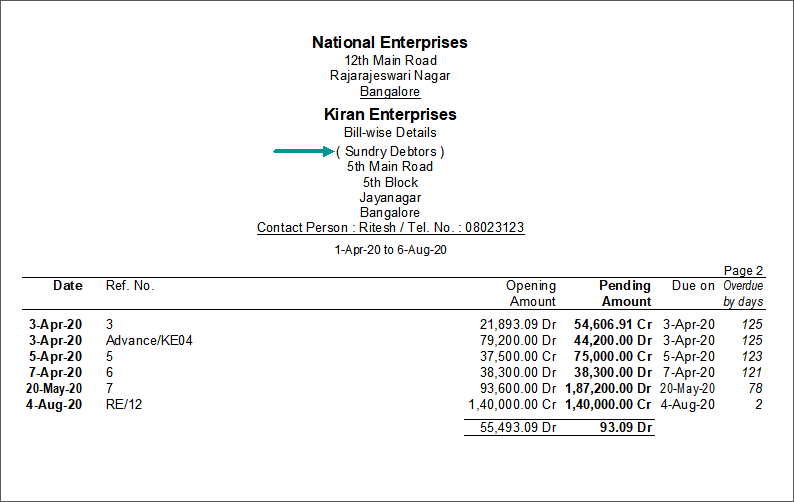
Print, Export, E-mail Index Page
Note: For illustration purpose, print related procedure and images have been used in this section.
You can print the Index Page to summarise the page-wise printing of ledger accounts/items. It serves as a Table of Contents (TOC) and helps identify the required Ledger Accounts/Items without going through the entire prints, thereby reducing time and cost.
- Press Alt+P (Print) > Others.
- In the list of Multi Account Reports, select All Ledger Accounts > and press Enter.
- Set Print Index page also to Yes.

- Press Esc to save and return to the Print screen. The Index page gets printed for all the ledgers.

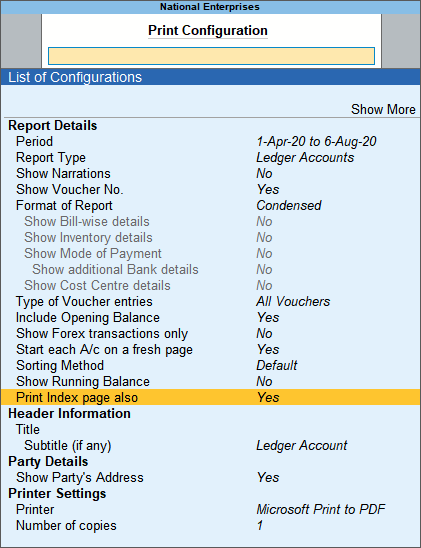
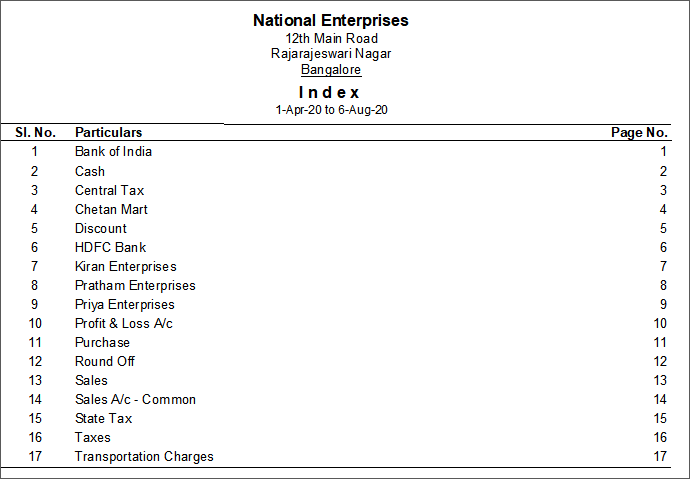
The option Print Index page also appears while Printing All Ledger Accounts/All Items and Group of Accounts/Group of Items from Multi Account Reports.
Print, Export, E-mail Day Book
Note: For illustration purpose, print related procedure and images have been used in this section.
- Press Alt+P (Print) > Others.
- In the list of Multi Account Reports, select Day Book > and press Enter.
- Set the option Show Voucher No. to Yes.

- Press Esc > press I (Preview) to preview it or press P (Print) to print.

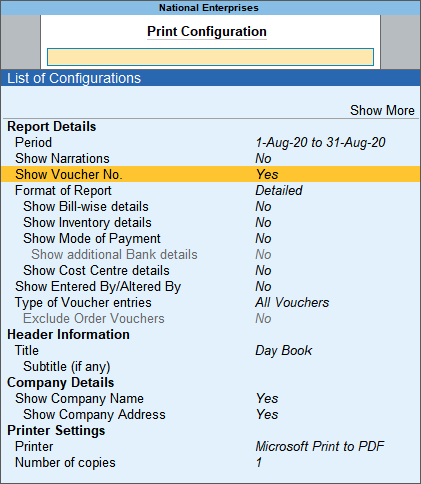
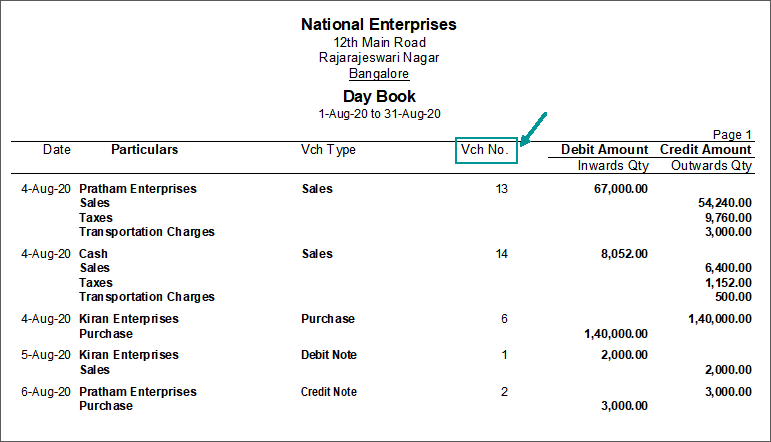
The option Show Voucher No. appears while printing Ledger Vouchers Report and Daybook.
To know more about the Printing feature and flexibilities in TallyPrime, refer to Printing Invoices and Reports topic.
Sorting Method for Printing Multi Account Reports
While printing Ledger Accounts and Group of Accounts from Multi Account Reports, you can sort the details as needed. The sorting method has the following options:
- The Default option will print Ledgers in Alphabetical order.
- The Group option will print Ledgers in Alphabetical order under respective Groups
- Press Alt+P (Print) > Others.
- In the list of Multi Account Reports, select All Ledger Accounts > and press Enter.
- Select the required Sorting Methods from the list of Sorting Methods.


Select Groups/Ledgers While Printing Multiple Accounts
You can print the required Groups/Ledgers in a sequence when printing Ledger Accounts from Multi Account Printing.
- Press Alt+P (Print) > Others.
- In the list of Multi Account Reports, select All Ledger Accounts > and press Enter.
- In the Print sub-screen, press C (Configure) > set Select Groups/Ledgers to Yes.

- In the Selection for Groups/Ledgersscreen, select the required groups and ledgers:
- Include these Groups: Select the required group(s) from the List of Groups to include them. This will print all Ledgers belonging to the included groups, in case none of the groups/ledgers are selected in the other sections, namely, Exclude these Groups, Include these Ledgers and Exclude these Ledgers.
- Exclude these Groups: Select the required group(s) from the List of Groups to exclude them. This will print all Ledgers belonging to the included groups other than the excluded groups’ ledgers.
Note: In case any group is selected under Include these Groups, this section will list only the sub-group(s) of the Included Group(s). For example, if Current Assets and Current Liabilities are selected under Include these Groups section, the Exclude these Groups section will list the groups/sub-groups of Current Assets and Current Liabilities only, which are, Bank Accounts, Cash-in-Hand, Deposit (Assets), Provisions, Sundry Creditors, Sundry Debtors, and so on. If no group is selected under Include these Groups, this section will list all the Groups.
- Include these Ledgers: Select the required ledger(s) from the list to include for printing.
Note: In case any group is selected under Include these Groups, this section will list all the ledgers other than the ledgers of the included groups, so that the user may select the required ledgers of other groups which have not been selected under Include these Groups. In case any group is selected under Exclude these Groups, this section will list all the ledgers of the Excluded Groups, so that the user may select the required ledgers from the same.
- Exclude these Ledgers: Select the required Ledger(s) to exclude for printing.
Note: This section will list all the Ledgers belonging to the included and excluded group(s), so that user can exclude the ledgers which are not required to be printed.

- Press Esc > press I (Preview) to preview it or press P (Print) to print.
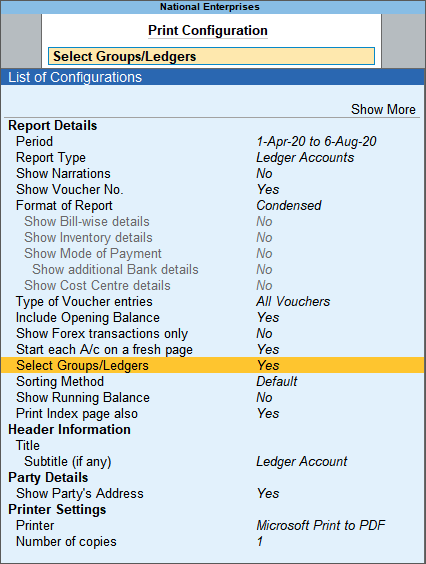

Set Alphabetical Print Range
You can print the ledgers as per alphabetical order, namely 0 to 9 and A to Z. Also, you can mention the required range to print the ledgers at one instance. For example, From A to G, From 1 to 5.
- Press Alt+P (Print) > Others.
- In the list of Multi Account Reports, select All Ledger Accounts > and press Enter.
- In the Print sub-screen, press C (Configure) > select Show More and press Enter, to view all the options.
- Enable the option Set alphabetical range to print > In the Range of Alphabetsselect the details for:
- From (blank for beginning): Type the first alphabet in the range.
- To (blank for end): Type the last alphabet in the range.

- Press Esc > press I (Preview) to preview it or press P (Print) to print.

This option is also available for Cash/Bank Book groups, Group of Accounts, Inventory Books – All Items and Group of Items. This option will skip in case you have set Select Groups/Ledgers to Yes, while printing.
Print Multiple Payslips
Payslip is a statement/document issued to an employee, providing the details of earnings and deductions.
You can print payslips for all the employees in one-go.
- Press Alt+P (Print) > Others.
- In the list of Multi Account Reports, select Multi Payslip > and press Enter.
- Specify the required date range in the From and To fields respectively.
- Select the required Employee Category.
- Select the Employee/Group to print the payslips for the individual employee or all the employees belonging to the Group.

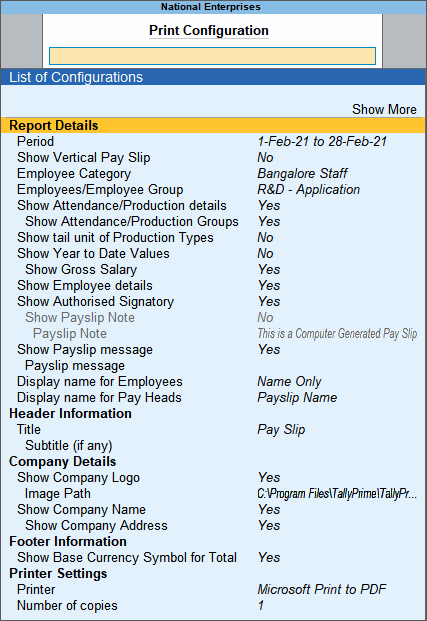
Disallow Access to Multi Account Reports
You can disallow users from using multi account reports to print reports. Use the security control to disallow access to various printing options under Multi Account Reports. You cannot disallow Multi Account Reports as a whole, as it would deprive users from printing different type of accounts in one-go. However, you can disallow access to specific reports under Multi Accounting Reports. For example, you can control access to Cash Book, Sales Register, Physical Stock Register, and so on.
You have to first create a security level in which the access to specific reports or printing options can be disallowed. You can then assign this security level to a user created under Users and Passwords. When such user logs in, the disallowed options are either hidden or available only for view.
Create security level
- Press Alt+K (Company) > User Roles.
- Enter the name for the new security level and press Enter.

- In the Use Basic Facilities of field, select Data Entry.
- Disable the option Allow company to connect, if you don’t want the user to connect company for sync, tally.net and browser access.
- In the Disallow the following Facilities column, select Full Access from the Type of Access list and press Enter.

- Select the name of the report you want to disallow. For example, if you want to disallow access to Bank Books, select it and press Enter. Full access to Bank Books will be disallowed for this security level, and for all users added under this security level.

- Similarly, you can disallow access other printing of other reports by selecting the report in the Disallow the following Facilities column.
- Save the changes.
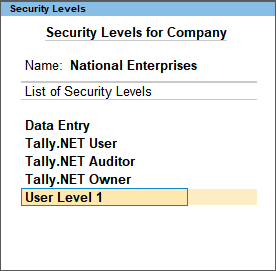
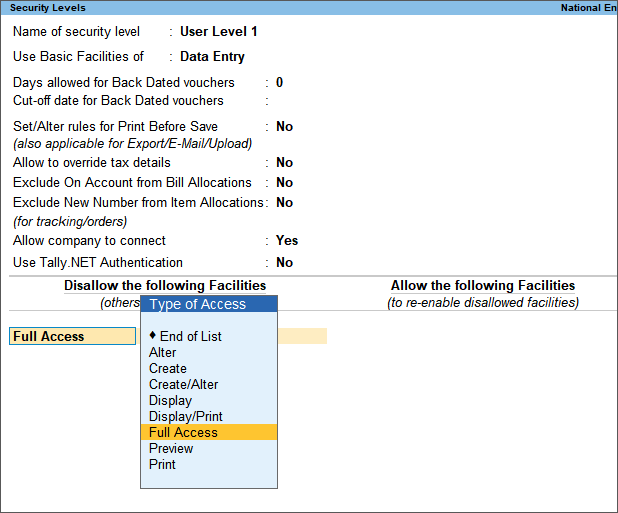

Assign the security level to users
- Press Alt+K (Company) > Users and Passwords.
- In the Users for Company screen, select the security level created to disallow access to reports under Multi Account Reports.

- Enter the username and password of the user in the Username/Tally.NET ID and Password (if any) fields.
- Save the changes.
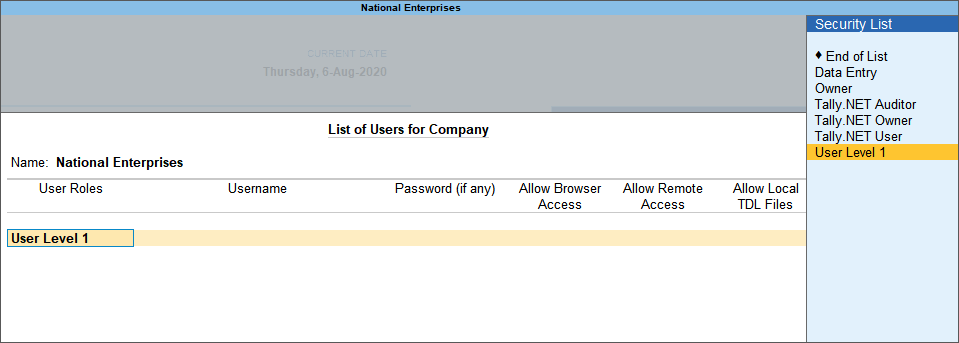
The reports for which you disallow access are not shown to the user.

Print reminder letters with outstanding balances
- Press Alt+P (Print) > Others > type or select Group of Account Outstandings > and press Enter.
- Select the required group.
- In the Print sub-screen, press C (Configure).
- Change the Report Type to Reminder Letter.

- Enter the ageing details.

- Press Enter to accept.
- Specify the Designation of Signing Authority > set the other configuration options as needed.
- Press Esc > press I (Preview) to preview it or press P (Print) to print.
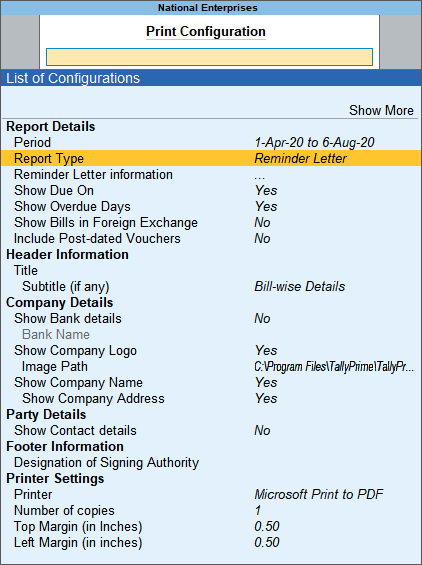
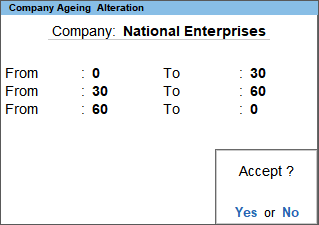
Content of a Reminder Letter
The content of a reminder letter is pre-defined in the product for printing. To add or change the content for Reminder Letter:
- Press Alt+P (Print) > Others > type or select Group of Account Outstandings > and press Enter.
- Select the required group.
- In the Print sub-screen, press C (Configure).
- Change the Report Type to Reminder Letter.
- Select Reminder Letter information and press Enter. You can change the details, or accept it as is.

- You can change the Top Margin or Left Margin as needed.

- Press Esc > press I (Preview) to preview it or press P (Print) to print.


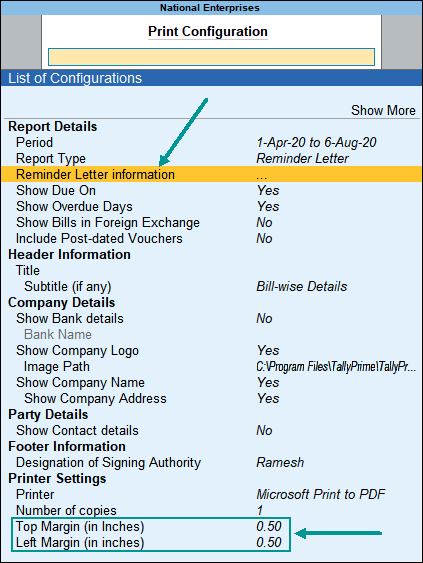
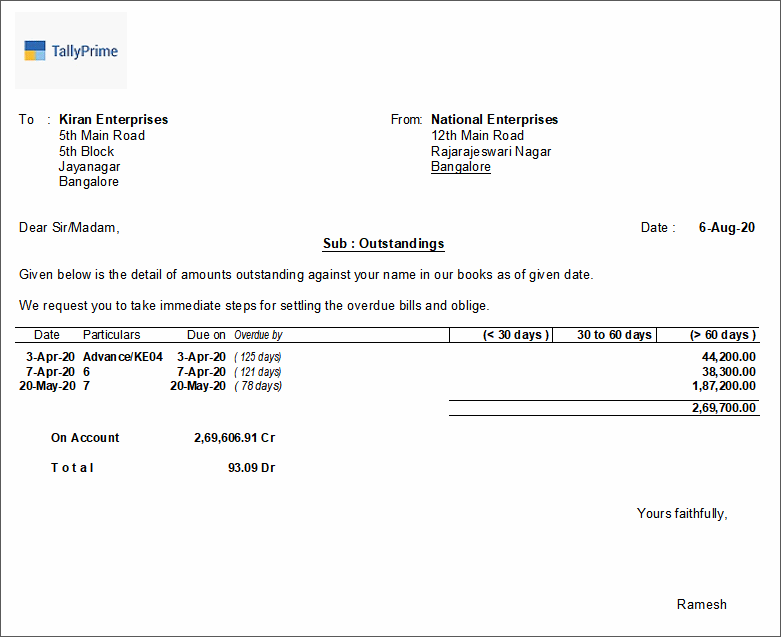
FAQ
While printing from Multi Account Reports, the ledger appears but is not printed. Why?
- Select the required report from Multi Account Reports and set the option Start each A/c on a fresh page to Yes.
- Select the required print format.
- Select the Printer and press Enter > select the required printer > In the Printer properties, and click Custom.
- Under paper size units as 0.01 inches > Width 900 > Length 1200.
Note: You can enter the paper size only when this option is available in the selected printer.
- Try printing now.
- If you have any other printer you can try printing on that and check
Was this article helpful?
That’s Great!
Thank you for your feedback
Sorry! We couldn't be helpful
Thank you for your feedback
Feedback sent
We appreciate your effort and will try to fix the article