


Some of the commonly asked questions about purchases are answered here.
In your business of goods or services, the purchase process that you follow may be cash purchases or purchases on credit. When you receive credit from your parties, you certainly implement measures to track the credit and pay the dues on time. The purchase process in TallyPrime assists you with options to include a credit limit from each supplier or even a predefined period to clear the dues. Similarly, in some scenarios for your purchase, you may need to record purchase returns, and receive cash or use debit notes. Based on the type or volume of business that you run, you can use a purchase order, receipt note, and so on. You can manage all such processes, and more, using TallyPrime with the flexibility of skipping any of the steps in between and interchanging the sequence of entries.
Cash Purchases: Recording the cash purchase process in TallyPrime is a single-step procedure. In the invoice, you can include details of all the items purchased, or services received. These purchase details can be allocated to a single ledger or multiple ledgers as needed. Additionally, you can include expenses like packaging, transportation, insurance, tax, and so on. After recording the details as per the invoice received from your supplier, you can print it with the supplier’s details, if needed.
Credit Purchases & Payments: In TallyPrime, the process to record a credit purchase is similar to a cash purchase. Apart from the details entered in the cash purchase voucher, for credit purchase you can record the invoice received from your supplier, record payments to the party against their invoices, and track the payables to closure. You can enter the buying prices based on the supplier profile.
Purchase Discounts: In some purchases, your supplier may give you some discounts in the form of price reductions, unbilled stock items, and so on. TallyPrime provides you the flexibility to record such trade discounts and item-level discounts using a specific ledger or even without it directly at the item level.
Additional Cost of Purchase: In some purchases for your business, you also pay additional charges like transportation expenses, extra packaging charges, labor expenses, or any other additional cost applicable to the stock item. This may be quoted in a lump sum for one or more stock items and you will want to know the additional cost of purchase on the stock items to assess the exact selling price or value of a stock item. In TallyPrime, you have the flexibility to mention the expenditure on each item in the purchase voucher along with the additional cost of purchase. You will be able to assess the exact selling price or value of a stock item that includes the additional purchase cost.
Purchase Return & Debit Notes: When you record purchase returns in your business, such return transactions can be recorded as a part of the purchase process in TallyPrime, that too against the original purchase invoice, if needed. Depending on the settlement of the bill, you may treat it as a rejection out, return cash or use a debit note to settle the return. As per your process, you can record the same in TallyPrime. Such debit notes, if any, can be consumed in the purchase invoice.
Receipt Note & Rejections-out: If your business uses a receipt note when shipping items from your supplier, you can use TallyPrime to create the same. Later, you can record purchases against the receipt notes, and track the receipt notes to closure. You also get the flexibility to generate receipt notes based on your purchase voucher. Item returned, if any, based on receipt notes can be recorded as rejections out and settled.
Purchase Order: In case you follow purchase order processing in your business, you can create purchase orders as a part of the purchase process in TallyPrime. Against the purchase order, you may record receipt notes or purchase invoices. You can track such purchase orders to closure by recording receipt notes and purchase invoices, and track receipt note to closure against purchase invoices. You may even pre-close the orders.
Though TallyPrime supports all these steps in a purchase process, it is not necessary that you choose to follow all these steps in any specific order. For example, you can just use purchase or purchase + payments or purchase order + purchase + payments, and so on. You can even record a purchase before a purchase order or purchase before receipt note.
Purchase of Goods and Services
In your business, you might need to purchase goods or services to fulfill the demands of your customers. You may make a simple cash purchase or purchase on credit. For each purchase transaction, you will need to keep a record of the items you bought, payments made, goods returned, and so on. TallyPrime provides you the facility to perform all such actions and much more, effortlessly. Moreover, you can view reports at any time to know about all the purchases made in your business and compare them against the sales performance.
Generate purchase bills: Record a cash bill or invoice when you make an instant payment to the supplier, using cash or any other mode like a cheque or credit/debit card. If it is a purchase on credit, record a credit purchase by using the supplier ledger. There are also situations when you want your supplier to deliver goods to a specific location that is different from your billing address. Similarly, you can record the transaction in various voucher modes as required like Item Invoice or Accounting Invoice, and so on. TallyPrime handles all your requirement to record the purchase of goods and services with party details, dispatch details, and more.
Record additional charges, discounts, and free items: Your purchase transaction may include additional expenses, such as transportation charges, insurance, and taxes. If your supplier has given discounts on your purchases, you will need to record the discounts in your invoices as well. Similarly, if you have received free items or samples from your supplier, all of these can be recorded and tracked in TallyPrime.
Reports: In TallyPrime, you can track all your purchase of goods and services using different reports, such as Purchase Register, Day Book, and so on. You can view your purchases across different periods, filter the data for specific details, configure the reports to view more purchase-related details, and more.
Record Purchase of Goods or Services
Whether you make a purchase on cash or credit, the procedure in TallyPrime remains similar. The only difference is that you will select cash or bank for cash purchases and the supplier ledger for credit purchases. You can record purchases of items using the Item Invoice mode and record purchases without items using the Accounting Invoice mode. TallyPrime also provides the flexibility to use these invoice modes interchangeably for recording purchases. You can also print the invoices with the necessary details, if needed.![]()
- Open the Purchase voucher.
- Press Alt+G (Go To) > Create Voucher > press F9 (Purchase).
Alternatively, Gateway of Tally > Vouchers > press F9 (Purchase). - Press Ctrl+H (Change Mode) to select the required voucher mode (Item Invoice, in this case).
- Press Alt+G (Go To) > Create Voucher > press F9 (Purchase).
- Specify the supplier details.
- Supplier Invoice No. and Date: The invoice number and date should be the same as given in the corresponding sales bill.
- Party A/c name: Select Cash or Bank for cash purchases. For credit purchases, select the supplier ledger. As in other transactions, you can create the item or ledger on the fly by pressing Alt+C.
- Receipt Details: Enter receipt details like receipt doc no., bill of landing, destination, and so on, if needed.
- Party Details: Enter the supplier’s name and address, if needed.
If you do not see the Party Details screen, press F12 (Configure), and set Provide Receipt, Order, and Import details to Yes.You may want to maintain specific details about your suppliers, such as address with landmark, alternative contact number, and so on, in the invoices. In such cases, you can create party ledgers with the required details. In the Suppliers field of Party Details screen, select the required ledger.
- Purchase ledger: Select the common purchase ledger created under Purchase Accounts.
If you do not see this field on the screen, press F12 (Configure) and set Select common Ledger Account for Item Allocation to Yes.
In Accounting Invoice, you can select the purchase ledger under Particulars. - Provide the stock item or service details.
As in other transactions, you can create the item or ledger on the fly by pressing Alt+C.
In Item Invoice, select the stock item and enter the Quantity. The Rate will be auto-filled, if available for the stock item. However, you may choose to enter the Rate or Amount.
In Accounting Invoice, select the service ledger and enter the Amount. - Select additional ledgers, like transportation charges, insurance, or discount, if any.
- Provide Narration, if needed, and accept the screen. As always, you can press Ctrl+A to save.

- Print the invoice.
- Press Alt+P (Print) > press Enter on Current.
- Press I(Preview) to check the invoice before printing, if needed.
- Press F12 (Configure) to view the Print Configuration screen and configure the invoice, if needed.
- Press P (Print) to print.
The following is a sample preview screen of the purchase invoice.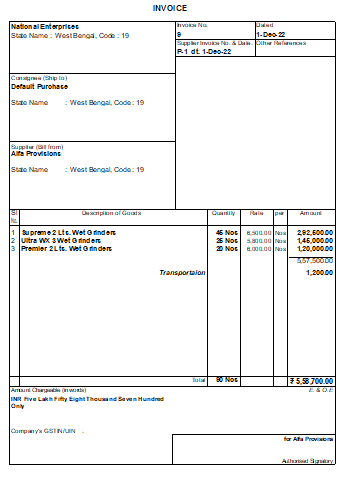
Use Less Paper Space for Printing
By default, TallyPrime prints invoices on A4-size papers. But it also provides you the flexibility to optimize the print space and fit in more data to reduce the usage of paper. In certain cases, your transaction may involve more stock items, which can be printed by optimizing the print space.![]()
- In the Purchase invoice, press Alt+P (Print) > press Enter on Current.
- Press C (Configure) > type or select Optimise printing to save paper and press Enter to set it to Yes. This will print maximum information in the print area and save paper.
This option will appear only when: The Country selected for the company is India. The company is enabled for GST/VAT/TDS/TCS. The service tax and excise features are disabled.
- Press Esc to return to the Voucher Printing screen.
Henceforth, all the purchase invoices you print will continue to have the same print size, until you change the option in F12 (Configure) for invoice printing. - In the Voucher Printing screen, press P (Print) to print the invoice on the paper used.

As the above invoice is printed by enabling the option Optimise printing to save paper, all the stock items are appearing on a single page. If this option was set to No, the same information would have been printed on two pages.
Specify Separate Supplier and Consignee Details
In some business scenarios, you may want your supplier to deliver goods to a location different from your billing address. TallyPrime provides you with the option to enter the delivery address as the consignee details when recording a purchase transaction.![]()
- In the Party Details screen of the purchase invoice, press F12 (Configure) > set Provide separate Buyer and Consignee details to Yes.
Henceforth, you can add both the consignee and supplier details in every purchase invoice, until you change the option in F12 (Configure) of the invoice. - Enter the Consignee and Supplier details.

- Accept the screen. As always, you can press Ctrl+A to save.
When you print the invoice, the consignee’s name and address where the supplier will deliver the consignment or goods will be printed.
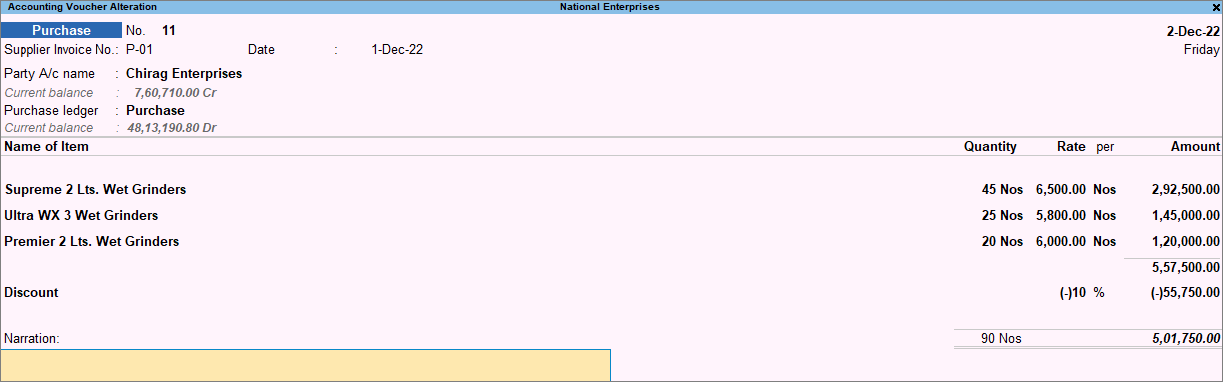
Purchase of Items with Discount
In your business, it may be common for you to receive discounts on the purchase of goods and services. You may receive discounts from the supplier on the total item amount or on each item amount separately. Using TallyPrime, you can record all such discounts with or without using the discount ledger. You can also record the item-level discounts as either indirect incomes or rate discounts.
In this section
Purchase with a discount on the total item amount
If you have received a discount on the total item amount, say 10%, you can account for such discounts while recording your purchase invoice using a discount ledger grouped under Indirect Incomes.![]()
- In the Purchase voucher, after you have selected the stock items, press Enter twice to skip one line.
Alternatively, press Enter > Spacebar > and select End of List.
This takes you to the next line in the screen where you can now select the discount ledger.
In Accounting Invoice, you can simply select the discount ledger after entering the purchase details. - Provide details of the discount.
- Select the ledger for discounts created under Indirect Incomes.
- Enter the discount percentage (%) under Rate as a negative number (in minus, for example, -10%). TallyPrime applies the discount to the total item amount and displays the discount Amount against the selected discount ledger.
Alternatively, you can enter the Amount.
- Enter the remaining details and accept the screen. As always, you can press Ctrl+A to save.

TallyPrime calculates the invoice total by subtracting the discount from the total amount for the items.
If your supplier calculated the discount after including additional charges, such as transportation, press F12 (Configure) > set Show more configuration to Yes > set Show all configurations to Yes > set Calculate Tax on Current Subtotal to Yes.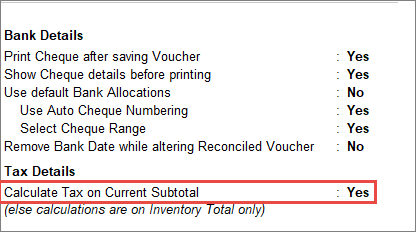
Henceforth, when you select the discount ledger, the discount will be applied to the total amount after including any additional charges, until you change the option in F12 (Configure) of the invoice.
Purchase with trade discount
While making a purchase of goods and services, based on your business terms with your supplier, you may get discounts on certain items depending on the quantity or supply. To record a purchase with such trade discounts in TallyPrime, you can show the discount percentage against the quantity of the item. Also, you have the flexibility to enter the discount percentage or amount for each item and book the total discount as indirect income in your purchase invoice.
For example, say you have purchased 100 pcs of Item A from a supplier. The standard buying price for this item is Rs. 100 each. Since this was a bulk purchase of 100 pcs, your supplier offered a discount of 10% on the item rate.
You can record this discount received in two ways:
- You can enter the discount % along with the item. The total item amount will appear as Rs. 9,000 for all 100 pcs of Item A. Here, as the item amount is changed to Rs. 9,000, this amount will be booked as a purchase.
- You can create a discount ledger for 10% as an indirect income and use it to calculate the total discount. That means, your per-item rate will show Rs. 100 and therefore Rs. 10,000 for all 100 pcs. The discount received for 100 pcs of the item will appear as Rs. 1,000, and the total payable at the end of the voucher will appear as Rs. 9,000.
In this section
- Enter the discount percentage against each item – without using the ledger account
- Enter discount percentage and amount on item rates – using the ledger account
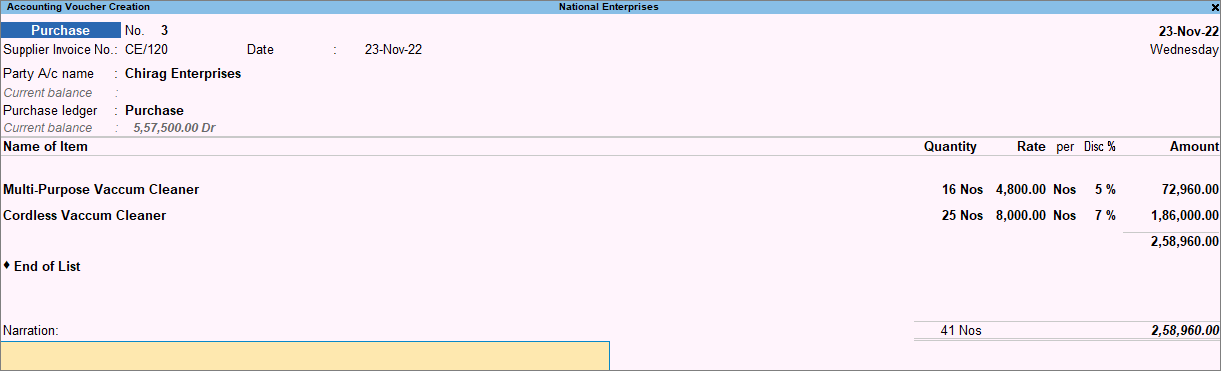
Enter the discount percentage against each item – without using the ledger account
You can enter the discount percentage against each item and the Amount will be calculated automatically.![]()
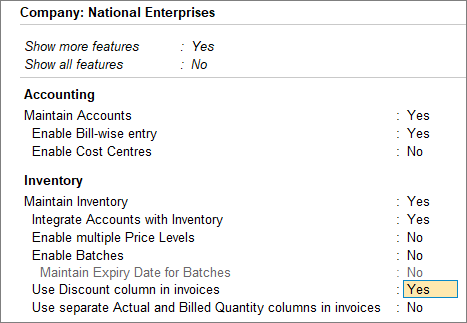
- Press F11 (Features) > set Use Discount column in invoices to Yes.
If you do not see this option, set Show more features to Yes.
Henceforth, you will see the Disc % column in every purchase invoice.
- In the purchase invoice, after you have provided the Quantity and Rate, enter Disc % for the selected item.
The Amount for the given quantity of the stock item is displayed after deducting the discount, without showing any change in the Rate.
- Enter the remaining details and accept the screen. As always, you can press Ctrl+A to save.
The discounted item amount appears against each item.
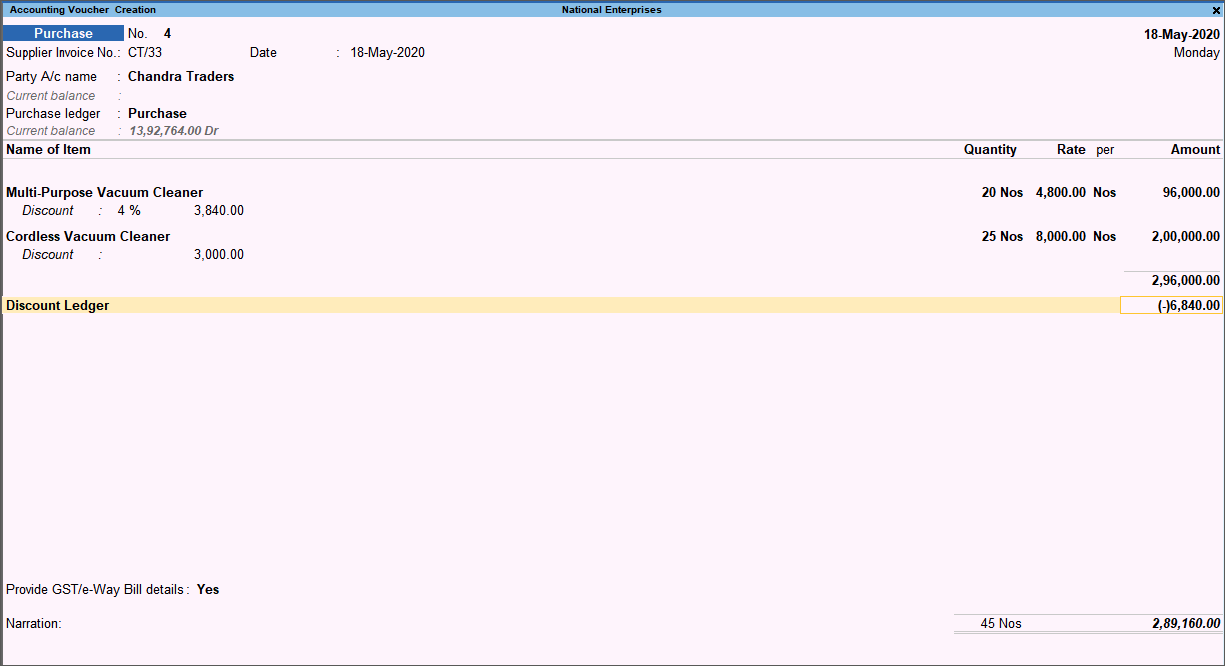
Enter discount percentage and amount on item rates – using the ledger account
You can enter the discount percentage or the discount amount directly after entering the quantity and rate of the stock items. Once the stock details are entered, you can select the discount ledger for the discount to be applied to the invoice amount.![]()
- In the purchase invoice, press F12 (Configure) > set Provide Cash/Trade Discount to Yes.
If you do not see this option, set Show more configurations to Yes. If the option does not appear, press F11 (Features) > enable the statutory options (GST or VAT) applicable to your business. - After you have entered the Amount of the stock item, in the Discount field, enter the discount percentage that you have received for that item.
This automatically calculates the discount and displays the amount in the next field.
Alternatively, press Enter to leave the first field blank and enter the discount amount in the next field. - Select the discount ledger created under Indirect Incomes.
Ensure that in the discount ledger, the option Type of ledger is set to Discount.
- Enter the remaining details and accept the screen. As always, you can press Ctrl+A to save.
The total discount amount appears against the selected discount ledger. This amount is the sum of the discounts displayed under each stock item.
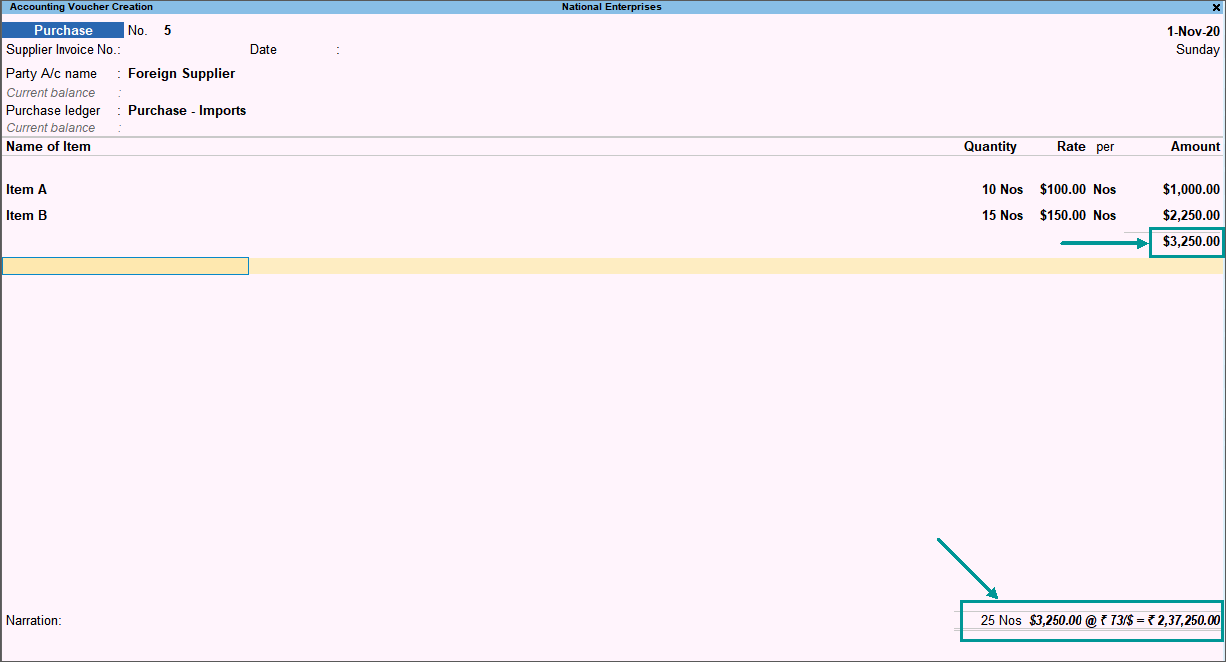
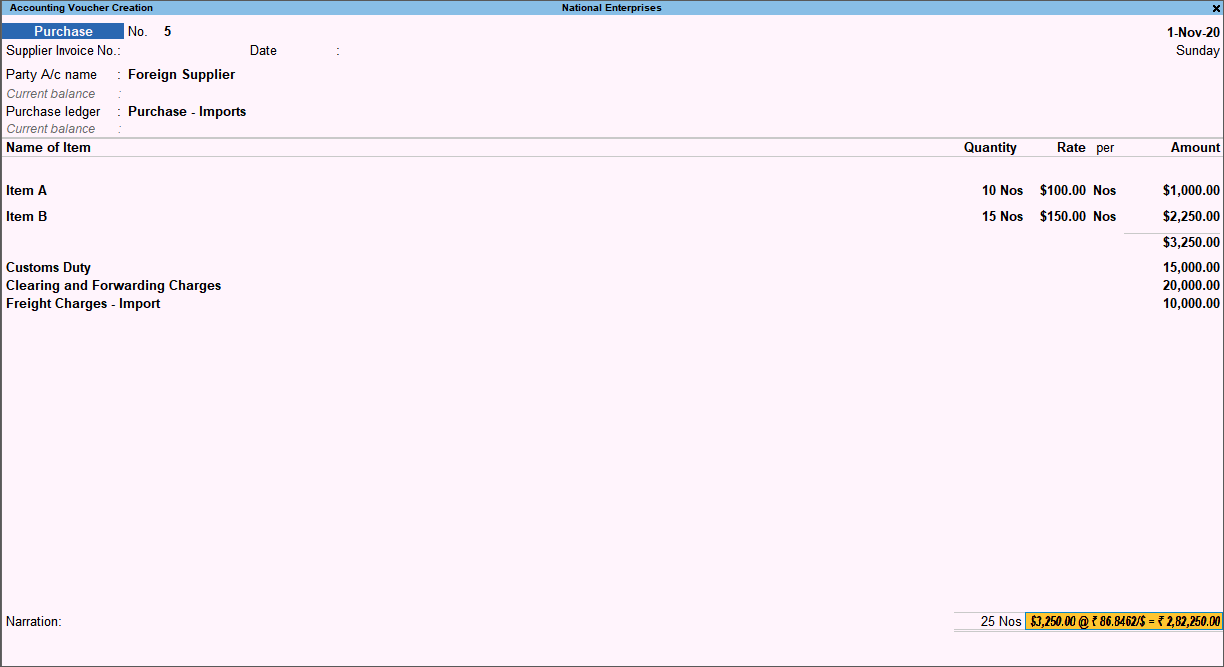
Purchase Import Invoice Entry – Case Study
In a case of imports, stock items are purchased from a foreign country in another currency, for example, US Dollar. The expenses incurred to bring the stock item to the production unit will be in local currency.
In this scenario, the supplier’s bill amount should not include expenses incurred within the country. However, the item value should include such expenses to arrive at the actual cost.
For example, here is the invoice received from the supplier.
| Purchase Import Invoice | ||||
| Date | 01-11-2020 | |||
| Party | Foreign Supplier | |||
| Address | USA | |||
| Sl. No. | Particulars | Quantity | Rate ($) | Amount ($) |
| 1 | Item A | 10 Nos | 100.00 | 1,000.00 |
| 2 | Item B | 15 Nos | 150.00 | 2,250.00 |
| Total | 25 Nos | 3,250.00 | ||
| Dollar Three Thousand Two Hundred and Fifty Only | ||||
Expenses incurred for procuring the material:
- Custom Duty – Rs.15,000.00
- Clearing and forwarding charges – Rs.20,000.00
- Freight Charges – Rs.10,000.00
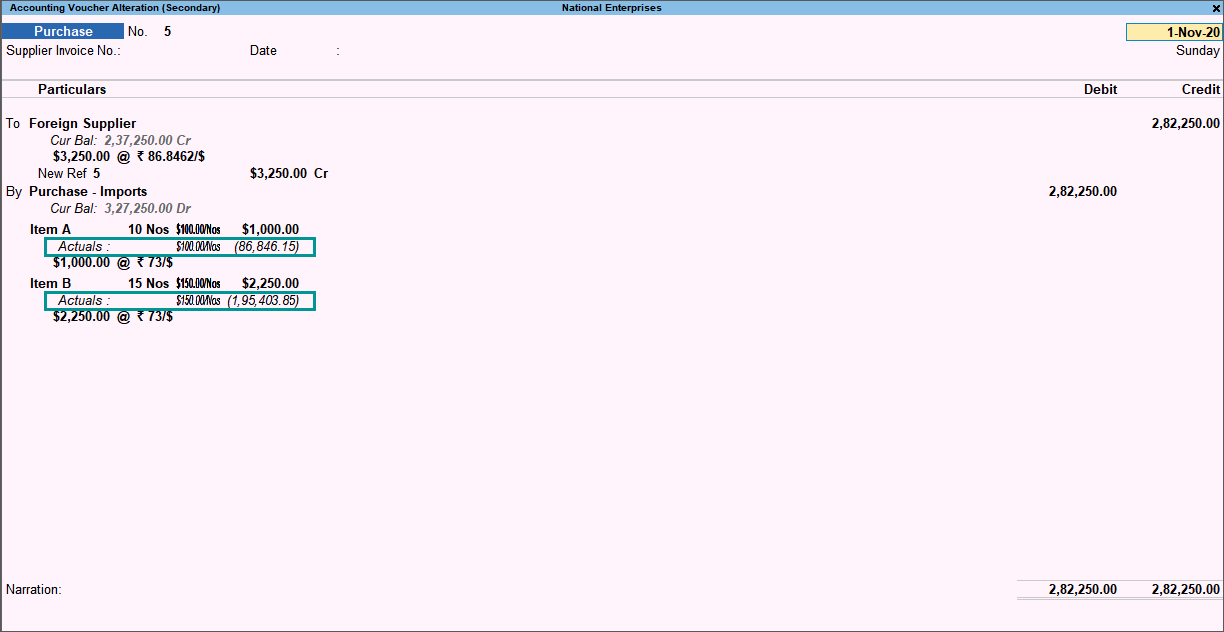
Amount payable to the foreign supplier is $3250.00, considering the currency exchange rate of Rs. 73/$. Also, the above expenses need to be appropriated to the item cost.
| Purchase Import Invoice | |||||
| Particulars | Quantity | Rate | Amount | Rate of Exchange | Item Rate in Rs. |
| Item A | 10 Nos | $ 100 | $ 1000 | Rs. 73/$ | 73,000 |
| Item B | 15 Nos | $ 150 | $ 2250 | Rs. 73/$ | 1,64,250 |
| Total | 25 Nos | $ 3250 | 2,37,250 | ||
| Additional Cost of Import | |||||
| Customs Duty | 15,000 | ||||
| Clearing and Forwarding Charges | 20,000 | ||||
| Freight Expenses | 10,000 | ||||
| Total Additional Cost | 45,000 | ||||
Let us create the masters and transaction in TallyPrime
Create Groups
- Press Alt+G (Go To) > Create Master > Group.
Alternatively, Gateway of Tally > Create > Group. - Create Import Expenses group under Direct Expenses. Set the option Method to allocate when used in purchase invoice to Appropriate by Value.
- Create Import Expenses Payable group under Current Liabilities. Set the option Method to allocate when used in purchase invoice to Not Applicable.
Create Ledgers
- Press Alt+G (Go To) > Create Master > Ledger.
Alternatively, Gateway of Tally > Create > Ledger. - Under Sundry Creditors group, create 2 ledgers – Foreign Supplier and Freight Forwarders.
- Under Import Expenses group, create 3 ledgers – Customs Duty, Clearing and Forwarding Charges, and Freight Charges – Import.
- Under Import Expenses Payable group, create 3 ledgers – Customs Duty Payable, Clearing and Forwarding Charges Payable, and Freight Charges – Import Payable.
- Under Purchase Accounts group, create Purchase – Import
Create Stock Items
- Press Alt+G (Go To) > Create Master > Stock Item.
Alternatively, Gateway of Tally > Create > Stock Item. - Create Item A and Item B with unit of measurement set to Nos.
Record a purchase invoice
- Enter the details in purchase invoice as shown below:

- Enter the additional costs incurred.

- Accept the invoice. You can press Ctrl+A to accept.
- You can view the break-up of additional expenses appropriated to item cost in the voucher mode. To view it,
- Press Page Up key to open the invoice in alteration mode.
- Press Ctrl+H (Change Mode) > select As Voucher.

- Select the stock item and press Enter. You can see the breakup of the additional expenses appropriated to the item cost, as shown below:

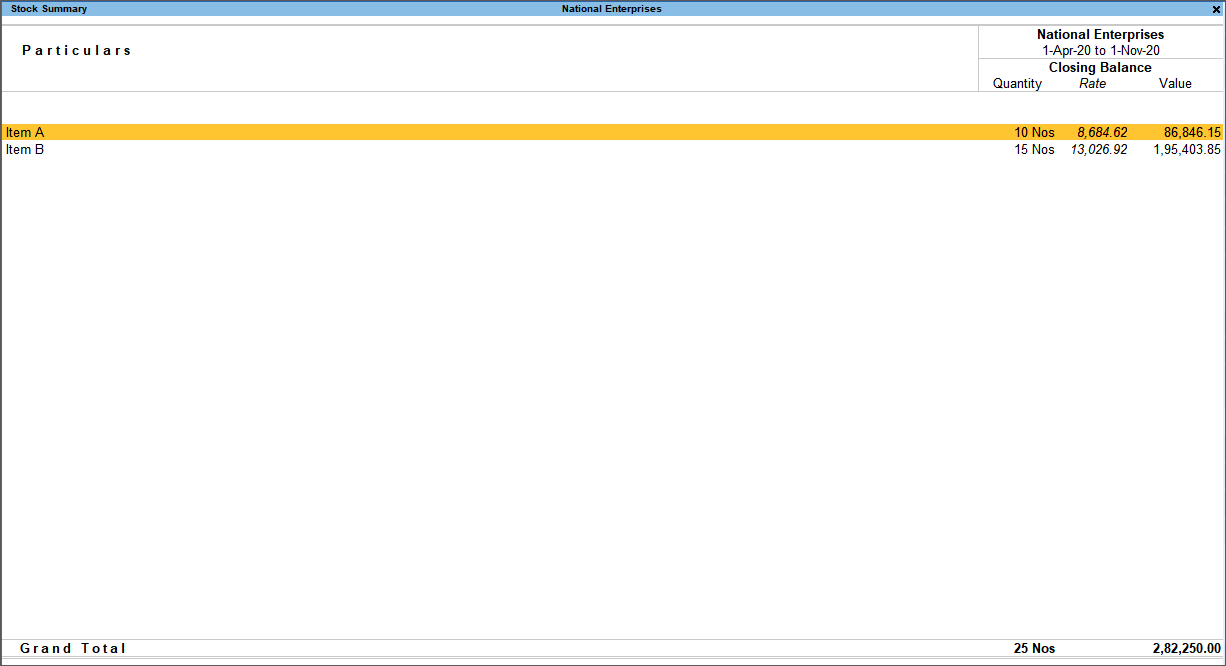
Check the Stock Summary
Press Alt+G (Go To) > type or select Stock Summary > and press Enter.
Record the vouchers for additional expenses
- Customs duty payment
Debit: Custom Duty Payable – 15,000
Credit: Cash – 15,000
- Clearing and forwarding journal voucher
Debit: Clearing and Forwarding Charges Payable – 20,000
Credit: Freight Forwarders – 20,000
- Freight payment voucher
Debit: Freight Charges – Import Payable – 10,000
Credit: Cash – 10,000
This is how you can record a Purchase Invoice for importing goods in TallyPrime.
Purchase of Free items
In some business cases, when you make a purchase, you might receive a few items for free from the supplier. For example, if you had placed an order for 12 pieces of an item, the supplier might have billed you for only 10 pcs and given the remaining 2 pcs without any additional cost. Alternatively, the supplier might have billed you for all 12 pieces and sent 2 additional pieces of the same item or a different item as samples. TallyPrime provides you the flexibility to record such purchases in two different ways. You can account for free items with transparency and mention the actual quantity and billed quantity of stock items. Also, you can create a purchase voucher without mentioning the rate and amount of the free item but only the quantity.
In this section
- Account for free items using Actual and Billed quantities
- Account for free items using zero-valued transaction
Account for free items using Actual and Billed quantities
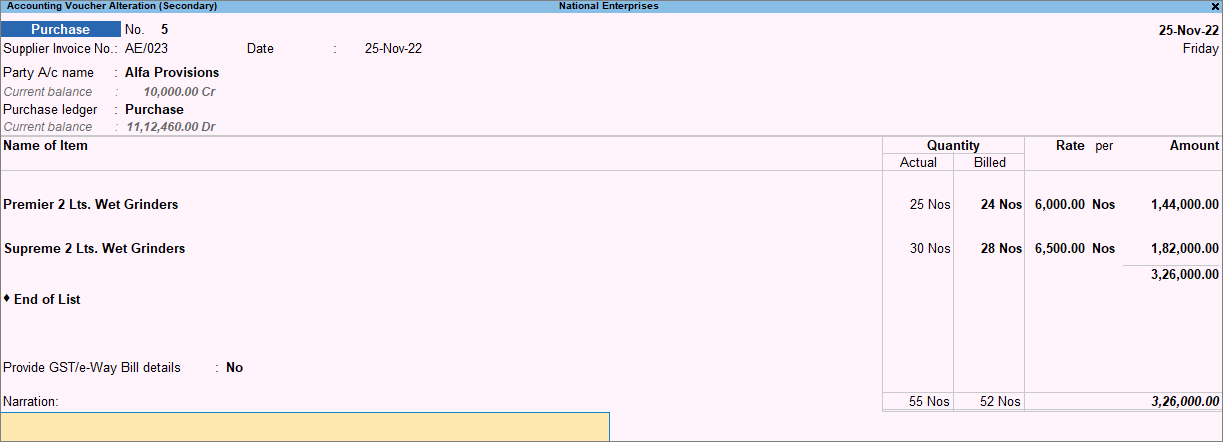
You can create a Purchase voucher mentioning the actual quantity and billed quantity of items.![]()
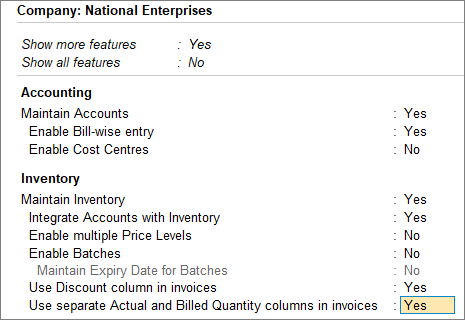
- On the Gateway of Tally, press F11 (Features) > set Use separate Actual and Billed Quantity columns in invoices to Yes.
If you do not see this option, set Show more features to Yes.
Henceforth, you will see the Actual and Billed columns under the Quantity column in every purchase invoice. - Select the stock item and enter the Actual quantity and Billed quantity.
Actual: Enter the quantity purchased from the supplier, say 25 Nos of the item.
Billed: Enter the quantity for which you will pay the supplier, say 24 Nos of the same item.
- Enter the remaining details and accept the screen. As always, you can press Ctrl+A to save.
The total amount calculated is based on the billed quantity; however, the items supplied to you are based on the actual quantity, which includes the free items.
Account for free items using zero-valued transaction
You can create a Purchase voucher to record free items received by mentioning only the quantity and not the rate or amount.![]()
- Press Alt+G (Go To) > Alter Master >Voucher Type > select Purchase > and press Enter.
Alternatively, Gateway of Tally > Alter > Voucher Type > select Purchase > and press Enter. - Set the option Allow zero-valued transactions to Yes.
Henceforth, you can enter stock items without entering the Rate (zero value) in every purchase invoice. - In the purchase invoice, provide details of the items – Quantity, Rate, and Amount – that you have been billed for.
- Select the same item again or a different item, as supplied to you for free, and enter the Quantity. Leave the Rate and Amount fields blank.

- Enter the remaining details and accept the screen. As always, you can press Ctrl+A to save.
The invoice generated displays the billed items with the Amount details, along with the total quantity received from the supplier.
TallyPrime also provides you the flexibility to record purchase transactions only for zero-valued items, such as free items or samples received from suppliers.
Purchase of Fixed Assets
In your business, if you purchase fixed assets like buildings, machinery, equipment, vehicles, tools, and more that you do not trade in, then you can record such purchases in TalllyPrime using a Purchase voucher.![]()
- Open the Purchase voucher in Accounting Invoicemode.
- Press Alt+G (Go To) > Create Voucher > press F9 (Purchase).
Alternatively, Gateway of Tally > Vouchers > press F9 (Purchase). - Press Ctrl+H (Change Mode) and select Accounting Invoice.
- Press Alt+G (Go To) > Create Voucher > press F9 (Purchase).
- In Party A/C name, select the supplier’s ledger.
- Under particulars, select the capital goods ledger grouped under Fixed Assets and enter the Amount.

- Provide Narration, if needed, and accept the screen. As always, you can press Ctrl+A to save.
This value will appear on the Balance Sheet.
You can record the same transaction in voucher mode, as per your business needs.
- Open the purchase voucher screen, and press Ctrl+H (Change Mode) to select the required voucher mode (As Voucher, in this case).
- Under Particulars, credit the party or cash/bank ledger and debit the fixed asset ledger.

- Accept the screen. As always, you can press Ctrl+A to save.
Reports | Know Your Purchases
For any business, it is very important to get real-time updates on the day-to-day purchase of goods and services to take decisions regarding upcoming movements in trade. This also helps in keeping track of stock availability. Tracking purchases day-wise, month-wise, or for any period provides insights on the overall purchase, returns if any, payment dues, and so on. TallyPrime provides different reports to get purchase-related data to analyze and make informed decisions for the business.
In this section
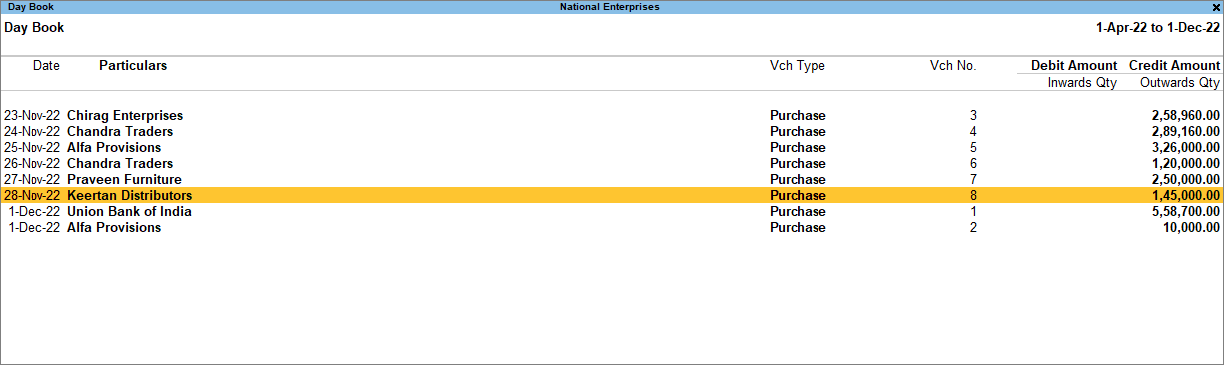
Day Book
This report tracks all your transactions on a day-to-day basis. You can filter this report to check all the purchase transactions made on a particular day.![]()
- Press Alt+G (Go To) > type or select Day Book.
Alternatively, Gateway of Tally > Display More Reports > Day Book.
By default, this report displays all the transactions as of the Current Date displayed on the Gateway of Tally screen. - To view the purchases recorded on any given day:
- Press F2 (Date) to change the date.
- Press F4 (Voucher Type) > select Purchase.

This report lists all the purchase transactions recorded on the selected date. For more information, refer to the topic Day Book.
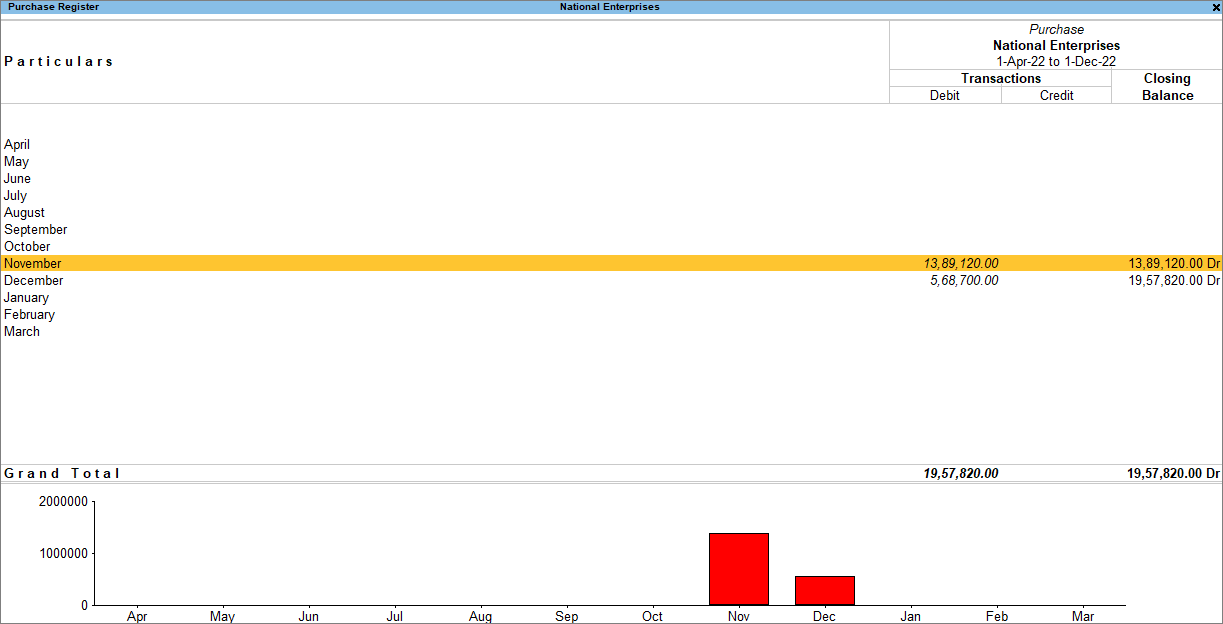
Purchase Register
This report provides a comprehensive view of the month-wise purchases done in your business. You can drill down from the selected month to view the voucher-wise listing of purchases. You can further configure the report to view the data for different periods and represent the purchase details in different ways, based on your business needs.![]()
- Press Alt+G (Go To) > type or select Purchase Register.
Alternatively, Gateway of Tally > Display More Reports > Account Books > Purchase Register. - Move your cursor up or down and press Enter to view purchase vouchers recorded in the selected month.

View Edit Log for Purchases
You may be making changes to your purchase voucher for various reasons. You may have ordered some quantity of a product and then you may want to change for which you need to change the purchase voucher recorded for your supplier. Similarly, you may record a purchase order and then you may need to cancel it because your supplier cannot supply the product. To make such changes, you will be performing an activity in the voucher that would lead to the creation of an Edit Log, if you are using TallyPrime Edit Log or TallyPrime Release 2.1 and its successors.
Record Debit Note for Purchase Returns and Credit Note for Increase in Purchase Value
In some business scenarios, after you have made a purchase there can be a situation where you return the entire supply or some of the items from the supply to the supplier due to varied reasons such as the quality of supply, surplus supply, late delivery, and so on. In TallyPrime, you can record Purchase Returns using a Debit Note and also mark the reason for issuing the note in narration as required. Debit Note is a document issued to a party stating that you are debiting their Account in your Books of Accounts for the stated reason. It is commonly used in the case of Purchase Returns to mark the reduction in expenses/liabilities. Similarly, in some cases, you may want to increase the purchase value of a supply due to varied reasons like an Increase in item cost due to fluctuating rates of the item or an increase in transportation cost involved and so on. In such cases as well, TallyPrime provided you the flexibility to record a Credit Note to record an increase in purchase value after purchase.
Record Purchase Returns
While receiving a supply, you might notice that the supplier has sent some defective items or let us say you are not satisfied with the quality of the items received. In such cases, TallyPrime gives you the option to record a debit note against the purchase and reduce expenses/liabilities from your books.![]()
- Open the Debit Notevoucher.
- Press Alt+G (Go To) > Create Voucher > press F10 (Other Vouchers) > type or select Debit Note and press Enter.
Alternatively, Gateway of Tally > Vouchers > press F10 (Other Vouchers) > type or select Debit Note and press Enter.
- Press Alt+G (Go To) > Create Voucher > press F10 (Other Vouchers) > type or select Debit Note and press Enter.
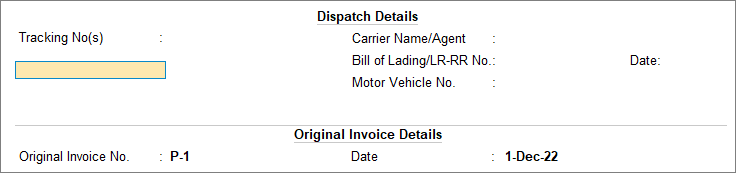
- In Party A/c name, select the party from whom the original purchase was made and press Enter. The Dispatch Details screen will appear.
- Under Original Invoice Details enter the Original Invoice No. and Date of the original purchase transaction against which you are recording a purchase return.
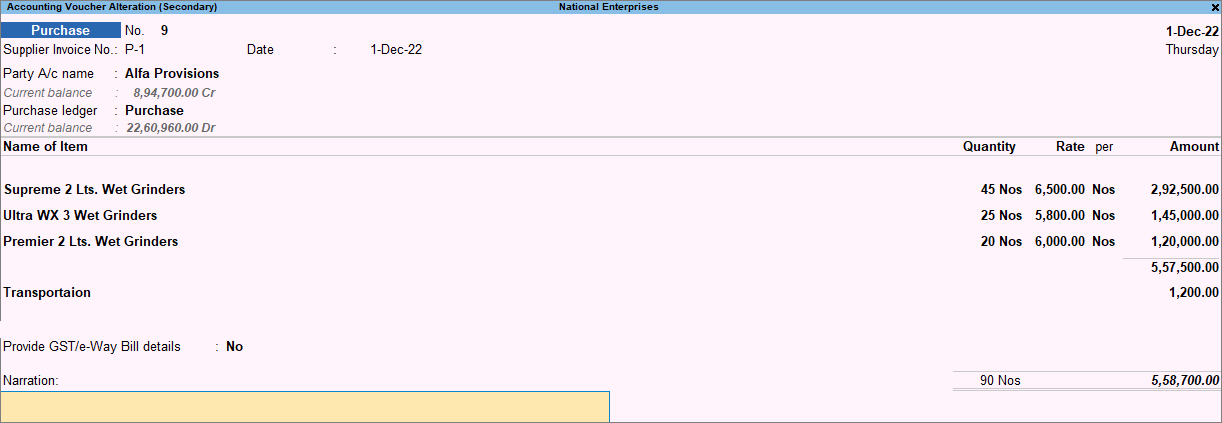
The following is an example of a Purchase voucher with Supplier Invoice No.: P-1 and Date: 1-Dec-2.
As per the Purchase voucher, you can enter the Original Invoice Details in the Debit Note as shown in the image below:
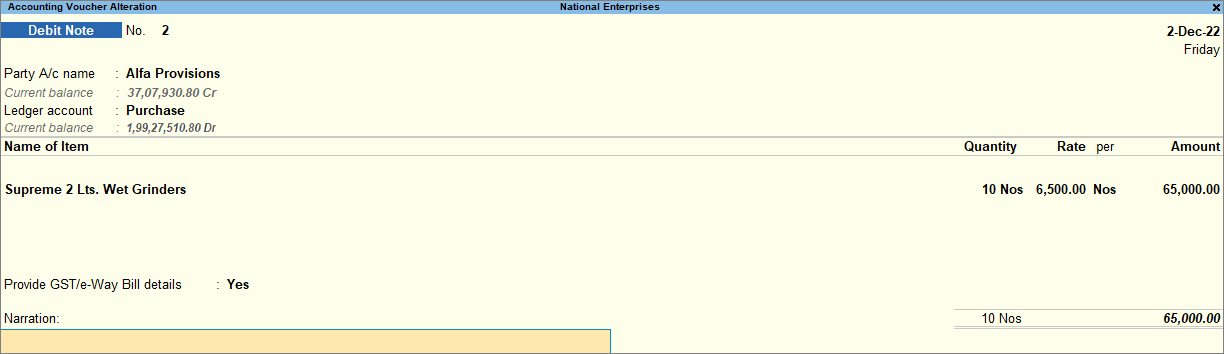
- Enter stock item details for debit note.
- Name of Stock Item – Select the stock item.
- Specify Quantity and Rate.
For example – Shown below is a Debit Note for 10 Supreme 2 Lts. Wet Grinders with a value of Rs. 65,000/- recorded on 2-Dec-22.
- As always, press Ctrl+A to save.
Account for Increase in Purchase Value
In some business scenarios, the value of supply might increase due to varied reasons like an Increase in item cost due to fluctuating rates of the item, an increase in transportation cost involved, and so on. In such cases, TallyPrime gives you the option to record a credit note against the purchase and increase expenses on your books.![]()
- Open the Credit Notevoucher.
- Press Alt+G (Go To) > Create Voucher > press F10 (Other Vouchers) > type or select Credit Note and press Enter.
Alternatively, Gateway of Tally > Vouchers > press F10 (Other Vouchers) > type or select Credit Note and press Enter.
- Press Alt+G (Go To) > Create Voucher > press F10 (Other Vouchers) > type or select Credit Note and press Enter.
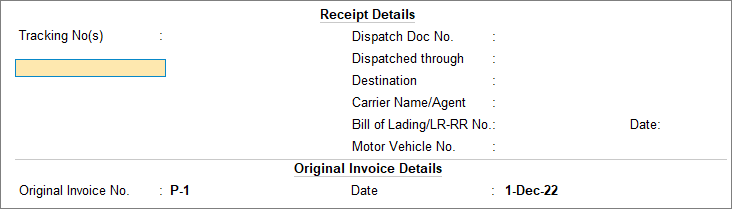
- In Party A/c name, select the party from whom the original purchase was made and press Enter. The Dispatch Details screen will appear.
- Under Original Invoice Details enter the Original Invoice No. and Date of the original purchase transaction against which you are recording a purchase return.
The following is an example of a Purchase voucher with Supplier Invoice No.: P-1 and Date: 1-Dec-2.
As per the Purchase voucher, you can enter the Original Invoice Details in the Debit Note as shown in the image below:
- Enter stock item details for Credit note.
- Name of Stock Item – Select the stock item.
- Specify Quantity and Rate.
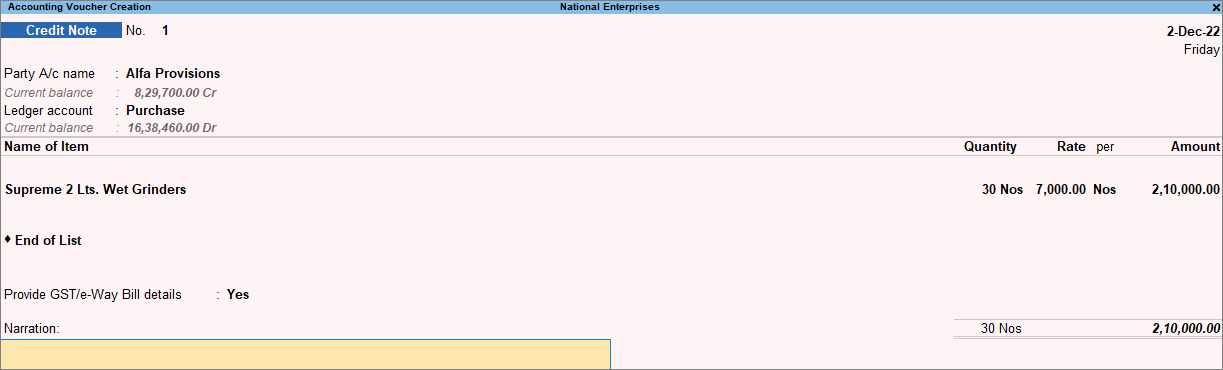
For example – Shown below is a Credit Note for 30 Supreme 2 Lts. Wet Grinders with a value of Rs. 2,10,000/- recorded on 2-Dec-22.
- As always, press Ctrl+A to save.
Account for Decrease in Purchase Value
You can record a debit note to decrease the purchase value of goods.
- Press Alt+G (Go To) > Create Voucher > press F10 (Other Vouchers) > type or select Debit Note > and press Enter.
Alternatively, Gateway of Tally > Vouchers > press F10 (Other Vouchers) > type or select Debit Note > and press Enter. - Press Ctrl+H (Change Mode) to select the required voucher mode (Item Invoice, in this case).
- Select the Party A/c name and provide the buyer details. You can also enter the Original Invoice No. and Date, against which this transaction is being recorded.
- In the Ledger account field, press Enter on Show More > select the purchase ledger to allocate the stock items.
- Provide the stock item details, and select the tax ledgers.
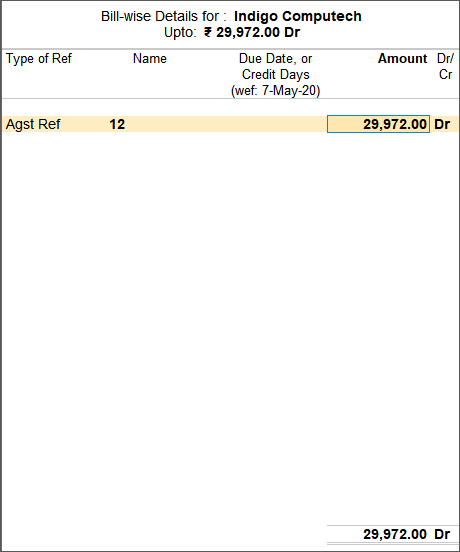
- In the Bill-wise Detailsscreen:
- Select Agst Ref as the Type of Ref and select the purchase invoice for which the value is being decreased.
- Enter the amount to the extent to which purchase value is decreased, including tax under Amount and Cr under Dr/Cr.

- Press Enter to return to voucher screen.

- Accept the screen. As always, you can press Ctrl+A to save.
This is how you can record a debit note against your purchases and show a decrease in the purchase value of the goods.
Record Purchase Order and Receipt Note
In some business scenarios, you may want to raise a demand to the supplier for a supply mentioning the required stock details. You can record a Purchase Order in TallyPrime to raise such demand indicating the types, quantities, and agreed prices for products or services. It controls the purchasing of products and services from external suppliers. Similarly, once you have received the goods, you can record a Receipt Note in TallyPrime to account for the goods received and against the existing Purchase Order as well. You can view your purchase bills that are pending and also pre-close orders via partial cancellation or complete cancellation as well.
When the order is placed with the suppliers for the supply of goods, the items, quantities, order due date, and so on, details are given with the Purchase Order Number. Later, when these goods are received, the Purchase Order is tracked for the Order Details in the Receipt Note or in the Purchase invoice based on your preferred business practices. If you follow the Order>Receipt Note>Purchase flow or Order>Purchase flow, TallyPrime gives you the flexibility to follow your preferred practices as they are.
The Outstanding Purchase Order reports are available in TallyPrime. Also, knowing the order position of any item in the Stock Summary is possible. Separate Purchase Order Outstanding report and Purchase Order Summary report are also available.
Record Purchase Order
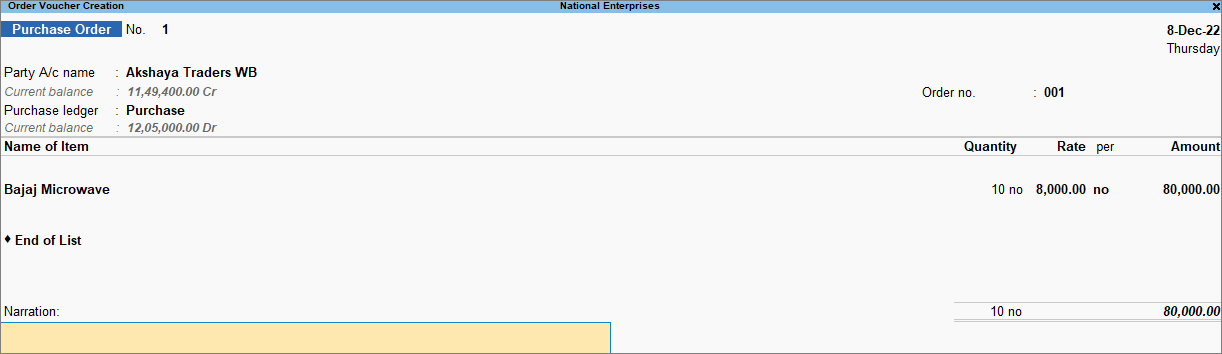
To record a Purchase Order in TallyPrime, you can create a voucher with various details like the order number, receipt details, and more that can later be tracked in various reports.![]()
- Open the purchase order voucher screen.
- Press Alt+G (Go To) > Create Voucher > F10 (Other Vouchers) > type or select Purchase Order.
Alternatively, Gateway of Tally > Vouchers > F10 (Other Vouchers) > type or select Purchase Order.
In case the voucher is inactive, you will be prompted to activate the Purchase Order voucher type. Select Yes or press Y to proceed.
- Press Alt+G (Go To) > Create Voucher > F10 (Other Vouchers) > type or select Purchase Order.
- Specify the supplier details.
- Party A/c Name: Select the party name and press Enter.
- Enter the required details.
If you do not see the Order Details, Receipt Details, and Import Details screen, press F12 (Configure), and set Provide Receipt, Order, and Import details to Yes.
As always, you can press Ctrl+A to save and proceed. - Enter Party Details.
- Enter the purchase Order no. for the voucher.
If you want to enter an order number for each item, press F12 (Configure) > set Provide Order No. for each Stock Item to Yes. The Order no. field will appear in the Stock Items Allocation screen. It will not appear on the main screen of the invoice. - Select the Purchase to allocate stock items.
- Provide stock item details.
- Select stock item.
- Enter the Due on date and Quantity. The Rate will be auto-filled, if available for the stock item. However, you may choose to enter the Rate. The Amount appears automatically.
If orders are split with different due dates, specify the appropriate due date for each lot to be sold. - After entering the due dates for all the lots, press Enter on the Due on field to return to the Voucher Creation screen.
- Provide Narration, if needed, and accept the screen. As always, you can press Ctrl+A to save.

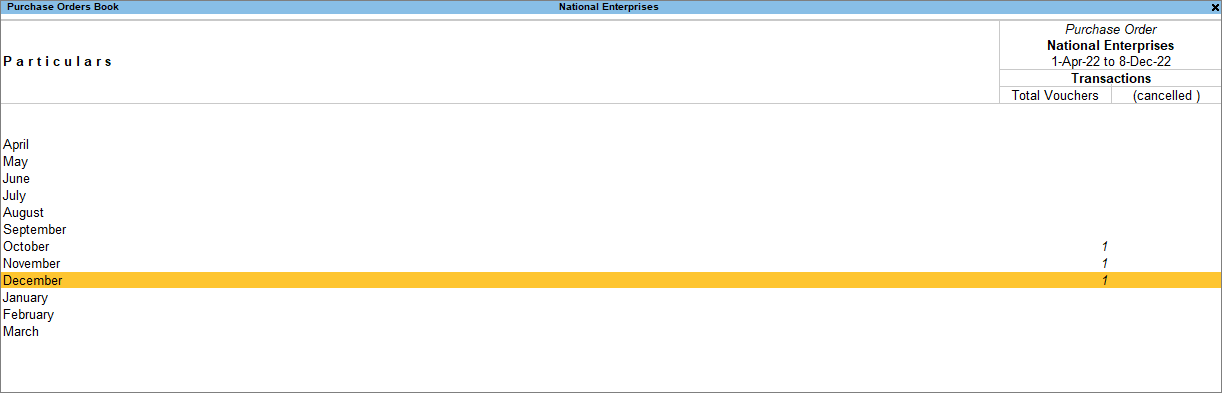
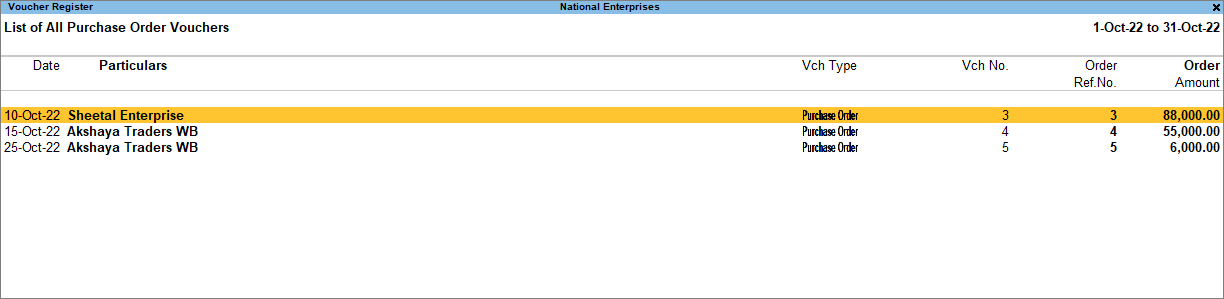
Purchase Order Book
Once you record a Purchase Order in TallyPrime, you can view a summary of it in Purchase Order Book. It displays the list of all purchase orders till the date of the last order entered.![]()
- Press Alt+G (Go To) > type or select Purchase Order Book.
Alternatively, Gateway of Tally > Display More Reports > Inventory Books> Purchase Orders Book.
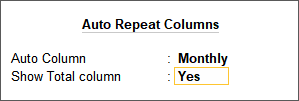
- Press Alt+N (Auto Column) and select the options in the Auto Repeat Columns sub-screen.

The Purchase Orders Book appears as shown below:
- Select the required month and press Enter to view the purchase orders recorded in that month.

Press F12 (Configure), and set the options as needed. The report appears with the relevant details.
Pre-Close Purchase Order
You may have to close orders with negligible quantities yet to be received, or you are no longer planning to receive those pending items from the supplier. Pending references for such orders continue to exist in TallyPrime until you close them. You can pre-close an order from Purchase Order Outstanding reports or from the purchase order transaction and reports.
In this section
Pre-close from transaction
You can pre-close the orders directly from the voucher.![]()
- Open the purchase order voucher in alteration mode and configure it for pre-closure of the order.
- Press Alt+G (Go To) > type or select Day Book > select the required Purchase Order voucher > and press Enter.
Alternatively, go to Gateway of Tally > Display More Reports > Day Book > select the required Purchase Order voucher > and press Enter. - Press F12 (Configure) > set Provide details to preclose orders to Yes.
- Press Alt+G (Go To) > type or select Day Book > select the required Purchase Order voucher > and press Enter.
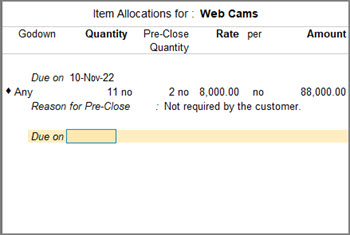
- In the Stock Item Allocations screen, enter the Pre-Close Quantity and the Reason for Pre-Close.

This will pre-close the order partially based on the entered details. - You can also pre-close the purchase order completely.
- Open the sales order voucher screen in alteration mode.
- Press Alt+W (Pre-Close Quantity) > enter the Reason and the Closed on date > press Enter to accept.
- As always, press Ctrl+A to save.
Based on your convenience, you can pre-close the orders with the purchase order voucher, receipt note, or purchase voucher.
Pre-close from reports
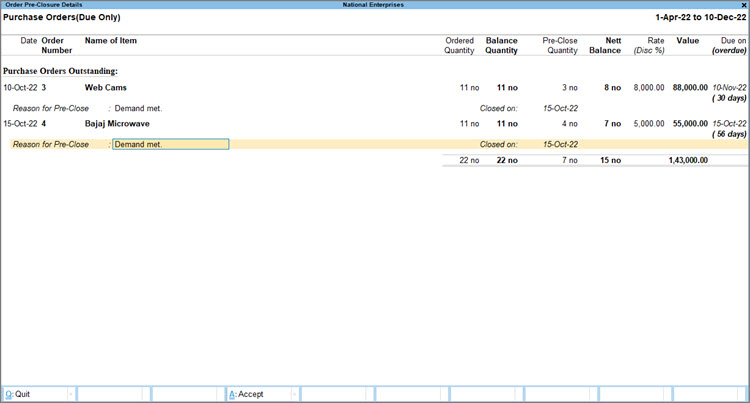
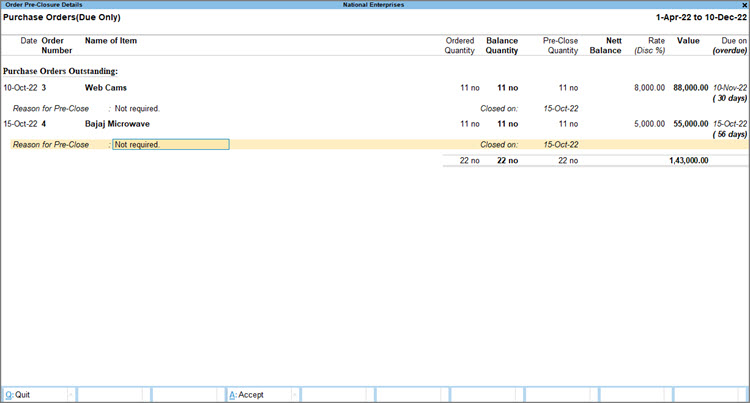
You can pre-close the orders from the Order Details report of Purchase Order Outstandings.![]()
- Press Alt+G (Go To) > Purchase Order Reports > type or select Purchase Orders (Due Only).
Alternatively, go to Gateway of Tally > Display More Reports > Statements of Inventory > Purchase Order Outstandings > All Orders. - Press F12(Configure).
- Set the option Show Cleared Purchase Orders to Yes.
- Set the option Show Pre-closure Order details to Yes.
- Set the option Show Reason to Yes.
The Order Details screen appears with the Pre-Closed Qty (Closed on) column and Reason for Pre-Close field. Now, you can partially or even completely pre-close orders directly from Purchase Order (Due Only) report.
Pre-close order – partial cancellation of orders
- Select the purchase orders (press Spacebar to select more than one order), and press Alt+W (Pre-close Orders).
- Enter the Pre-Close Quantity and the Reason for Pre-Close.

- As always, press Ctrl+A to save.
Pre-close order – complete cancellation of orders
- Select the purchase orders (press Spacebar to select more than one order)
- Press Alt+W (Pre- close Orders) > Alt+W (Set Quantity).
- The balance quantity reflects under the pre-close quantity column.

- As always, press Ctrl+A to save.
Purchase Order Outstanding
In some business cases, after you record a purchase order, the supply might get partially or completely canceled. Also, you may want to keep a track of the purchase orders outstanding and account for the partially or completely canceled orders. TallyPrime provides you with the Purchase Order Outstandings report to view all such outstanding orders. You can also pre-close the outstanding orders and canceled orders at any point in time.
There are different reports under Purchase Order Outstandings. The outstanding orders can be viewed Stock Group-wise, Stock Item-wise, Group-wise, Ledger-wise, or from All Orders.
- Press Alt+G (Go To) > type or select any of the Purchase Order Reports.
Alternatively, Gateway of Tally > Display More Reports > Statements of Inventory > Purchase Order Outstandings > choose the report to view.
In this section
- Purchase Order – Stock Group
- Purchase Order – Stock Item
- Purchase Order – Group
- Purchase Order – Ledger
- Purchase Order – All Orders
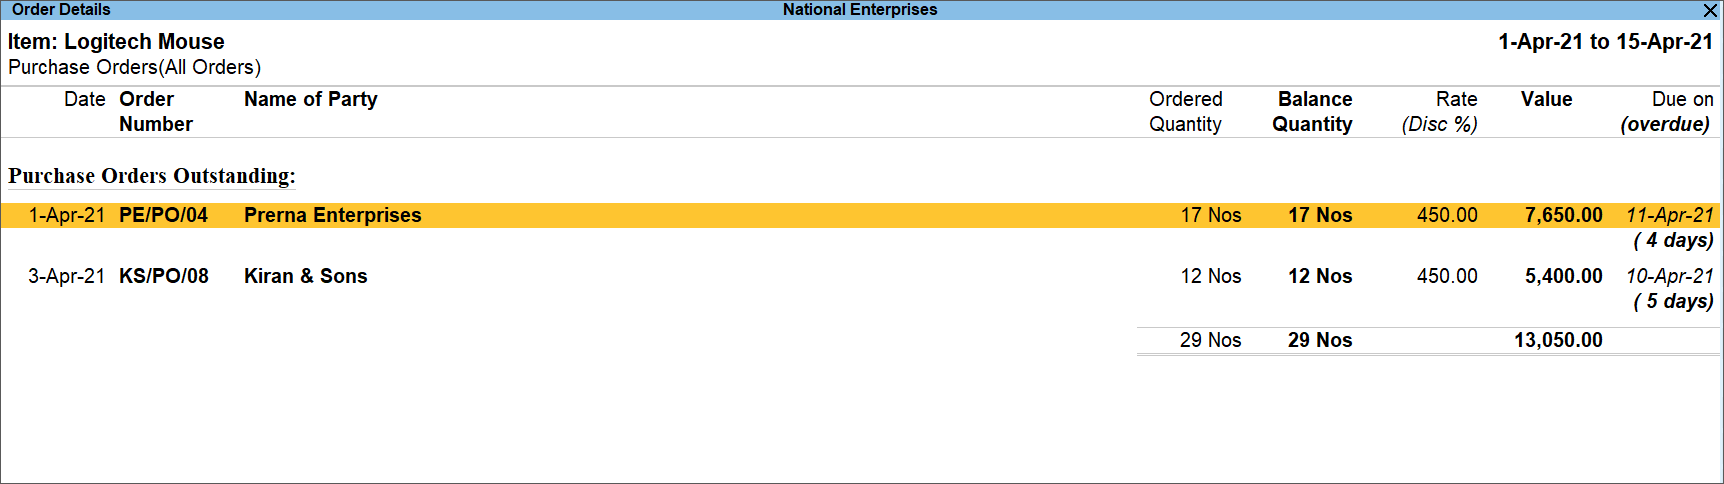
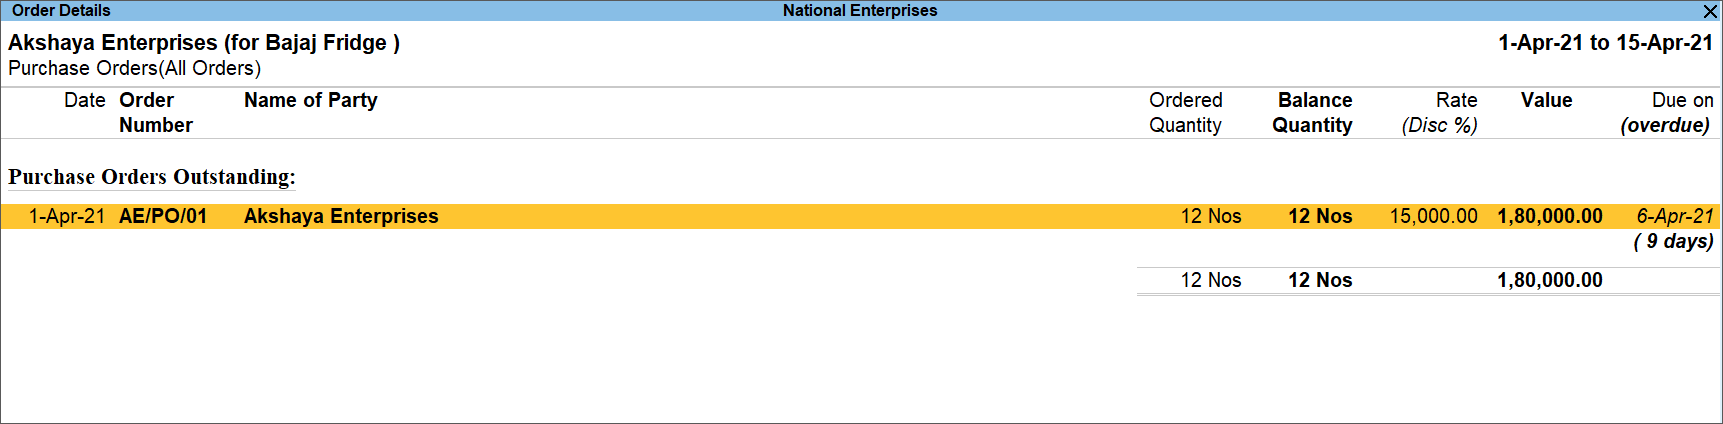
Purchase Order – Stock Group
This report displays the Purchase Order Outstanding summary of all or a selected Stock Group.
- Press Alt+G (Go To) > type or select Stock Group Purchase Order Outstanding.
Alternatively, Gateway of Tally > Display More Reports > Statements of Inventory > Purchase Order Outstandings > Stock Group > select Primary or the required Stock Group.
If you want to know how to record a Purchase Order, then click here. - Drill down from any stock item to view the Purchase Orders Outstanding of the stock item in the Order Details screen.

It displays the Date of the order, Order Number, Name of Party, Ordered Quantity, Balance Quantity, Rate, Value of the ordered stock, Due on date for delivering the goods, and the number of days overdue.
You can press F12 (Configure) and set the options as needed, to view the details of the required orders for each account group.
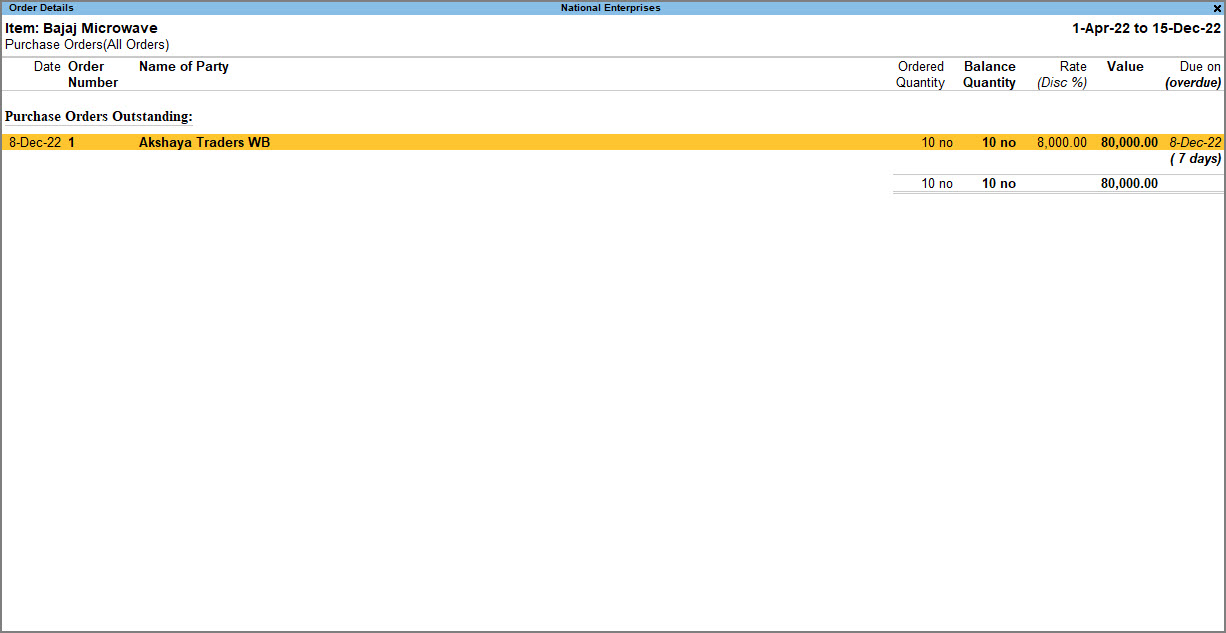
Purchase Order – Stock Item
This report displays the Purchase Order Outstanding summary of Stock Items.
- Press Alt+G (Go To) > type or select Stock Item Purchase Order Outstanding.
Alternatively, Gateway of Tally > Display More Reports > Statements of Inventory > Purchase Order Outstandings > Stock Item.
If you want to know how to record a Purchase Order, then click here. - Select the stock item from the List of Stock Items and press Enter.
- Drill down from the stock item to view the Purchase Orders Outstanding of the stock item in the Order Details screen.

It displays the Date of the order, Order Number, Name of Party, Ordered Quantity, Balance Quantity, Rate, Value of the ordered stock, Due on date for delivering the goods, and the number of days overdue.
You can press F12 (Configure) and set the options as needed, to view the details of the required orders for each stock item.
Purchase Order – Group
You may have created subgroups for your Sundry Creditors based on the region, type of party, city, location, or for each salesman, as per your business need. You can use this report to view the Purchase Order Outstanding for such groups.
- Press Alt+G (Go To) > type or select Group Purchase Order Outstanding.
Alternatively, Gateway of Tally > Display More Reports > Statements of Inventory > Purchase Order Outstandings > Group.
If you want to know how to record a Purchase Order, then click here. - Select Sundry Creditors and press Enter.
- Drill down from the stock item to view the Purchase Orders Outstanding of the stock item in the Order Details screen.

It displays the Date of the order, Order Number, Name of Party, Ordered Quantity, Balance Quantity, Rate, Value of the ordered stock, Due on date for delivering the goods, and the number of days overdue.
You can press F12 (Configure) and set the options as needed, to view the details of the required orders for each account group.
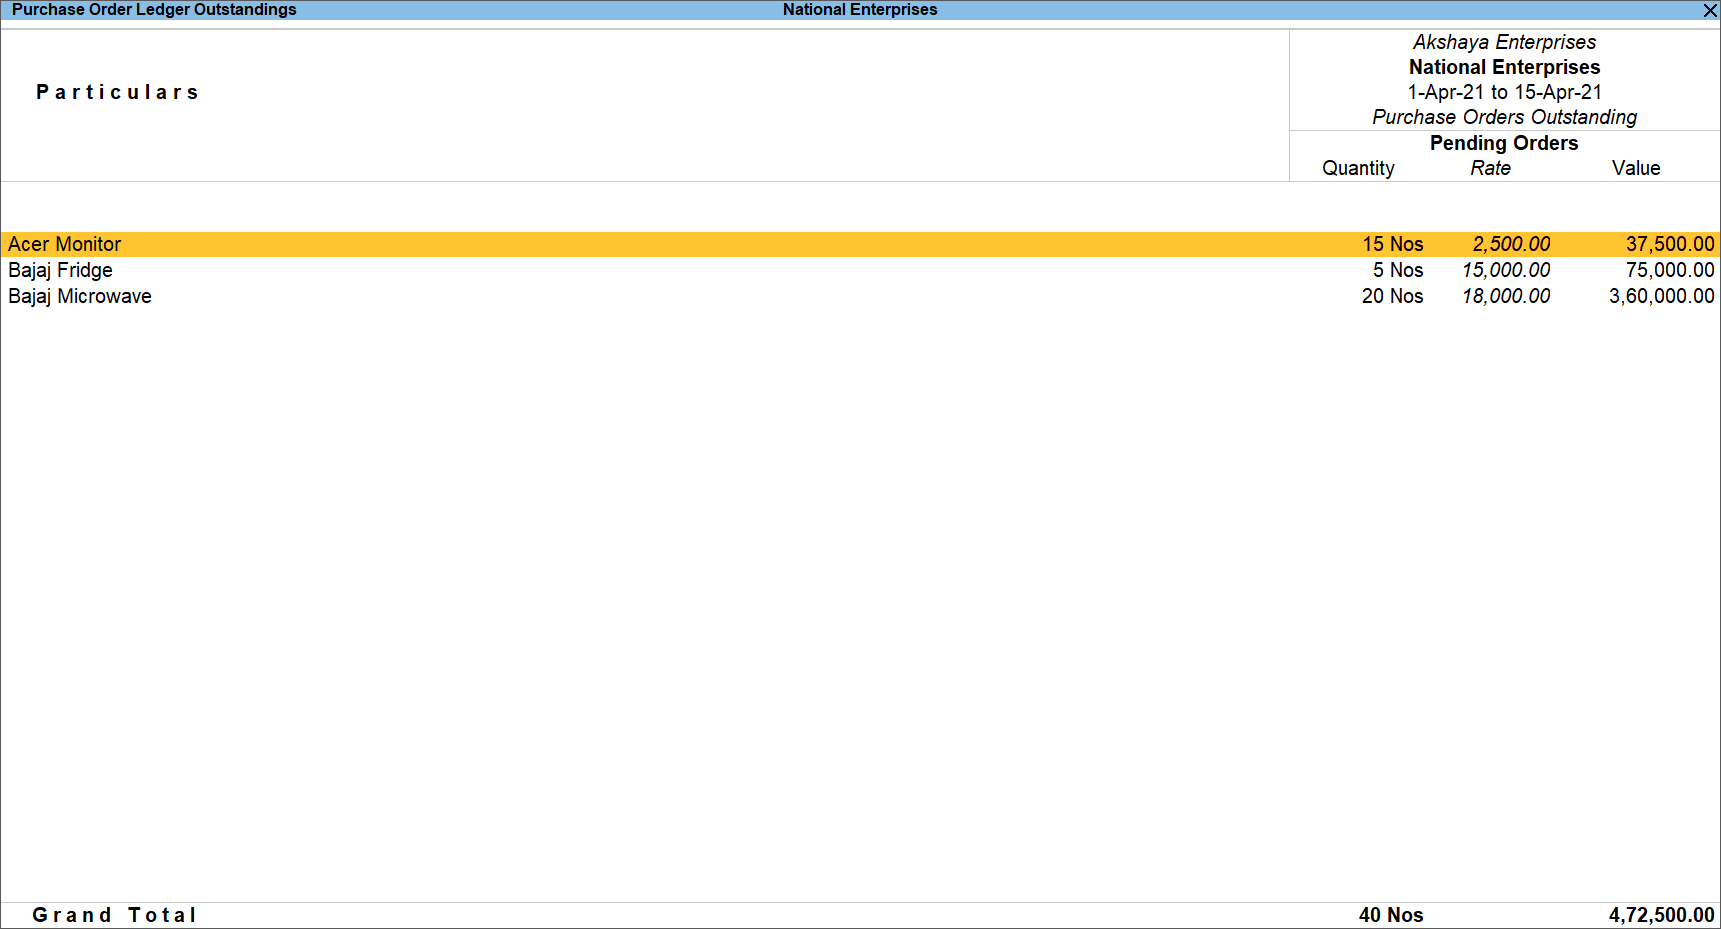
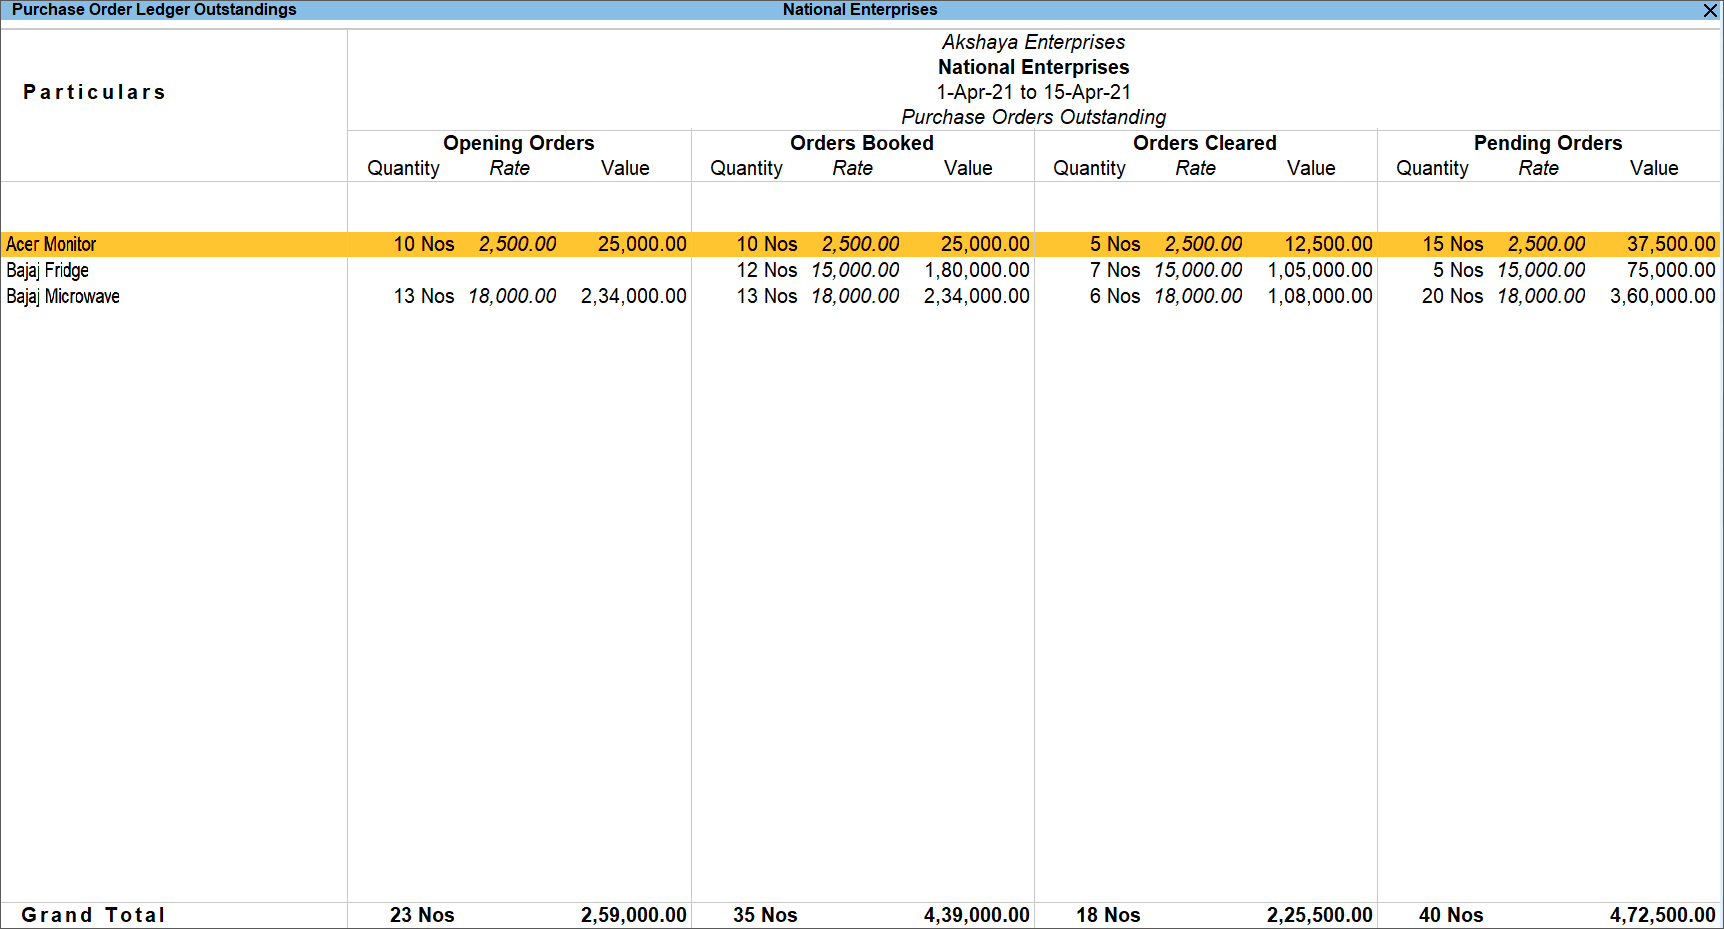
Purchase Order – Ledger
This report displays the Purchase Order Outstanding summary of ledgers.
- Press Alt+G (Go To) > type or select Ledger Purchase Order Outstanding.
Alternatively, Gateway of Tally > Display More Reports > Statements of Inventory > Purchase Order Outstandings > Ledger.
If you want to know how to record a Purchase Order, then click here. - Select the Ledger and press Enter.

- Press F12 (Configure) and set the below options to get a comparison of the number of Orders Booked, Orders Cleared, Pending Orders, and also Opening Orders, if any.
- Show Opening Orders to Yes.
- Show Orders Booked to Yes.
- Show Cleared Orders to Yes.
- Show Pending Orders to Yes.

If you have any pending orders which are yet to be cleared, you can get those orders displayed in the Opening Orders column by setting the date that is one day after the due date set for that order.
You can also set other options as needed from F12 (Configure), to view the required order details for each ledger.
Drill down from the stock item to view the Purchase Orders Outstanding of the stock item in the Order Details screen.

It displays the Date of the order, Order Number, Name of Party, Ordered Quantity, Balance Quantity, Rate, Value of the ordered stock, Due on date for delivering the goods, and the number of days overdue.
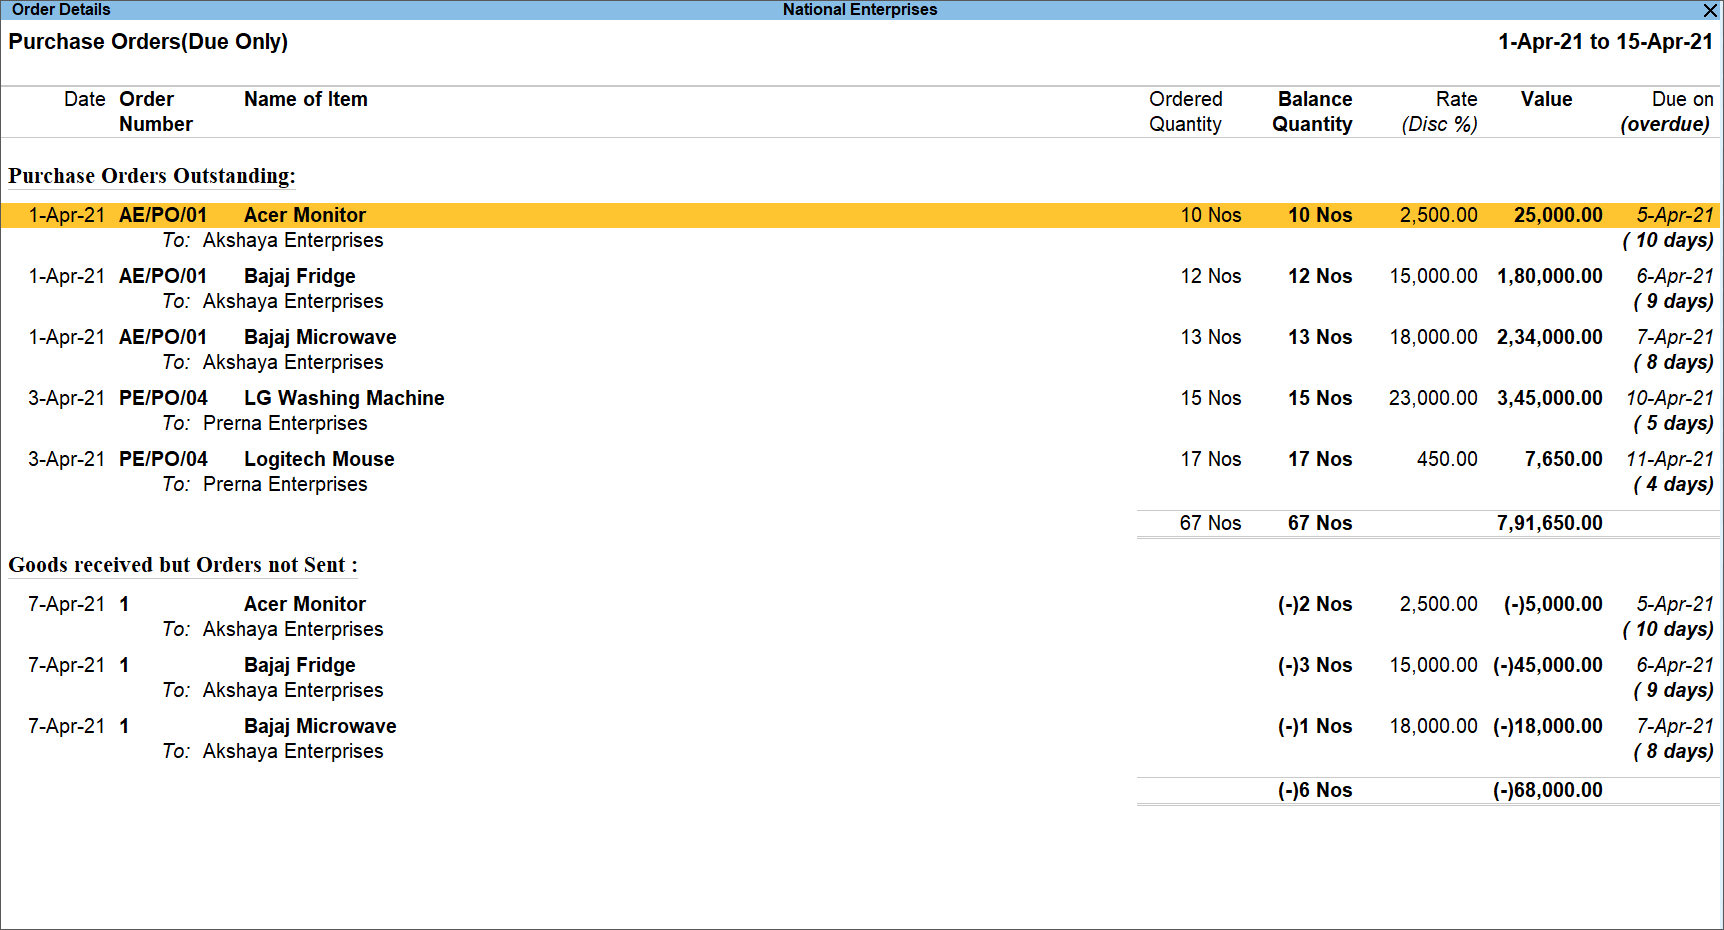
Purchase Order – All Orders
This report displays the Purchase Order Outstanding summary of all the pending orders. It displays the list of stock items with pending purchase orders along with the order details, party details, and due date for delivering the goods. It also provides information on Goods received but Orders not Sent, if any.
- Press Alt+G (Go To) > type or select Purchase Orders (All Orders).
Alternatively, Gateway of Tally > Display More Reports > Statements of Inventory > Purchase Order Outstandings > All Orders.
If you want to know how to record a Purchase Order, then click here.
It displays the Date of the order, Order Number, Name of Item with party information, Ordered Quantity, Balance Quantity, Rate, Value of the ordered stock, Due on date for delivering the goods, the number of days overdue, and Goods received but Orders not Sent, if any.
Some of the additional features are mentioned below, which you can consider when viewing Purchase Orders Outstandingsummary of all the pending orders.- Press Alt+F5 (Detailed) to view the purchase orders in detailed format.
- Press F6 (Age wise) to view the age-wise analysis report.
- Press F8 (All Orders) to view all the orders that are due. This button can be used to view All Orders and Due Orders alternatively.
- Press Alt+W (Preclose Orders) to pre-close the purchase orders.
Record a Receipt Note for Goods Received
In TallyPrime you can record a Receipt Note for goods received and track it with its reference number in the Purchase invoice and also against the Purchase Order. However, you can record a Receipt Note even without recording a Purchase Order.![]()
The procedure to record Receipt Notes with or without Purchase Orders is explained below.
- Open the Receipt Note voucher screen.
- Press Alt+G (Go To) > Create Voucher > F10 (Other Vouchers) > type or select Receipt Note.
Alternatively, go to Gateway of Tally > Vouchers > F10 (Other Vouchers) > type or select Receipt Note.
You can activate the Receipt Note voucher type if the voucher is inactive. Select Yes or press Y to proceed.
- Press Alt+G (Go To) > Create Voucher > F10 (Other Vouchers) > type or select Receipt Note.
- Enter the Reference No if required and Date.
- In Party A/c name, select the party ledger against which you are recording the receipt note.
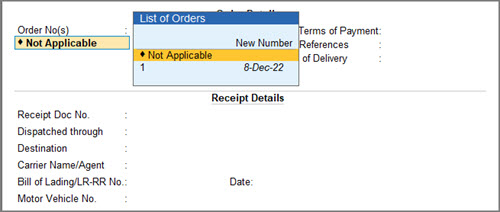
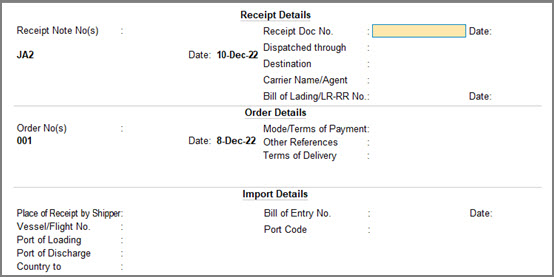
- On the Party Details screen, enter the Order Details and Receipt Details as required.
- Select Order No(s) from the List of Orders, if a purchase order exists for that supplier. If not, select Not Applicable.

- Select Order No(s) from the List of Orders, if a purchase order exists for that supplier. If not, select Not Applicable.
- Select the Purchase Ledger.
- Specify the details in Stock Item Allocationsscreen.
- If you select a purchase Order No(s) in the Party Detailsscreen of the invoice:
- The stock items details in the purchase order appear in the receipt note.
- The Order No.is prefilled in the Stock Item Allocations screen.
- If Order No(s) is selected as Not Applicable then specify the details in Stock Item Allocationsscreen.
- Enter a Tracking No. By default, the invoice number appears. You can change it if required by creating a New Number.
- Set the Order No. to Not Applicable.
- Enter the Quantity and Rate.
- Accept the screen
- If you select a purchase Order No(s) in the Party Detailsscreen of the invoice:
- Enter the Narration if required. As always, press Ctrl+A to save the voucher.
A Receipt Note with Tracking No. marked as Not Applicable is an inventory document affecting only the inventory values. This will not affect the accounts.
You can select the tracking number of the receipt note to track the received goods in the purchase invoice.
Record Purchase Against Receipt Note
If you have a receipt note, which needs to be tracked against the purchase invoice, you can select the order number and tracking number in TallyPrime to link it to the relevant invoices.![]()
- Open the purchase invoice and enter the invoice number and date.
- Press Alt+G (Go To) > Create Voucher > press F9 (Purchase).
Alternatively, go to Gateway of Tally > Vouchers > press F9 (Purchase). - Enter the Supplier Invoice No.: and Date.
- Press Alt+G (Go To) > Create Voucher > press F9 (Purchase).
- Press F12 (Configure) > set the option Provide Receipt, Order, and Import details to Yes.
Henceforth, you can enter the additional details in the purchase voucher until you change the option in F12 (Configure). - Select the party ledger in the Party A/c name.
- Select the receipt note reference in the purchase invoice.
- After selecting the party, a sub-screen opens. Select the receipt note reference. The details from the receipt note reflect will reflect in the purchase voucher.
If you have generated the receipt note against a purchase order, the purchase order details also get prefilled. Press Ctrl+A to save.
- After selecting the party, a sub-screen opens. Select the receipt note reference. The details from the receipt note reflect will reflect in the purchase voucher.
- Select the Purchase Ledger.
- Change the stock item’s Quantity and Rate on the Stock Item Allocations screen, if required.
Tracking No.: and Order No.: will be auto-filled by default based on the receipt note and order number reference. - As always, press Ctrl+A to save the voucher.
A receipt note is closed if billed completely. The details appear in the Purchase Bill Pending report if it is partially closed.
Record Purchase with New Tracking Number
If you want to record a purchase invoice before a receipt note, you can record the invoice with a tracking number and track it in the receipt note. The transaction is accounted against the party ledger without updating the stock value and appears as Bills made but goods not received in the Purchase Bill Pending report.![]()
- Ensure the tracking number feature is enabled.
- Record the purchase voucher.
- Press Alt+G (Go To) > Create Voucher > press F9 (Purchase).
Alternatively, go to Gateway of Tally > Vouchers > press F9 (Purchase). - Select the party ledger and stock item.
- In the Stock Item Allocationsscreen:
- Select New Number for the Tracking No.
- Enter the New Number.

- Enter the stock item’s Quantity and Rate. The Amount appears.
- Press Enter to return to the purchase voucher.
- Press Alt+G (Go To) > Create Voucher > press F9 (Purchase).
- As always, press Ctrl+A to save the voucher.
You can use the tracking number of the purchase voucher in the receipt note.
Disable the Tracking Number
To prevent the Tracking Number from being displayed in the transaction, after all your Receipt Notes have been consumed by generating a Purchase bill against them, or after generating a Receipt Note against a Purchase voucher, you can deactivate the Receipt Note voucher type altogether.![]()
- Press Alt+G (Go To) > Alter Master > Voucher Type > type or select Receipt Note > press Enter.
Alternatively, go to Gateway of Tally > Alter > Voucher Type > type or select Receipt Note > press Enter.
The Voucher Type Alteration screen appears. - Set the option to Activate this Voucher Type to No.
- Press Y to accept the screen. As always, press Ctrl+A to save the Voucher Type Alteration.
As a result of this change, the Receipt Note voucher types are deactivated, and the Tracking Number no longer appears in the transaction unless you are specifically reactivating it.
Similarly, you can disable the Tracking Number in the Sales process by deactivating the Delivery Note voucher type. As a result, the Tracking Number no longer appears in the transaction.
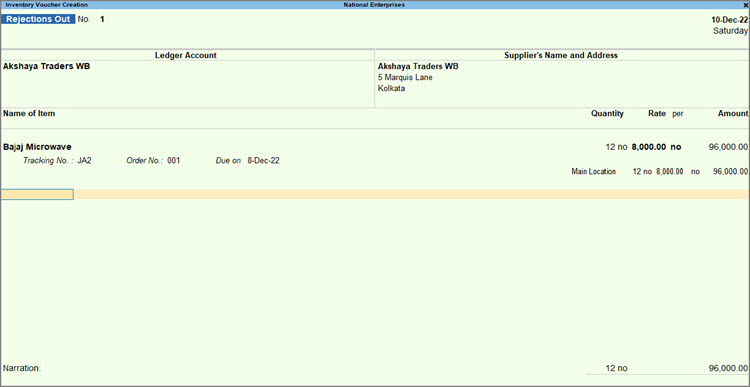
Record Rejections Out against Receipt Note
Rejections Out vouchers are used when you reject or return goods to your supplier. The transaction is recorded after raising a receipt note but before raising a purchase voucher.![]()
- Open the Rejections Out voucher.
- Press Alt+G (Go To) > Create Voucher > F10 (Other Vouchers) > type or select Rejections Out.
Alternatively, go to Gateway of Tally > Vouchers > F10 (Other Vouchers) > type or select Rejections Out. - You can activate the Rejections Out voucher type if the voucher is inactive. Select Yes or press Y to proceed.
- Press Alt+G (Go To) > Create Voucher > F10 (Other Vouchers) > type or select Rejections Out.
- Provide the party details.
- Under Ledger Account, select the party ledger to which you are returning the goods.
- The party’s name appears under Supplier’s Name and Address with the address entered in the ledger master.
- Provide the stock item details.
- Select the stock item. In the Item Allocations screen, the same details appear if you had recorded a receipt note with a tracking number. You can select the relevant tracking number.
- Enter the Quantity and Rate.

In the F12 configuration, enable the option Show Godown–wise Details to view the batch and godown details in the invoice.
As always, press Ctrl+A to save.
The stock will decrease to the extent of the quantity entered in the rejections out voucher.
Know your Purchase Bills Pending
Purchase Bills Pending report lists all instances of incomplete purchases where goods may have been received but not invoiced. It also lists instances of invoices raised but against which goods have not been received.
When the Receipt Note or Rejections Out voucher is recorded with a new tracking number, but the purchase invoice (or voucher) or debit note is not linked to it, the inventory details are updated, but accounting entries are pending. Similarly, if you have entered a purchase invoice or debit note with a new tracking number, but the Receipt Note or Rejections Out voucher is not linked to it, the accounting details are updated, but inventory entries are pending.![]()
This report lists transactions of Goods Recd. but Bills not Recd.: and Bills Recd. but Goods not Recd.:.
Press Alt+G (Go To) > type or select Purchase Bills Pending.
Alternatively, go to Gateway of Tally > Display More Reports > Statements of Inventory > Purchase Bills Pending.
The default report appears as shown:
You can view the pending and cleared bills in the Purchase Bills Pending report.
You can configure the Purchase Bills Pending report by selecting the appropriate option.
Press F12 (Configure) and set the options as needed.
To drill down to the voucher level, place the cursor on the voucher detail line and press Enter.
The Purchase Bills Pending report can be generated only when the option Tracking Numbers is set to Yes.
Purchases – FAQ
Was this article helpful?
That’s Great!
Thank you for your feedback
Sorry! We couldn't be helpful
Thank you for your feedback
Feedback sent
We appreciate your effort and will try to fix the article